Lockbox
- Lockbox
- A feature that gives you the ability to import bank files containing payment transaction information into netFORUM and payments.
The Lockbox group item contains the standard group item links (Find. List, Query, Query Central with the exception of the basic Add functionality.
Lockbox information is added using the following methods:

|
|
Lockbox Group Item
|
Lockbox Process
Lockbox services shorten the amount of time it takes to process a customer's payments.
- The payments (or remittances) go to a post office box number, or lockbox processing center
- From there, they are delivered directly to the bank.
- The bank opens the payment envelopes and deposits the money into the organization's bank account.
- The bank then provides a remittance file, and through direct data transmission, updates accounts receivable information in netFORUM.
netFORUM in turn, matches transactions in the Lockbox with existing Invoices by doing an exact match against the Invoice Number (inv_code_cp database field). After the lockbox file is uploaded, you can choose to either Import Payment or Create Credit. When payments are created, the remitter (the individual or organization making the payment) is the bill to customer from the original invoice.
Adding Records
Data File Format
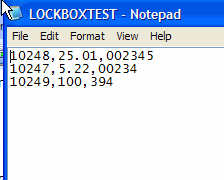
The Lockbox file format must be comma delimited (.csv). The column order is important and must be exactly as follows (subsequent columns will be ignored)
| Column 1 | Column 2 | Column 3 |
| Invoice Number - varchar(53) | Check Amount - Decimal | Check Number - nvarchar(20) |
Things to keep in mind...
- The import file must not contain column names as the first row.
- The import file must not contain any formatting or summary aggregate information.
- It is not required that the import file have .csv as the file extension as long as the data format is correct.
EXAMPLE: Correctly Formatted Lockbox File
|
| Correctly Formatted Lockbox File |
Lockbox File Import Wizard
The recommended approach for uploading and processing a lockbox file is to use the Lockbox Import Wizard.
To Start the Lockbox Import Wizard:
- Go to the Accounting module.
- In the Lockbox group item, select the Import File Wizard. The Lockbox Import (Manager) Wizard displays in a new window.
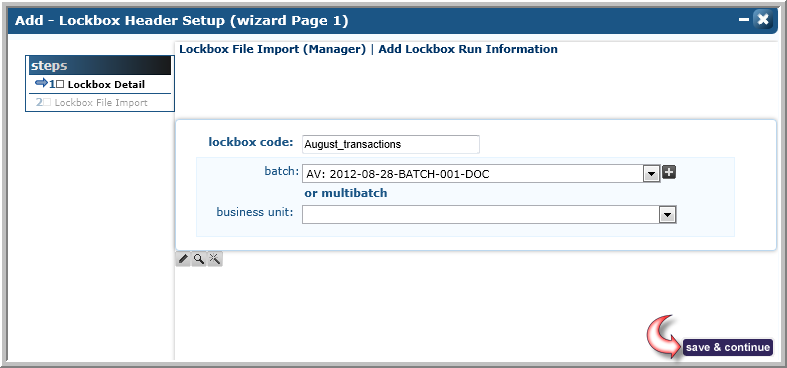
Step 1: Lockbox Detail
- In the Lockbox Import (Manager) Wizard window
- Enter a lockbox code.
- The lockbox code is used for future references and will be saved as part of the lockbox header.
- Select a batch. The batch is used when the actual payments are created in the lockbox process.
- Click save & continue to proceed to Step 2.
|
| Lockbox Detail Information |
Step 2: Lockbox File Import
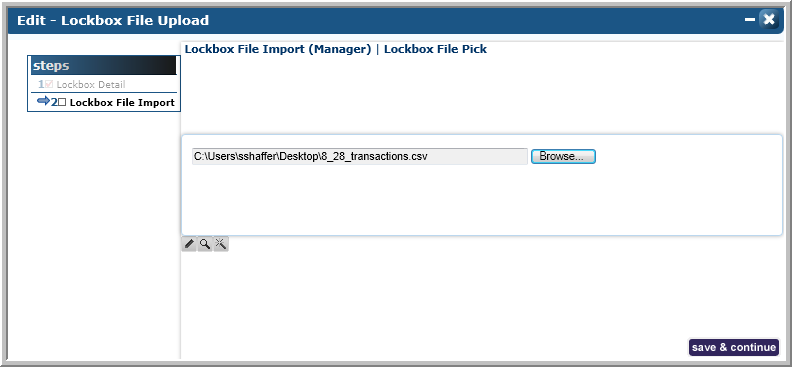
- In the Lockbox File Upload window, click the Browse button.
- In the Choose file window, select the .csv file that you want to import and click Open.
|
|
Select the File You Wish To Import
|
- In the Lockbox File Import (Manager) | Lockbox File Pick window, click save & continue to upload the file. The Lockbox Import/Process Data | Lockbox Import page displays.
- The imported data displays in a grid in the Lockbox Header Data section and can now be matched and imported.
- netFORUM matches transactions in the Lockbox with existing invoices by doing an exact match against the invoice # (ac_invoice.inv_code_cp database field).
|
| Lockbox File Pick window |
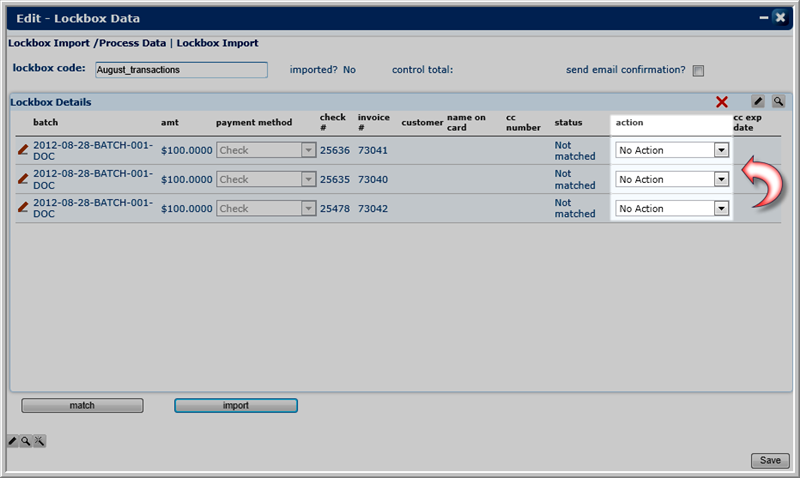
- Click the match button to match records in the Lockbox with existing invoices.
- Select an action (see below) for each record in the Lockbox Header Data section:
- If there is a match, the action field of that particular line itme will be Import Payment.
- If there is no match, the actions field defaults to No Action.
- It is also possible to Create Credit from a lockbox.
- Click the send email confirmation check box to send a confirmation email to all of the individuals associated with the invoices being processed.
- Click the import button to process the selected action. The default action would be to apply payment to the matched invoice (Note: If any item has an action value of no action, netFORUM will not process the lockbox because we do not want to process financial data that the bank has already processed).
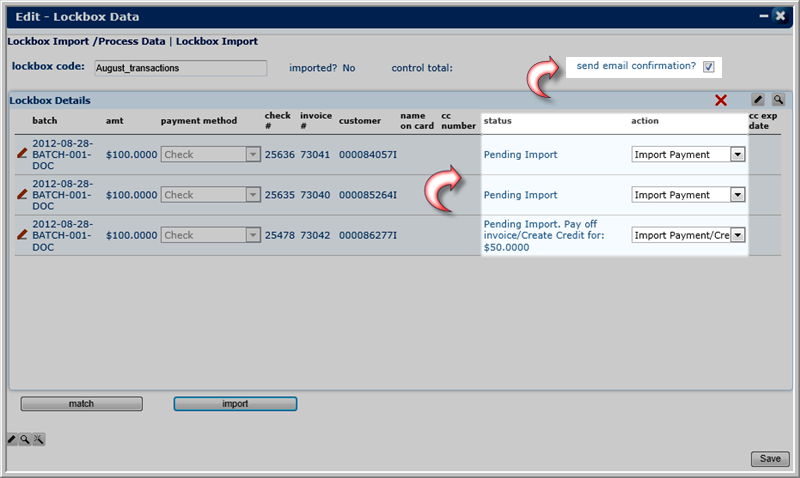
- When you click the import button, netFORUM will update the action for each payment in the file based on the previously explained logic. The "Status" field is also updated with more information.
|
|
Edit - Lockbox Data Pop-Up Window with Status and Action Columns Highlighted
|
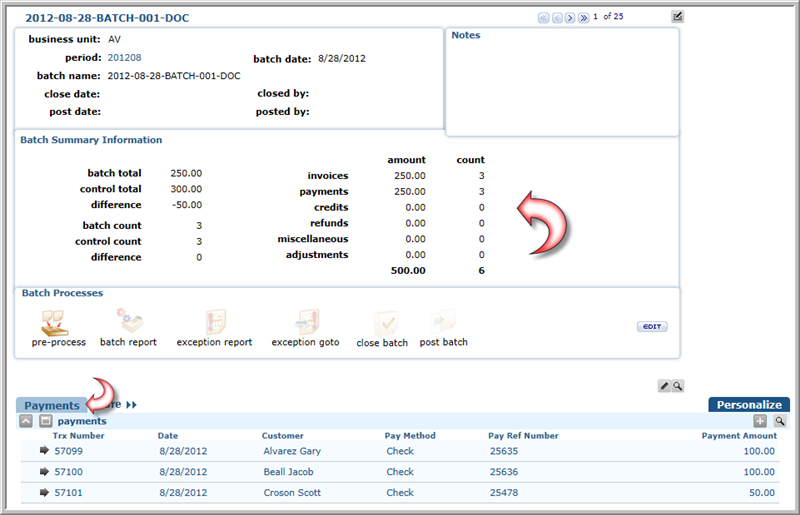
To view the financial transactions created by the import process, open the Batch Profile for the batch you selected in the first window of the Lockbox Import Wizard and look at the payments child form.
|
|
Batch Profile for Lockbox Transactions with theBatch Summary and payments Child Form Updated
|
Actions
There are 4 possible actions that the match process can generate:
- No Action
- This means the invoice number in the lockbox file can not be matched. This is a bad record from the import. If there is any line item in the lockbox that has an action of "No Action", no payment in the lockbox will be imported at all.
- Import Payment
- The invoice number can be matched and the amount in the lockbox is less than or equal to the invoice balance. Lockbox will apply the payment amount to the invoice lines with no specific order. If the payment is less than the invoice balance, some line items will still be left with a balance.
- Import Payment/Create Credit
- The invoice number can be matched and the amount in the lockbox is greater than the invoice balance. Lockbox will apply the payment so the balance will become zero (0). Any amount over the invoice balance will be created as a credit to the customer.
- Create Credit
- The invoice number can be matched but the invoice balance is zero (0). In this case, any payment amount in the lockbox will be created as a credit and be tied to the invoice customer.
Manual Lockbox Wizard
The manual lockbox wizard is built directly into netFORUM as one form. No pop-up windows will occur. Further, when matching invoices and payments, the match will attempt to be made as soon as the save button is clicked.
The Manual Lockbox gives you the ability to enter basic payment information and then have netFORUM match those payments to the invoice. To use this feature, you must know:
-
- The invoice number
- The payment information.
This is currently only available for checks and credit cards.
To Use the Manual Lockbox:- Go to the Accounting module.
- In the Lockbox group item, select the Manual Lockbox Wizard group item link.
- The Lockbox Input Import (Manager) wizard will display.
- Step 1
- Enter the lockbox code and select a batch
- Step 2
- Enter the number of payments and a control total in the number of transaction lines and lockbox total fields.
- Step 1
- After these are entered, the form refreshes with the appropriate number of lines for the number of payments. Enter the payment information.
- Step 3
- The next step is to check the invoice number and make sure that there is a balance to pay on the invoice.
- To match the payments to their appropriate invoices, click Match. The form refreshes and the customer number and action display.
- Step 3
- Actions
- If matches are found, the action will default to either Import Payment or Import Payment / Create Credit based on the payment amount and the balance due of the invoice.
- If a match is found and the invoice has no balance, the action will default to Create Credit.
- If no match is found, the action will default to No Action.
- If no match is found, you can edit the row and add additional information, such as the customer number, or correct any data that may have been entered incorrectly.
- Once you have matched all of your payments, click the Import button. This will create the payment records and apply the payments to the appropriate invoices.
Finding Records
There are multiple ways to locate a record using the Find page (for detailed methods on how to locate records, see the Find page). The Find functionality is universal throughout netFORUM. The results will display in a List page, which is also universal throughout netFORUM.
The Lockbox information is stored in the database by the "columns" (fields) you selected during the Add process on the Lockbox File Import Wizard or the Manual Lockbox Wizard. Only a pre-defined set of columns pertaining to Lockbox will be available to you on the Find - Lockbox page:
- Lockbox Code
- Import File
- Add User
Find vs. Query
The Find page is setup with a pre-defined set of columns (fields) versus a Query which allows you to select from ANY column in the search Table.
To go to a Lockbox Profile:
- Go to the Accounting module.
- Click (or hover over) the Lockbox group item.
- Select the Find Lockbox group item link. The Find - Lockbox page displays.
- On the Find - Lockbox page, enter search criteria to find the Lockbox Profile record and click Go. The List - Lockbox page displays.
- On the List - Lockbox page, click the Goto arrow
 to the left of the record you wish to view. The Lockbox Profile page displays.
In the example below, the search will be on the Lockbox transactions on that specific date (4/11/2007).
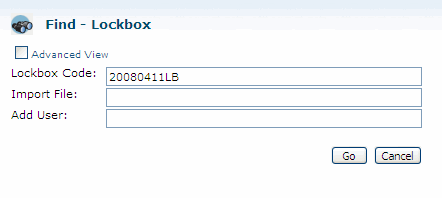 |
| Find - Lockbox page |
Managing Records
Once the lockbox is imported, netFORUM will create the financial transactions into the accounting batch specified in Step 1 and also creates a lockbox record with details.
Lockbox Profile
 |
Lockbox Profile |
Click the Show Transactions button to view the details of the lockbox. Since the lockbox has been processed (imported), the status now shows "Imported" and the action is now disabled.
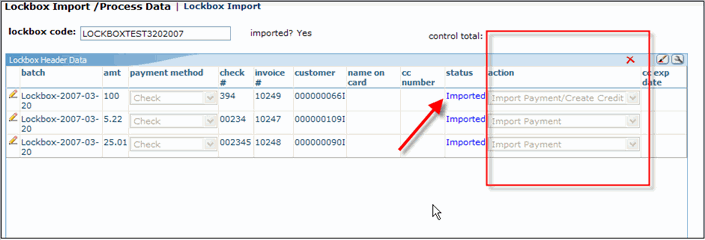 |
Displaying Lockbox Details |
Additional Information
- You are responsible to picking the file to import. This is not an automatic process.
- netFORUM baseline lockbox does not handle credit card payments.
- netFORUM baseline lockbox will associate payment to the invoice customer. If a refund is created from the cancellation/return of the lockbox payments, the refund will go back to the customer on the invoice.
- The lockbox will process only when "all" payments have been matched. Any non-match payment will cause no payment to be imported.
- The lockbox can process partial payments in the payment order applied to the invoice items if the order is set-up prior to processing.
Technical Information
The LockboxImportCustomMethod system option allows you to describe the .Net assembly containing a LockBox import method. See main article for more.
