Batch Payment
The Batch Payment feature allows you to add multiple invoices to a single batch at one time. This is particularly useful if you are processing a stack of paid invoices and would like to add them all to the same batch. Rather than processing each one individually, you can now select the appropriate batch and add all of the desired invoices in one session.
To add a batch payment, complete the following steps:
- Click the Module Menu to expand the netFORUM Module Menu.
- Click the Accounting link to launch the Accounting module.
- Mouse over the Payments tab to expand the Payments fly-out menu.
- Click the Batch Payment link.
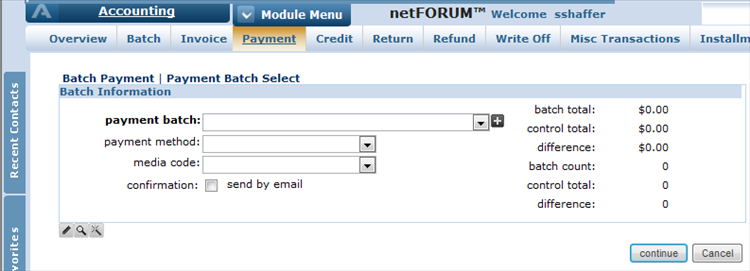
This will open the Batch Payment | Payment Batch Select page.
 Payment Batch Select Form
 - Expand the payment batch drop-down menu and select the desired batch.
Clicking the Add
 icon next to the payment batch drop-down menu, will open the form necessary to create a brand new batch.
- Expand the payment method drop-down menu and select the desired payment method.
This is the payment method that will default for all of the invoices that will be entered. You will have the option to override this setting when actually entering the payments.
- Expand the media code drop-down menu and select the desired media code for this set of payments
- Click the confirmation checkbox to send payment confirmations by email, if desired.
- Click the continue button.
This will open the Batch Payment | Payment Info page.
- Enter the first few numbers of the invoice you would like to record the payment for in the invoice code field.
This will open a search pop-up window that shows invoices that match the numbers you entered in the invoice code field.
Note: If the invoice code entered is an exact match for an existing invoice, that invoice profile will open and allow you to continue.
- Click the hyperlinked number from the search results of the invoice to which you wish to apply payment.
This will populate the following fields:
- the full invoice number in the invoice code field
- the paid by field with the individual attached to the invoice
- the unpaid balance of the invoice in the payment amt field
- the default payment method set on the previous screen in the payment method field
- the net balance and unpaid balance for the selected invoice.
- Each of these fields can be edited if desired.
 Payment Info Fields Completed After Invoice Selection
 - Complete the payment information fields located next to the payment method drop-down menu.
- These fields will change depending on the method of payment selected in the payment method drop-down menu.
- Click the Save and Add Another button to continue adding invoices and payments to the selected batch.
- Click the Save and Goto Batch button when you are done entering invoices and payments to the selected batch.
This will take you to the batch profile where you can process the payments entered.
Batch Details
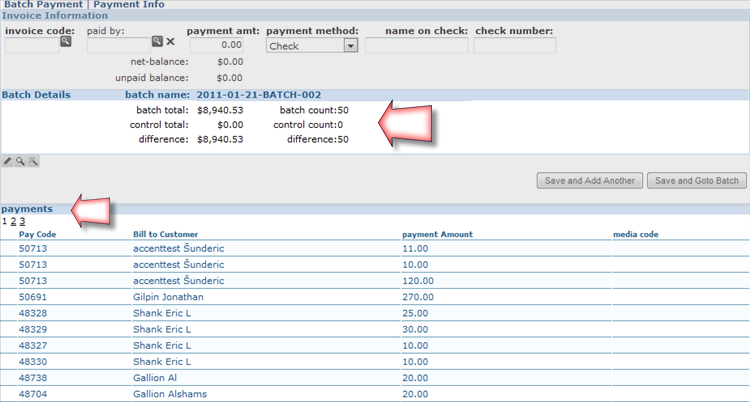
Below the Invoice Information section of the Batch Payment | Payment Info form is the Batch Details section. The Batch Details section gives you information about the batch you are working with. This section displays the total amount applied to the batch, the number of transactions applied to the batch, the control totals that were set for the batch, and the difference between the actual amount applied/transaction counts and the control totals.

|
|
Accounting Batch Details Section Highlighted
|
As each invoice is processed (using the steps outlined above), the Batch Details section will update and display the current totals.
In addition, if the batch has control totals populated (i.e. not zeros), then additional warnings will kick in that will assist you. These warnings are:
- When the actual batch count matches the control count (as set up on the batch), the user will be prompted.
- If the totals match, they will be prompted to go to the batch profile.
- If the totals do not match, they will be notified that their totals do not match
- If their batch total matches the control total before the batch count matches the control count, they will also be notified of this.
Batch Payment Forms
The Batch Payment forms provide information about the batch selected.
Once you select the batch on the Payment Batch Select form, information about the batch you selected will be displayed along the right side of the form.

|
| Batch Information Displayed on the Payment Batch Select Form |
In addition, more information about the selected batch will display on the Payment Info form.
The Batch Details portion of the Payment Info form will display the same information seen on the Payment Batch Select form.

|
|
Payment Info Form Showing Batch Information
|
The payments child form will display all of the payments that have been processed with the selected batch. Please note, not all of these payments may have been assigned during the Batch Payment process you are working with. If you selected a previously created batch, these payments may reflect previous transaction. For this reason, many people will create a new batch for each Batch Payment process they decide to run for easier record keeping. Creating a new batch for each Batch Payment process you run will only display information for that specific Batch Payment operation.
