Contact Info Tab
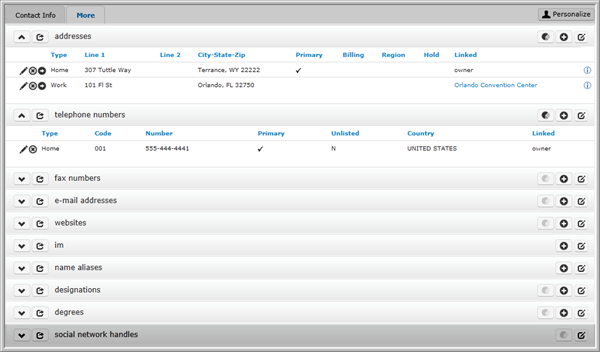
The contact Info tab includes child forms with pieces of the individual's contact info.
This help topic covers contact info for individuals and all the child forms associated with it including:
-
addresses
-
telephone numbers
-
fax numbers
-
e-mail addresses
-
websites
-
im
-
name aliases
-
designations
-
degrees
-
social network handles
|

|
goto record icon to view that record's profile page. |
|
|
edit icon to edit a record on the child form. |
|

|
linked headings to sort the records. |
Contact Info Tab

Child forms under the Contact Info tab
Addresses, Telephone Numbers, Fax Numbers, E-Mail Addresses, and Websites
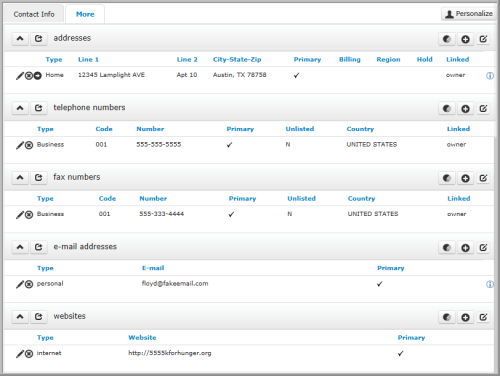
The addresses, telephone numbers, fax numbers, e-mail addresses, and websites child forms operate in the same way. They allow you to add, edit, and delete pieces of contact information from the individual's profile.
There are two actions you can perform from thechild forms listed above: add another record using the add ![]() icon, or launch a report using the export
icon, or launch a report using the export![]() icon.
icon.

The addresses, telephone numbers, fax numbers, e-mail addresses, and websites child forms
E-mail Addresses
netFORUM validates email address syntax .
Invalid Email Address
If messaging integration tries, and fails, to send an email to a specific email address it will suppress that email address. Email addresses suppressed by MagnetMail (this happens only when an email address bounces for reason of "user unknown" 2 times over a 30 day period) will be marked as invalid in netFORUM and no other delivery attempts will be made.
Also, if an email message is flagged as spam by the recipient, it will also be suppressed and marked as invalid.
If an email is marked as invalid, it will be visible on the Edit - Individual Email form available from within the individual profile.
Note: If an email is used elsewhere in netFORUM (in an invoice, for instance), you can mark it as invalid, but you cannot delete it.
To view whether an email address has been flagged as invalid, complete the following steps:
- Go to Modules > CRM > Individuals > List, Find, Query Indiviual
- Click the Individual to see the Individual Profile.
- In the child form section of the Individual Profile, click the More tab to view the list of available child form tabs.
- Click the Contact Info option.
- Expand the e-mail addresses child form to view the list of email addresses associated with this individual profile.
- Click the Edit
 icon to open the Edit - Individual Email pop-up window.
If the invalid? checkbox is checked, then this email address has been marked as invalid.
To remove the invalid designation for this email address, click the invalid? checkbox to remove the check.
IM
IM is a piece of the individual's contact info that you can add from the edit contact info button. The im child form allows you to add, edit, and delete the instant message information for the individual. From the im child form, you can click the add ![]() icon to add a new im record.
icon to add a new im record.
Name Aliases
The name aliases child form allows you to add, edit and delete information not available through the edit contact info button. If the individual goes by another name, you can add that name here, just click the add ![]() icon.
icon.
Designations
A designation is a distinguishing name or title such as "MD" for Medical Doctor. The designations child form allows you to add, edit and delete information not available through the edit contact info button. From the designations child form, you can click the add ![]() icon to add a new designations record.
icon to add a new designations record.
Degrees
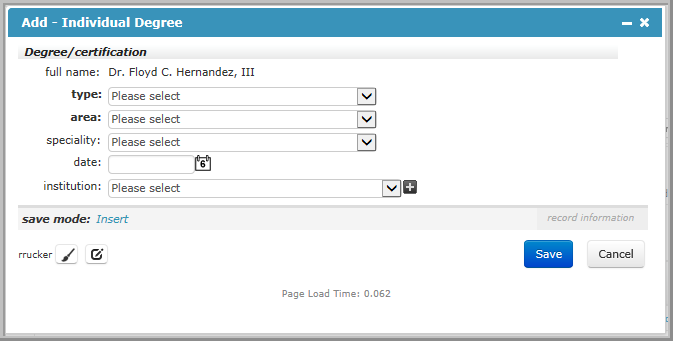
A degree records an Individual's educational experience. The degree child form allows you to add, edit and delete information not available through the edit contact info button. From the degree child form, you can click the add ![]() icon to launch the Add - Individual Degree window.
icon to launch the Add - Individual Degree window.

The Add - Individual Degree Window
Use the following steps to add a degree record from the Add - Individual Degree window:
- Select the type, area and specialty from the drop down lists. Note that specialty is not required. These values are configured in the Degree Setup area.
- Enter the graduation date in the date field. If you do not know the exact day, enter the month, year, and first day of that month.
- In the institution drop down list, select the college, university or educational institution.
- Click Save.
Social Network Handles
Social network handles record an Individual's contact information for social networking sites like Facebook, Twitter, LinkedIn and others. From the social network handles child form, you can click the export ![]() icon to add a new social network handles record.
icon to add a new social network handles record.
Note: Unlike the other child forms under the Contact Info tab, you cannot add information via the social network handles child form. To add information to the social network handles child form, click the edit contact info button in the main individual profile window.
Troubleshooting
If you are experiencing issues Logging In to Real Magnet from netFORUM, go to your Internet Options and ensure that https://www.magnetmail.net as well as your netFORUM iWeb site are set up as a Trusted Site. Add the site in the Security tab and in the Privacy tab.
