Accounts Payable Invoice Session Form
Use this form to create, review, update, and/or delete invoice transactions. Starting or opening a session displays the document transactions associated with the session.
This page assumes that you have all applicable Accounts Payable access rights.
Click Accounts Payable Invoices on the title bar to return to the Accounts Payable Invoice Form.
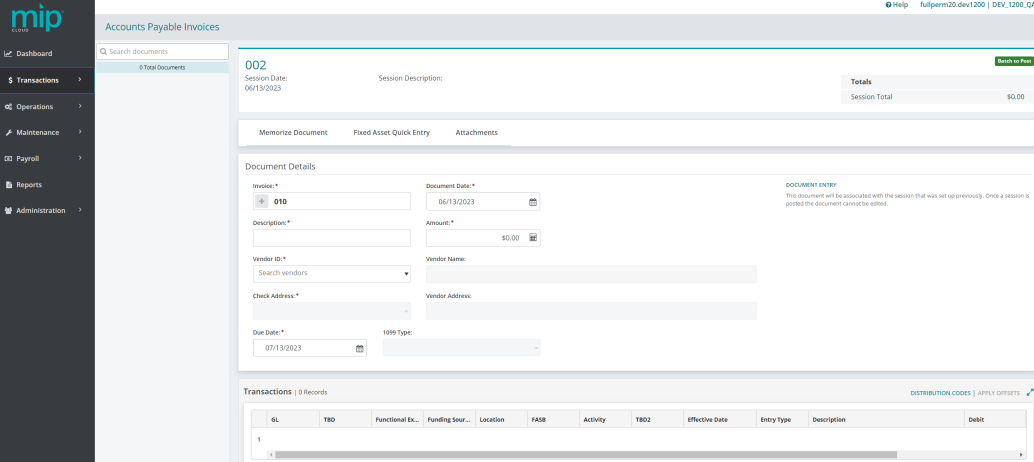
Document List
Existing session documents are listed on the left under the Search documents field. Click an existing document to load it into the session form.
Session Information
The session information section of the form includes the following information.
| Session Name | The session name |
| Session Date | The session date |
| Session Description | The session description |
| Session Status | The session status: Batch to Suspend or Batch to Post |
| Session Total | The session total dollar amount |
Note: Click on the session name on the title bar to bring up the Session Information Form to make changes to session information.
Session Options
Before a document is selected or created, the form displays these options:
| Copy Document | Click to display the Copy Posted Document Form |
| Reverse Document | Click to display the Reverse Posted Document Form |
| Recall Memorized Document | Click to display the Recall Memorized Document Form |
After a document is selected or created, the form displays these options:
| Memorize Document | Click to display the Memorize Document Form |
| Fixed Asset Quick Entry | Click to display the Fixed Asset Quick Entry Form |
| Attachments | Click to display the Attachments Form |
Document Details
Use the Document Details fields to create or update an Accounts Payable Invoice Session Document.
| Invoice |
To create a new document, enter a unique ID. While any sequence of characters can be entered to identify the document, using a logical and consistent method of assigning IDs makes locating specific information much easier and provides a better audit trail. To have the system assign a session ID:
To work with an existing document, click one of the documents in the Document List. The remaining fields and buttons of the form activate after a document ID is entered or an existing document is selected from the Document List. |
| Document Date | Accept the session date, or enter a valid date specific to this document |
| Description | Enter a brief description of the invoice or accept the session description as a default |
| Amount | Enter the amount of the invoice |
| Vendor ID | Select the ID of the vendor from the drop-down list |
| Vendor Name | The full name of the vendor that is auto-populated from Vendor ID selection |
| Check Address | If more than one check address is available for this vendor, select the ID for the appropriate one from the drop-down list |
| Vendor Address | The full address for the selected check address ID that is auto-populated from Vendor ID selection |
| Due Date | Accept the default date, which is set to one month after the Document Date, or enter another due date |
| 1099 Type | Select the 1099 type for this invoice, if appropriate for this vendor. If a non-1099 Vendor ID is selected, this field will be inactive |
User Defined Fields
Created by an administrator, user defined fields (UDF) have specific characteristics such as field type, character length, and default values specific to the field. All fields that display in this section are specific to your organization.
Transactions
The Transactions table lists the number of records for the document. Click in a table entry to add or adjust an entry. Refer to Tips and Shortcuts for more information on working with tables of data.
Note: The fields available depend on the document record viewed.
| GL, Fund, and other segments | The segment code for the transaction. Segments were set up when the organization was created |
| Debit | The transaction debit amount |
| Credit | The transaction credit amount |
| Entry Type | The transaction entry type |
| Effective Date | The transaction effective date |
| Description | The description of the transaction |
| UDF Fields | Includes any user defined fields |
| Delete | Click to remove the transaction line from the document |
| Distribution Codes | If your organization has one or more distribution codes defines, you can use them to simplify the process of entering related transactions by clicking DISTRIBUTION CODES at the top right of the Transactions table. See the Distribution Codes help topic for more details |
| Applying Offsets | If your organization has appropriate offsets assigned for this account, you can apply them to the invoice by clicking APPLY OFFSETS at the top right of the Transactions table. Offsets are assigned using MIP Fund Accounting |
| Debit, Credit, Net | For non-budget transaction types, Credit and Debit transactions must balance before you can save a document |
Buttons
| Cancel | Click to clear the current transaction document |
| Delete | Click to delete the currently loaded document. This button is disabled until a document is loaded, or until a newly entered document is saved |
| Save & New | Click to save the current document and return to the empty form |
| Save | Click to save the current document but leave it on the screen for further edits |
| Save & Close | Click to save the current document and close the session, returning to the Accounts Payable Invoice Form |
Note: To use a different save functionality, click the up arrow on the right of the Save & New button; a menu appears with the other two options. As a time-saving measure, if you select one of these options, the default button label changes to match.