How Do I Create a Requisition?
The following is a checklist for creating a requisition. If needed, review the checklist for Setting Up Electronic Requisitions.
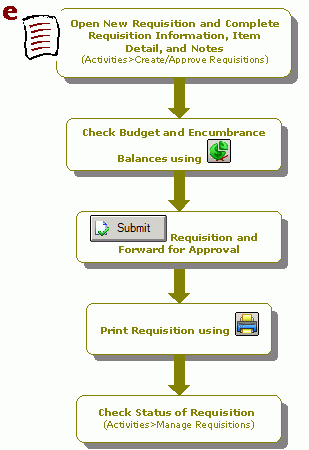
- Open a new requisition in the system (Activities>Requisitions>Create/Approve Requisitions), and then complete the following tabs:
- Requisition Information tab - Specify the number and title of the requisition. You can also assign optional information, such as a vendor ID, address codes, and date options (when the requested items are needed). Your default address codes automatically display if they were set up in the system (Security>Requisitions>Set Up Requisition Users).
- Item Detail tab - Request orders for products. Enter the specific items that you are requesting.
- Notes tab - Record any specific notes or reminders regarding the requisition.
- Check budget and encumbrance balances for the current requisition, if you have the rights, using Check Budget and Encumbrance Balances
 .
. - Click
 , and then select the person to forward the requisition for approval. (The requisition is automatically saved upon submitting.) Your default approver automatically displays from Security>Requisitions>Set Up Requisition Users.
 - Print the requisition if desired using Print
 .
. - Check the status of your requisition using the Activities>Requisitions>Manage Requisitions form. This form also appears when you log on to the system allowing you to view your pending requisitions (Options>Customize Workstation Settings>Preferences tab).
