Closing an Accounting Period
Closing periods works very much the same way as closing a Batch. Work left to right with the icons listed in the Actions Bar starting with the preprocess icon. However, the preprocess, revenue recognize, and inventory trans icons will be the ONLY Active Icons sequentially, unless adjustments need to be made. The three exception icons ![]() refer to each previous process only.
refer to each previous process only.

The exception icons refer to the previous process only
Preprocess
![]()
The preprocess icon will check all batches that have deferred revenue for the period are closed. If there are exceptions, just like on the Batch Profile, click on the exceptions icon and go to the exceptions.
To Preprocess an Accounting Period:
- Go to the Accounting Period Profile.
- In the Actions Bar, click the preprocess icon.
- If there is an error, the exception icon
 will activate.
 - If all batches are posted, there are no exceptions and there is deferred revenue to recognize, the recognize revenue icon
 will activate (see BELOW for the steps on how to Recognize Revenue).
 - If all batches are posted and there are no exceptions or any deferred revenue to recognize, the close batch icon
 will activate.
Exceptions
![]()
An exception will occur only if a batch in the Accounting Period was not closed or a batch was not posted.
If an exception occurs, the exception icon will activate.
To Correct an Accounting Period Exception:
- Click the exceptions icon. The exceptions page displays.

|
| An exception for a batch that is not closed |
- In the exceptions child form, click the goto arrow
 of the record that needs the correction. In the case of batch not being closed, the goto arrow will direct you to the Batch Profile.
 - After correcting the exception, click the (accounting) period link in the top left profile information panel to return to the Accounting Period profile, click the preprocess icon again (REQUIRED!) in the actions bar and continue closing the period.
Recognize Revenue
Prior to recognizing revenue, you can click the Deferral Revenue Available for Recognition (Form) Report on the middle profile information panel to run a report that shows the Deferred Revenue that will be recognized in this period. This is not required however.
Examples of Typically Deferred Revenue: membership dues, term-based subscriptions, event registrations, and other prepaid products.
To Recognize Deferred Revenue in this Accounting Period:
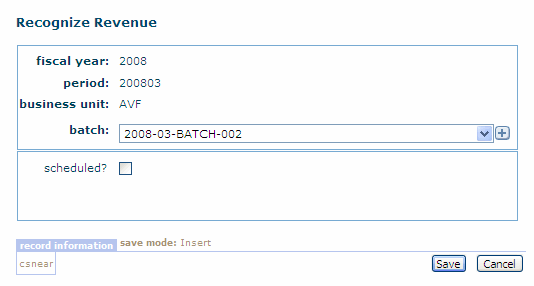
- Click the recognize revenue icon. The Recognize Revenue window displays.
- The fiscal year, (accounting) period, and business unit will default.
- Select a batch (or click the Add button
 to add a new batch). This
- The Batch you choose or add must be in the same accounting period that you are in the process of closing. This is REQUIRED for the process to be completed.

|
|
The Recognize Revenue window after adding a new batch
|
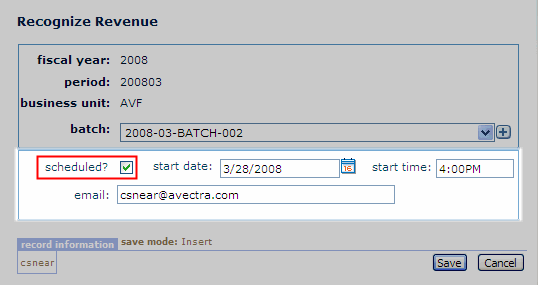
- Select the scheduled check box to schedule a date and time to run this process.
- This is a helpful functionality if you have a large quantity of deferred revenue transactions.

|
| COMPLETED Recognize Revenue window with the scheduled check box selected |
- Click Save. The process will run and you will be returned to the Accounting Period Profile.
- If there is not inventory to recognize, the batch icon will activate.
- Important Note: Close and Post the batch you selected or added. If you did not and you click the batch icon, you will get an exception.
- After posting the batch, return to the Accounting Period Profile. If you closed the Accounting Period window, you must click the preprocess icon again. Click the batch icon and continue the process.
Inventory Trans
![]()
If you are tracking the Cost of Goods Sold, click the inventory trans icon to complete the process, and debit your COGS account and credit your Inventory account.
The Add - Inventory Transaction window is IDENTICAL to the Recognize Revenue window, including the Steps to execute the process.

|
| COMPLETED Add - Inventory Transaction window |
If you are tracking the Cost of Goods Sold you will also need to do the following steps:
- Setting up the InventoryMethod system option as FIFO (First In/First Out) or AverageCost -- the 2 ways that NetForum will determine the COGS.
- The product has to track inventory and have a Cost of Goods Sold account set up for it.
- The product being tracked must have been ordered.
- The item ordered must have been fulfilled within this fiscal period -- this is to recognize the cost of the item when it was shipped to the customer.
Close Batch
![]()
After you complete the previous processes, the close-batch icon activates. This process ensures that all of the batches in the Accounting Period are closed.
If a batch is not closed, the exception icon ![]() to the right of the close-batch icon activates and at this point, you must return to each Batch Profile page individually and close each batch. This includes the batches you created during the revenue recognition and inventory trans processes. When all of the batches are closed, you will be returned to the Accounting Period Profile with the close-batch icon already activated to continue with the period closing procedures.
to the right of the close-batch icon activates and at this point, you must return to each Batch Profile page individually and close each batch. This includes the batches you created during the revenue recognition and inventory trans processes. When all of the batches are closed, you will be returned to the Accounting Period Profile with the close-batch icon already activated to continue with the period closing procedures.
Remember...batches with pro forma invoices can not be closed. You should move the pro forma invoices to another Accounting Period by just changing the period from the Edit - Batch Profile page.
Post Batch
Once you have closed all batches, click the post-batch icon. This ensures that all closed batches within the Accounting Period have been posted. If there are batches that have not been posted, the exception icon ![]() to the right of the post-batch icon will activate. When all of the batches are posted, you will be returned to the Accounting Period Profile with the post-batch icon already activated to continue with the period closing procedures.
to the right of the post-batch icon will activate. When all of the batches are posted, you will be returned to the Accounting Period Profile with the post-batch icon already activated to continue with the period closing procedures.
You can post multiple batches at once by clicking the Post Multiple Batches link in the Profile Information Panel. Select the appropriate check box(es) to post those batches and create a single export file for all the transactions in all the batches. You can access this file from the Accounting Period profile page from the accounting period -> export child form.
Close Period
![]()
After the posting process is complete, click the close-period icon and the process is completed automatically. This process ensures that all batches are closed and posted and restricts the Accounting Period from accepting any new batches.
An Accounting Period can be closed ONLY if:
- All prior periods have been closed.
- The closing date is after the end date that was entered for that Accounting Period. For example, if the June Accounting Period begins 06/01 and ends on 06/30, the earliest this period can be closed in 07/01.
Viewing G/L Account Summaries
For closed batches, you can view a G/L Account Summary by Accounting Period. On the Accounting Period Profile, the accounting summary child form displays debit and credit amounts for the accounting period.