Refund
- Refund
- Returning money to a customer for a credit they have on their account, reducing their credit balance by the refunded amount.
In NetForum, a credit to the customer's account is automatically created when a product is returned or canceled. Credits can also be created manually. A Refund can then be generated from the total sum of the customer's list of credits.
A refund can also be created at the time of the cancellation. In this case, the credit and the refund are created at the same time, though the credit is created transparently in the interface.
-
- If the payment was made by credit card or ACH, the money will be credited back to the customer's credit card or ACH account appropriately. (see Refunding a Payment to a Credit Card below).
- If the payment was made by another method, a refund check will need to be cut in your accounting system.
The five standard Group Item Links (Add, Find, List, Run Query, Query Central), are available in the Refund group item. Additional Group Item Links include:
|
|
Refund Group Item
|
Adding Records
Payment for a Refund can be:
-
- Credited back to a credit card.
- Returned to the customer in the form of a refund check.
Note: Before you create a refund transaction, it is recommended that you create a Batch for the refund.
To Refund a Payment:
- Ensure that you have properly created a CREDIT for the products you are refunding.
- Go to the Accounting module.
- In the Refund group item, click the Add Refund group item link. The Add - Refund page displays.
- On the Add - Refund page, enter search criteria to locate the credit you wish to refund. The more criteria you select, the narrower the scope of the results:
- sort name (customer) (or use the LookUp button
 )
)
- product type
- date range for the invoice...this is the most commonly used!
- sort name (customer) (or use the LookUp button
- To generate the results of the search, click the search button. The list results for each credit line item display the following information:
- Customer Name
- Credit # (credit transaction)
- Available Amt (Amount of credit available for that specific product)
- G/L Credit Account
- Address
- Refund (Type) available.
- Currency (the Transaction Currency).
- Select the refund batch (or add a new batch using the Add button
 to the right of the drop-down list).
- Enter a refund amount per line item.
- Select the G/L Credit Account (for the refund).
- Select the customer's address (where to send the refund).
- If a credit card was used for the original purchase, the Refund CC/ACH/PAYPAL check box will be available for that line item.
- If you select this check box, the full amount will be refunded to the credit card using the payment transaction ID (the credit card number is NOT kept on file via PCI Compliance).
- This is the same as selecting the auto refund check box during the initial return/cancel process. If you do not select this check box, you must process a check refund the same way you would process the refund if the original payment was a check.
- If you would like to refund all of the available credits, click the refund all button.
- If you select this option, the refund amounts in full will automatically populate the Refund Amt fields for each line item.
- Selecting this option does NOT automatically select any Refund CC/ACH/PAYPAL check box.
- Click Save. You will directed to the Refund Profile page of the of the credit you refunded or to the first on the list if multiple credits were refunded.
|
|
COMPLETED Refund page
|
The credits and refunds will display on the Individual or Organization Profiles, on the credit child form and the refund child form in the Other Actg tab. If you selected the Refund CC/ACH/PAYPAL check box, the payment will automatically be refunded to the credit card.
|
| Credit and Refund child forms on the Individual Profile |
Note:
If a customer returns a product and the refund or write-off amount is credited to a split account, if the refund amount is an odd number, the system randomly picks which account gets the extra penny. For the next refund to the same split account, the other account is chosen to receive the extra penny.
When someone cancels an event registration, the cancellation fee will be subtracted from the amount being credited or refunded to the customer.
Note: You also have the ability to refund a credit directly from the Credit Profile.
Refunding a Payment to a Credit Card
This can be done at the time of the return or cancellation by simply selecting the auto refund check box on the Return page.
Finding Records
There are multiple ways to locate a record using the Find page (for detailed methods on how to locate records, see the Find page). The Find functionality is universal throughout NetForum. The results will display in a List page, which is also universal throughout NetForum.
The only data available to locate a Refund record on the Find - Refund page is Sort Name (customer), Refund Code and Refund Batch because all of the other pertinent information was entered during other processes.
Find vs. Query
The Find page is setup with a pre-defined set of columns (fields) versus a Query which allows you to select from ANY column in the search Table.
The Refund Profile can ONLY be accessed from the List - Refund page.
To go to an Refund Profile:
- Go to the Accounting module.
- Click (or hover over) the Refund group item.
- Select the Find Refund group item link. The Find - Refund page displays.
- On the Find - Refund page, enter search criteria to find the Refund Profile record and click Go. The List - Refund page displays.
- On the List - Refund page, click the Goto arrow
 to the left of the record you wish to view. The Refund Profile page displays.
In the example below, the search will be on all refunds in the selected batch for the selected customer.

|
|
Find - Refund page
|
Managing Records
Refund Profile
|
|
Refund Profile Page
|
Void is the only functionality available on the Refund Profile; there is no additional functionality other than the information already displayed.
Voiding a Refund
![]() Voiding a refund returns the money to a credit. You can void refunds, except those refunded to a credit card, from the Refund Profile.
Voiding a refund returns the money to a credit. You can void refunds, except those refunded to a credit card, from the Refund Profile.
You cannot void a refund that is in a closed batch.
- Scenario
- You have processed a refund for a customer but before the check is processed, they change their mind and want to apply the credit to the purchase of another product.
To Void a Refund:
- On the Refund Profile, click the void icon on the Actions Bar.
- A Windows Internet Explorer warning window will display.
|
| Windows Internet Explorer warning window |
- Click OK if you want to void this refund.
- The void is automatically generated, the void icon on the Refund Profile page is deactivated, and the information displays on the refund detail child form.
Note: The refund is added to the selected batch and the payment will be refunded when the batch is posted.
Partial Credit Card Refund
See Refund Partial Credit for how to create a Credit and use part of the credit to pay an invoice and the other part of the credit will be issued back to the customer.
Writing Off Credits
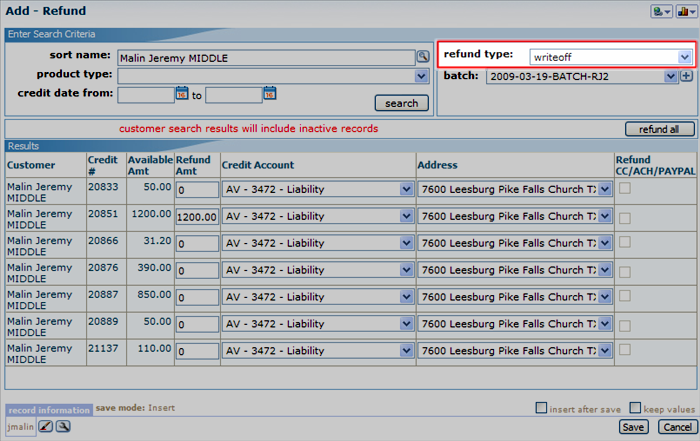
Credits may be written off that have been created but will never be refunded or used. This is normally used when a credit has been created by accident. Previously, there was no way to get rid of this credit. This can now be accomplished with a new drop-down menu on the Add - Refund screen.
|
| Use the new refund type drop-down on the add refund screen to write off a credit. |
When you need to write off a refund, you may now choose a refund type of write off in the drop-down. Reports will not pull this as a refund in the future.
See Write Off Credits for more detail on how to write off credits.