Addresses Child Form
OR
Addresses Child Form Information
You see the following columns on the Addresses child form:

| Column | Description |
|---|---|
| Type | Displays the Address Type, such as Shipping, Billing, or Home. |
| Line 1 | Displays the first line of Address information. |
| Line 2 | Displays the second line of Address information. |
| City-State-Zip | Displays the City, State and Zip. |
| Primary | Displays a check mark if this address is marked as the primary address. |
| Billing | Displays a check mark if this address is marked as the billing address. |
| Region | Displays the abbreviation on the region. |
| Hold | Displays a check mark if this address has been placed on hold. |
| Linked |
Displays the relationship of the entity in the profile to this linked address. Displays one of the following three options:
|
Child Form Icons
Use the following icons to work with child forms. Not every form will have all of the icons listed. The icons are also different if the form uses the updated user interface available with version 2017.
Note: When you use the edit icon to open the Address Information page so you can edit an address and the change reason, then the does not stay in the drop-down box. The change reason you choose does, however, get recorded in the change log when you click the Save button. To see the change reason in the change log, go to the Profile Log tab > Address Change Log.
| Icons | Actions | |
|---|---|---|
| Classic UI | Current UI | |
|
|
|
expand/close icon to expand or close a child form. |

|
|
goto record icon to view that record's profile page. |
|
|
|
add icon to add a new record to the child form. |
|
|
|
edit icon to edit a record on the child form. |
|
|
|
delete icon to delete a record on the child form. |
|
|
|
grandchild form icon to expand or close a grandchild form. |
|
|
new window icon to open a child form in a new window. | |

|
more info icon to see more information about the a record on the child form. | |

|
linked headings to sort the records. | |
|
|
refresh the data in the form. | |
|
|
export the data to a quick report for download. | |
Add Address
OR
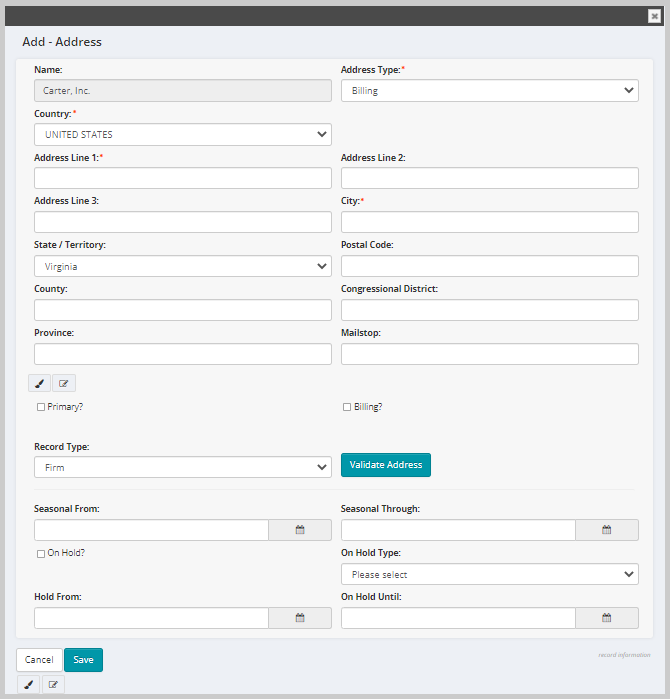
Using the Addresses child form on an organization profile, you can add or update address information for the organization profile.
The following section describe the steps to add an address information for an organization in the NetForum.
Adding Address
-
Follow the path listed above.
-
Click the Add icon. The Add - Address page opens.
-
Fill in the fields as described in the table below:
-
Click the Save button to add an address to the child form and return to the Profile. Click the Cancel button to return to the Profile without saving the address.

| Field Name | Required | Description |
|---|---|---|
| Name | Required | This field default to the name of the organization. |
| Address Type | Required | Select an address type from the drop-down list. Options may include Billing, Home, Other, Shipping, or Work. |
| County | Required | Select a country from the drop-down list. Address location fields update to reflect the country selected. |
| Address Line 1 | Required | Enter the address in this field. |
| Address Line 2 | Optional | Enter the address in this field. |
| Address Line 3 | Optional | Enter the address in this field. |
| City | Required | Enter the city name in this field. |
| State/Territory | Optional | Enter the state/territory name in this field. |
| Postal Code | Optional | Enter the Postal Code in this field. |
| County | Optional | Enter the county name in this field. |
| Congressional District | Optional | Enter the county and then enter the congressional district. |
| Province | Optional | Enter the province name in this field. |
| Mailstop | Optional | Enter the four-digit code after the zip code in a US postal address. |
| Primary? | Optional | Check this box if you want this address to be the primary address. |
| Billing? | Optional | Check this box if you want this address to be the billing address. |
| Record Type | Optional | Select an address record type option from the Record Type drop-down list. You can validate the address using the Validate Address button next to the Record Type field. |
| Seasonal From | Optional | Set a seasonal from date if you wish to display the address as seasonal address for a particular duration, starting from the mentioned date. |
| Seasonal Through | Optional | Set a seasonal through date if you wish to display the address as seasonal address for a particular duration, ending on the mentioned date. |
| On Hold? | Optional | Check this box if you want this address to be placed on hold. |
| On Hold Type | Optional | Select an on-hold type from the drop-down list. Options may include Restricted, Out of Country and so on. |
| Hold From | Optional | Set the hold from date if you have selected the On Hold checkbox. |
| On Hold Until | Optional | Set the on-hold until date if you have selected the On Hold checkbox. |