Registering for a Waiver Required Event on eWeb
You can register for a waiver required event on eWeb using the Online Store or the Events Calendar.
Note: Event Waivers are not available for Group Registrations.
Registering for a Waiver Required Event Using the eWeb Online Store
To register for a waiver required event using the Online Store, complete the following steps:
-
Click the Online Store hyperlink located on the eWeb site.
-
Expand the Browse store categories… drop-down menu and click the Events hyperlink.
-
Click the hyperlinked name of the event for which you wish to register.
-
Click the Individual Registration button to register an individual.
-
Expand the Registrant Type drop-down menu and choose the appropriate type.
-
Enter the Registrant and Badge Information in the respective sections as appropriate.
-
If you have any ADA and special dietary requests, enter them in the ADA requirements field.
-
On the Event Waiver section, read the event waiver agreement and select the I agree check box. Once you select the I Agree check box, the Name and the Signed date fields will be displayed.
-
Enter your name in the Name field as a digital signature for agreeing with the event waiver.
-
Select any Event Fees that are necessary (or desired) for this registration.
-
Click the check box(es) next to the track(s) and/or session(s) you wish to attend. Any fees for the selected Track and/or sessions will be included in your overall total.
-
Click the Add to Cart button.
-
Once you are ready to check out, click the Check-Out button.
-
Review your payment information and make any adjustments needed.
-
Expand the Payment method drop-down menu and click the type of payment you wish to use for this registration. The screen will refresh based on the type of payment method chosen.
-
Complete the necessary fields for the payment method chosen.
-
Click the Continue button.
-
Review the details of your order. Click the delete icon to remove an item from your order. Click the Edit Payment button to edit the method of payment used for this registration.
-
If the order is correct, click the Submit Order button.
The Online Store page will refresh to only display events. You may also enter search criteria if you are looking for a specific event in the Search Events section of the Online Store - Events page.
This will open the eWeb profile page for that event.
Note: If you are not already logged into the eWeb site, you will be prompted to do so before being able to continue the registration process.
The Event Registration | Register for Event page will open. This page will have most of your information pre-populated from your profile. Several fields may be edited as needed.
Note: The system displays a duplicate registration warning if you have already registered for the event. You can continue the registration by clicking the Proceed With Registration button or cancel it by clicking the Cancel button.
Important! The user must manually enter their name in the Name field to proceed with the registration process. If the user selects the name from the auto-suggested pop-up to fill in the Name field, the system will display WAIVER AGREEMENT REQUIRED message and the Add to Cart button will be disabled.
The Signed date field will automatically populate the current date.
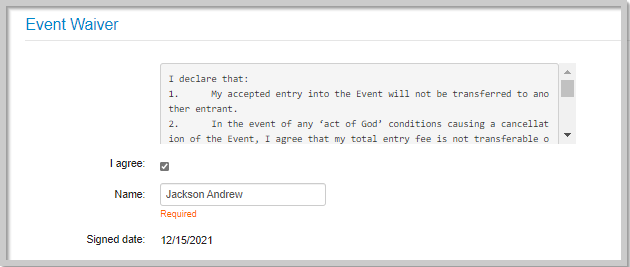
Note: The Add to Cart button will remains disabled and displays Waiver Agreement Required text above the Add to Cart button until you select the I agree check box and enter your name in the Name field.
This will open the Shopping Cart | View page. Here you can remove items from your cart by clicking the delete icon, add Discount Codes, and/or Source Codes.
The Shopping Cart | Confirm your order page will display.
The receipt for your registration will display. This receipt also has a Print hyperlink to allow you to print a copy for your records.
Registering for an Event Using the eWeb Online Calendar
To register for an event using the Events Calendar, complete the following steps:
-
Hover over the Events hyperlink located in the navigation bar of your eWeb site to expand the Events fly-out menu.
-
Click the Events Calendar hyperlink.
-
Locate the event for which you are interested in registering.
-
Click the hyperlinked event name on the calendar.
-
Follow the steps from above (Registering for a Waiver Required Event Using the eWeb Online Store section), beginning with Step 4, to complete your registration.
This will display the Event Calendar.
This will open the eWeb event profile for the selected event.