Creating and Syncing Event Product in Freestone
Event product created in iWeb will be sync in Freestone site by following the below steps. The catalog sync will send Event product information to Freestone.
To create and sync event product in Freestone through NetForum, complete the following steps:
- Expand the Event module, and go to Events Planning group item and then click Add Event, this will display Event Creation page.
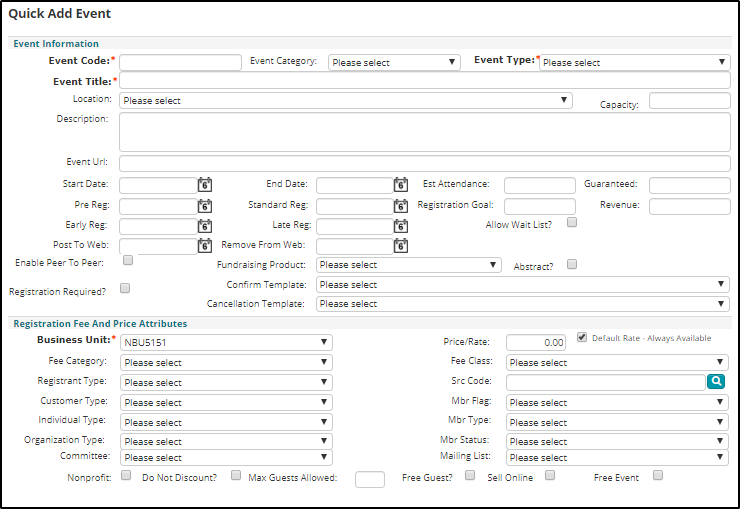
- From the Event Creation page, click Create Event link. This will display Quick Add Event page.
- Enter the appropriate details to create an Event product. Follow the below steps to sync this Event product to Freestone.
- Enter the desired information in the fields: Event Code, Event Type, Event Title and Description, Start Date, Post to Web (This date must be different than Start Date).
- In the Fee category field, select an appropriate option from the drop-down list. To add a new Fee category refer Fee Categories section in Event Tab topic.
- Enter the price value in the Price/Rate field.
- Select Sell Online check box to post it on Freestone.
- Enter other details you wish to include in this product.
- Set the GL Accounts details from their relevant fields.
- Click Save. This will create an Event product and you will be directed to the product profile page.
In order to sync this product with Freestone, it should have a keyword or Tag which matches the keyword set in the Freestone integration. Refer below steps on how to add keyword or tag to an event product.
To add a keyword to this event product, complete the following steps:
- Add the keyword to the new event to enable syncing with Freestone.
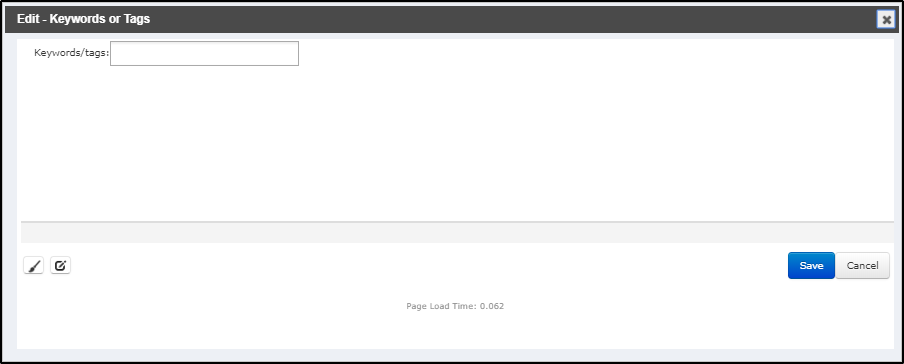
- From the Publication Profile that you just added, click the Tag/Keywords
 button. This will display Edit - Keywords or Tags window.
 - In the Keywords/Tags field, enter Freestone Course (You can enter the first three letters, and select the displayed tag) in this field and click Save.
For adding an Online description to the product, complete the following steps:
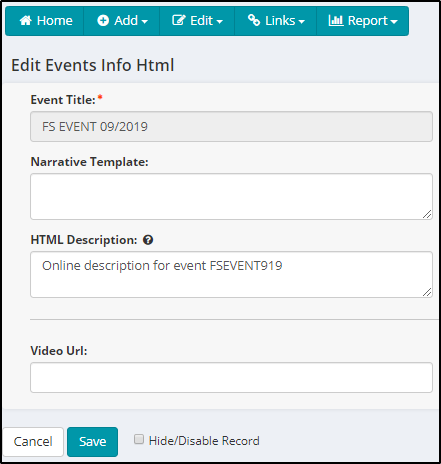
- From the Event profile page, click Edit menu bar at the top. This will display edit menu list.
- Click Online info from the list. This will display Edit Events Info Html page.
- In the HTML Description field, enter the appropriate description in this field and then click Save.
Verifying the Added Event Product in Freestone
To Verify the Event Product Added in the Freestone, complete the following steps:
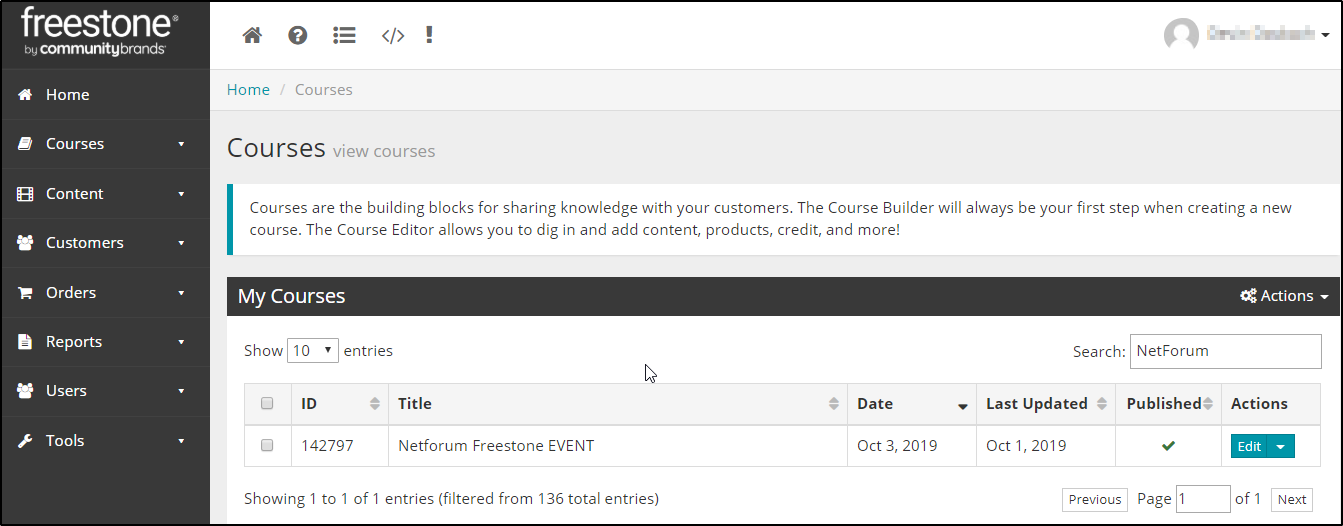
- Login to Freestone site.
- Expand the Courses menu list on the left navigation menu.
- Click View Courses, this will display the list of courses available.
- Verify the event product that you created is synced with the Freestone.
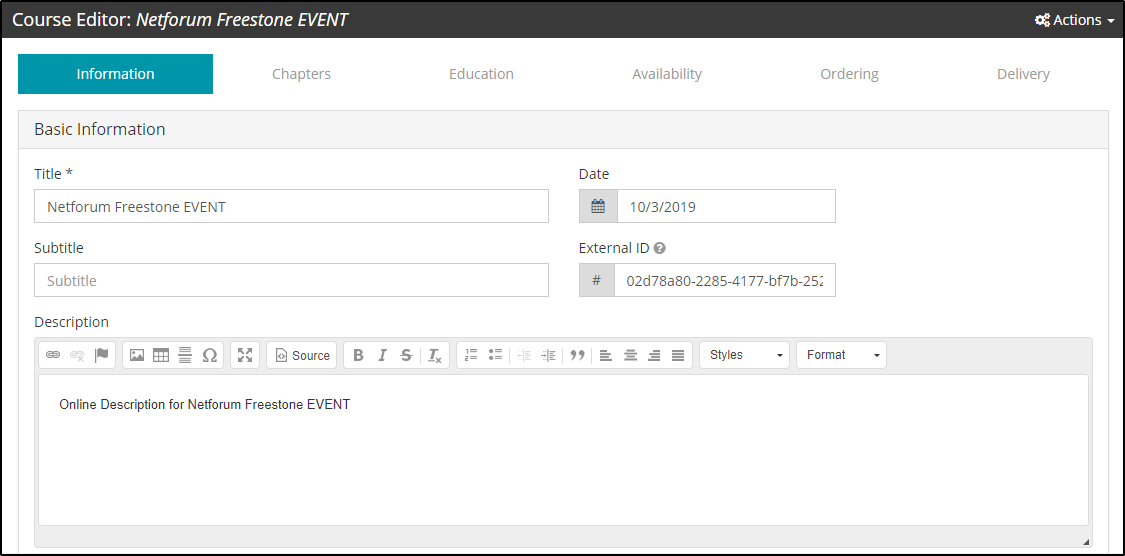
- Click Edit button in the Actions column of the event product you added. This opens Course Editor window. Verify the details in the Information tab that you added in the iWeb. External ID is the GUID key of this product in the iWeb.
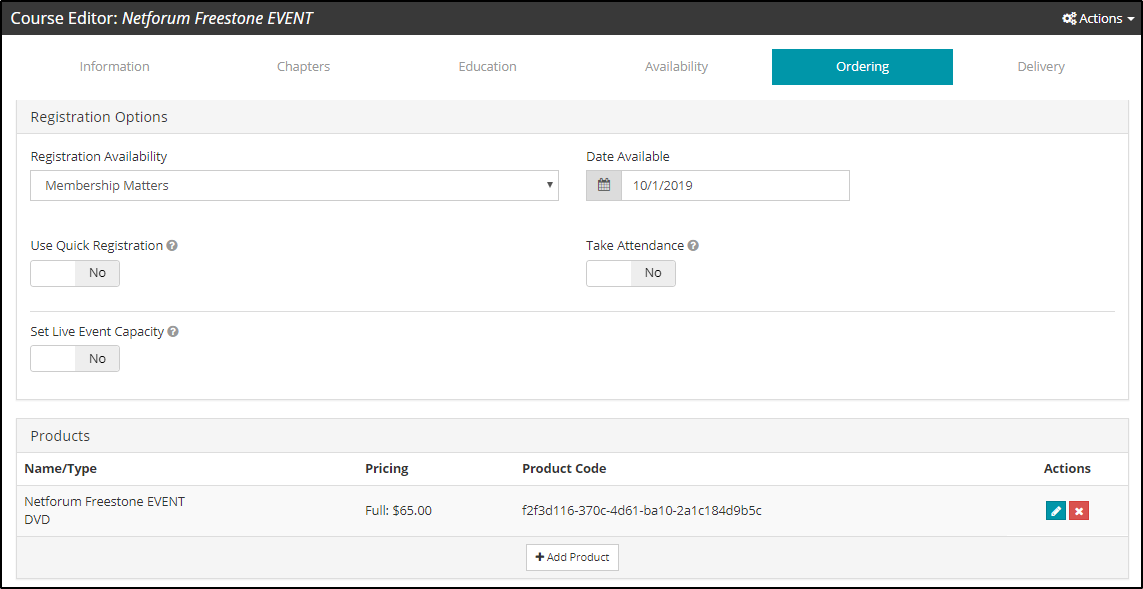
The Ordering tab will give the products details like: Data Available (Start date), Name/Type, and Pricing that you added in iWeb. Note that the Product Code column displays the External ID of the event product in NetForum.
Adding Multiple Price to a Freestone Synced Event
User can add multiple price to an event that is synced with Freestone. Integration settings are required for multiple pricing levels, refer section Multiple price settings under topic Freestone Integration setup for more information.
To add multiple price to an Event, complete the following steps:
- Open the Freestone synced event profile in NetForum and then click Fees tab.
- Click Add New Record
 icon on the Registration Fees section. This will display Add - Event Registration Fee window. Note that the many fields are auto-filled, these data are fetched from the publication product.
 - Enter the price in the price field and make sure to select the sell online? check box in order to reflect this price on Freestone site.
- In the Fee Attributes section, select fee category from the fee category drop-down list.
- Select an option from the member? drop-down field. If the member is selected, then member type and member status fields will be populated.
- Select the desired member type from member type drop-down field.
- Click Save.
- Click
 icon to expand the Prices section and then click Add New Record icon. This will display Add - Event window.
 - In the Price Information section enter the price value in the price field and select the sell online check box.
- In the Product Price Attribute section, select an option from the member? field. If the selected option is member then member type and member status fields will be populated.
- Select the desired member type from member type drop-down field.
- Click Save.
To add another price to this event, use the same Registration Fees that you created in above steps.
These details will be synced to the Freestone site, below section will guide on verifying the multiple prices in Freestone.
To verify multiple prices in Freestone, complete the following steps:
- Login to Freestone.
- Expand the Courses module on the left navigation pane.
- Click View Courses. This will display the My Courses list. Search for the Event for which you added multiple prices; you can also sort the course list to Last Updated for getting the latest changes on top.
- Open the event product and click the Ordering tab.
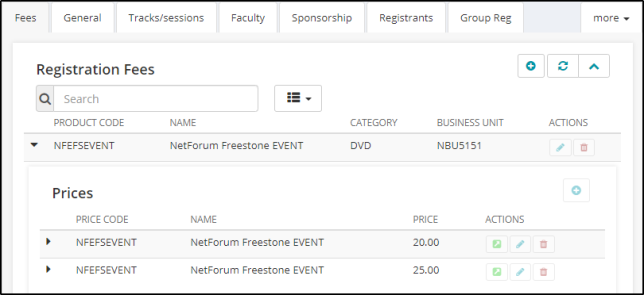
- Under the Products sections, you will find the multiple pricing for the product. Click Edit
 icon to check the details of product pricing.
Note: The highest price is the full price and the other prices will be as set in NetForum
![]()
Adding Presenter to an Event in Freestone through NetForum
In order to add a presenter to a synced event withFreestone, you need to add an individual as a speaker to the same event in NetForum. This will sync the speaker details in the Freestone and the same will be available as presenter here. Follow below steps to add a presenter in Freestone.
To add a presenter to an event in Freestone through NetForum, complete the following steps:
- On the event profile page, go to Faculty tab and then go to Speakers section.
- Click add
 icon on the Speakers section. This will display Add - Speaker page.
 - Enter the speaker details in the Add - Speaker page and then click Save.
Important! An individual should be associated to an organization, it is required to sync the individual as a presenter in Freestone.

An individual will be listed as a presenter for the event and the same will ve sync with Freestone. Now verify that the Speaker is listed in the Freestone as a presenter.
Verifying the added Presenter in Freestone
To verify the added presenter in Freestone, complete the following steps:
- Login to Freestone.
- Expand the Courses module on the left navigation pane.
- Click View Courses. This will display the My Courses list. Search for the Event for which you added presenter; you can also sort the course list to Last Updated for getting the latest changes on top.
- Open event product and you will find the presenter information under the Information tab.
