Adding a Bundle Product
Bundles allow you to group products together and sell them as a group.
Step 1: Add Bundle Product
To add a Bundle Product complete the following steps:
- Click the Module Item expand icon.
This will expand the Inventory Module Item flyout menu.
Note: To close the Module Item flyout menu, click the expand icon again. This will close this menu.
- Click the Bundle Product option on the Module Item flyout menu. This will expand the Bundle Product options.
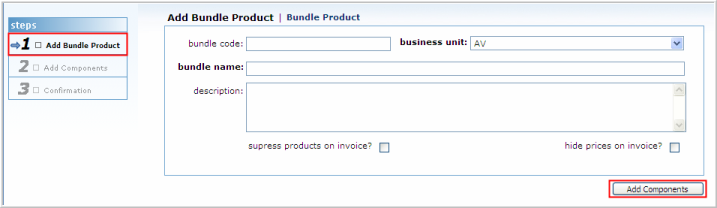
The Add Bundle Product Wizard will display. The Wizard is a three step process to set up the bundle, add the components, and confirm the data.
- Enter the name of the bundle name in the bundle name text box (required).
- Select the suppress products on invoice? check box to display a total bundle price only on the invoice.
- Select the hide prices on invoice? check box to display an itemized listing of all the products without their individual prices.
Selecting neither will display an itemized listing of products in the bundle with their prices.
- Click the Add Components button.
Step 2: Add Components
To add components to the bundle, complete the following steps:
- Specify the product type.
The product type drop-down list will default to ALL. By selecting ALL, and clicking the product name look up, every product name throughout the system will display on the List—Product View page. To narrow the product selection process, select a specific product type from the product type drop-down list. Only products in that product type will display.
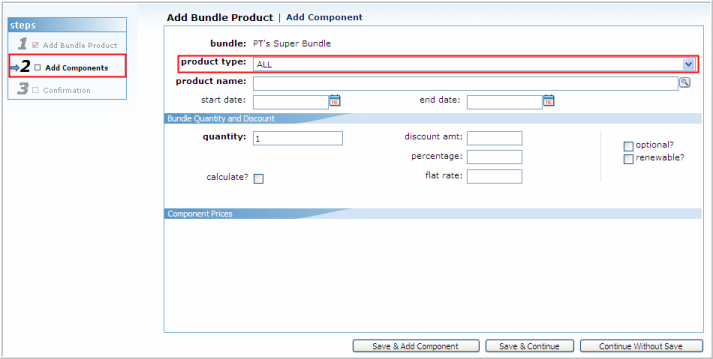
- Once you have specified the product type, choose from the list of available products (of that product type) by expanding the product name drop down menu and clicking on the desired selection.
For example, by specifying Membership Dues in the product type drop-down, you are able to add membership dues you have defined during Association set-up while adding national dues, or chapter dues. Notice that both member and non-member dues prices are added to the bundle in this case which is one advantage of using a bundle over a package. This will give you the further option of choosing between the member and non-member option when purchasing the product in COE. See Selling a Bundle Product for more information. Keep in mind that the older-style dues packages cannot be added as a bundle component.

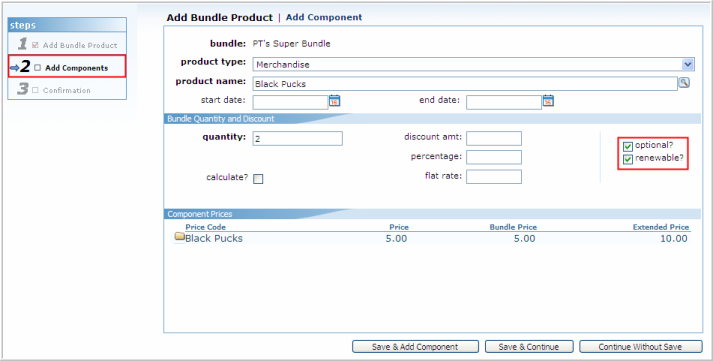
- Set the Bundle Quantity and Discount options.
The Bundle Quantity and Discount section has several features regarding pricing, discounts, renewals and invoicing options. Each pricing and discount option selected will remove the other options from the form.
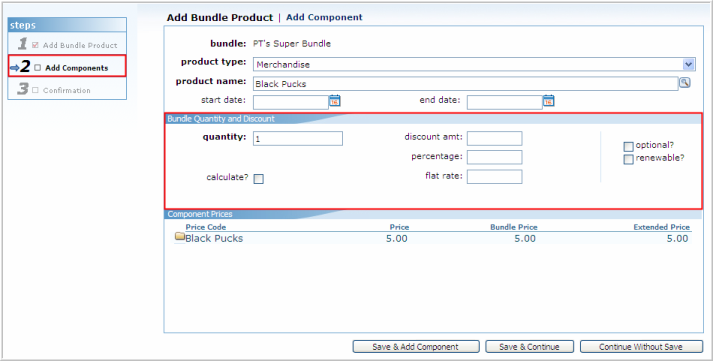
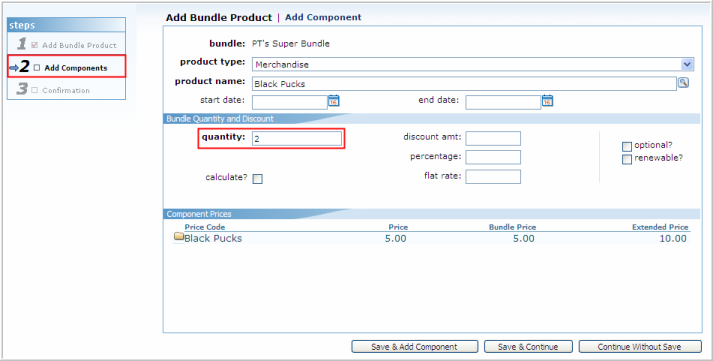
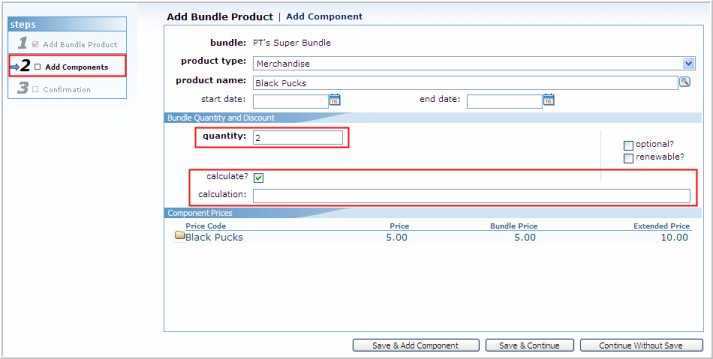
- Set the quantity of the item in the bundle by entering a value in the quantity text box (required).
- Set whether the value of this item will be calculated or not by clicking the calculate? check box (optional).
This is a .NET method to calculate the price of the item regardless of the price entered on the product setup. If checked, the calculation text box will display.
- Enter the .NET method in the calculation field, that will be called.
The .NET method must be entered in the following format: dllName|TypeName|MethodName (example: extension|Avectra.netForum.Extension.CustomCalculationClass|CustomCalculationMethod).
The .NET method should always take the InvoiceDetail object as a parameter. (example: CalculatePrice(InvoiceDetail oDetail)).
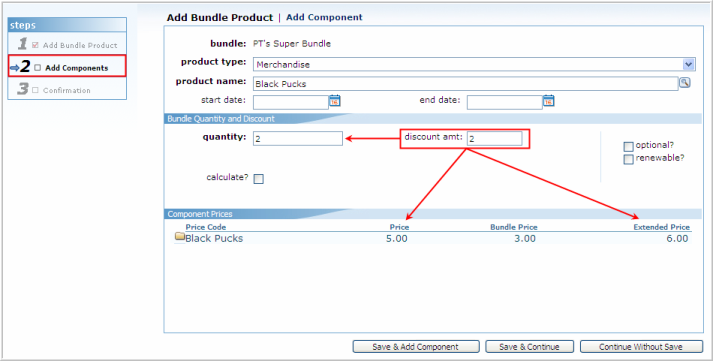
- Enter the amount of discount to be applied to this component in the discount amt text box (optional).
This will be entered as a dollar amount discount applied to that per individual quantity.
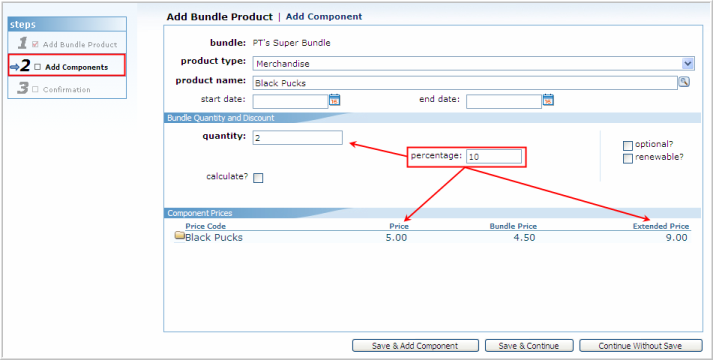
- You may opt to enter a percentage amount of the discount in the percentage text box (optional).
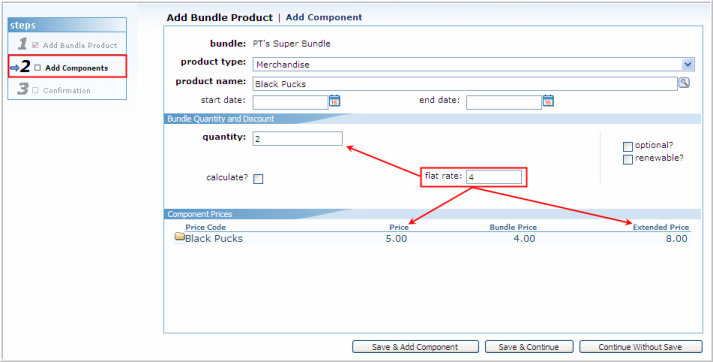
- You may also opt to override the price determined for this product during product setup by entering a dollar amount in the flat rate text box (optional).
Note: Entering a value in the flat rate field will override the regular price for this product that was specified during product setup.
- Set the product to be an optional part of the bundle by clicking the optional? check box (optional).
Products are required to be purchased by default when added to a bundle. Selecting this check box gives you the option of removing this item during invoicing without removing the entire bundle.
Users on eWeb who add this bundle will also have the option of removing optional items from their cart during checkout when purchasing a bundle through the Online Store on eWeb.
- Set the product to be an optional part of the bundle by clicking the optional? check box (optional).
- Set the item to be renewable by clicking the renewable? check box (optional).
Selecting this check box will include the product when the bundle is renewed based on the determined time frame e.g. bundle with a membership, subscription, publication and merchandise. When the membership is automatically renewed, the other products will renew as well.
- Set the quantity of the item in the bundle by entering a value in the quantity text box (required).
- Click Save & Add Component button to add another product to bundle.
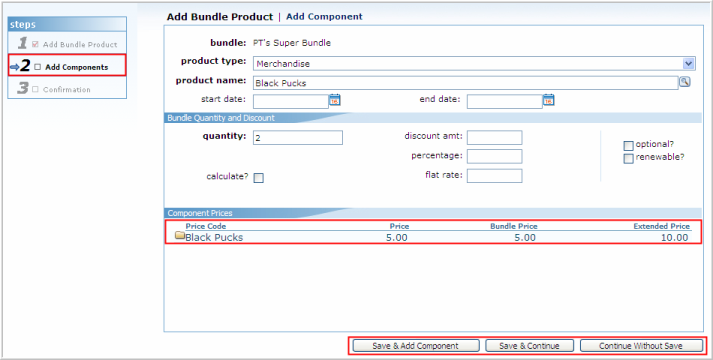
- If your bundle is complete, click Save & Continue button to move to Step 3.
- Click Continue Without Save button to continue without the last product entered.
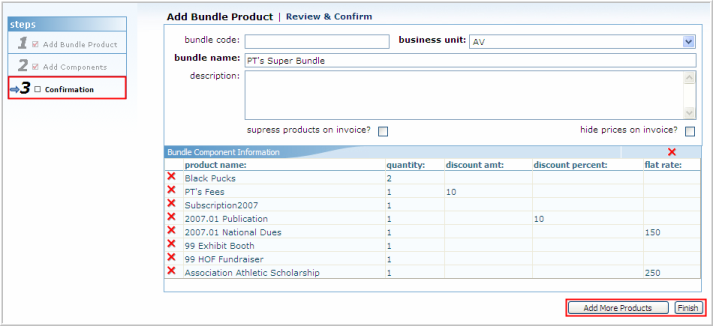
Step 3: Confirmation
The Review & Confirm page will display. Review to ensure all of the data is correct. Click the delete button to remove any bundle products. If you wish to add more bundle products, click the Add More Products button. If the bundle products are correct, click Finish.
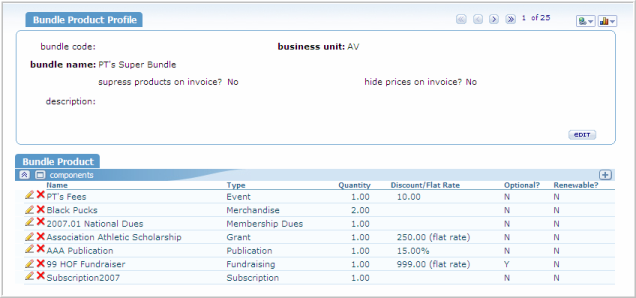
The Bundle Product Profile page will display. The products will display on the components child form.
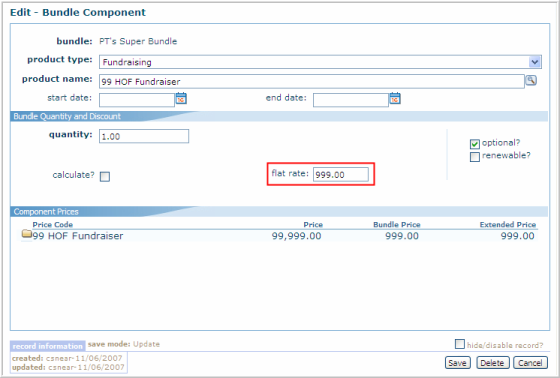
Click the edit button to edit any product in the components child form. The Edit — Bundle Component page.
Navigating to the Bundle Profile
The Bundle Profile is displayed once you have entered a new Bundle into the NetForum application. If you want to navigate to and view a specific profile page:
- Click on the Inventory module from the Module Menu drop-down.
- On the Group Item Overflow Menu, click Bundle Products. You can then choose to List Bundle or to Find Bundle.
- You can also choose to click on the Bundles icon from the Inventory content group page.
Depending upon which Bundle you choose, its Bundle Profile will display.
Bundle Profile
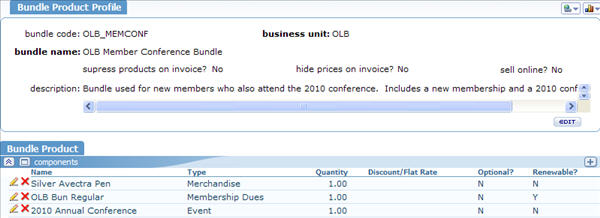
The Bundle Profile shows the bundle code, business unit, bundle name, and bundle description. Also included on the profile are invoice specifics such as whether or not you want to include the products you choose for your bundle to be itemized on your invoice. If you do not want your items to be displayed on the invoice, click the suppress products on invoice checkbox. The same is true of the hide prices on invoice checkbox. If you would prefer that the prices you select for your products not be shown, select this checkbox. Finally, if your product is to be shown online, select this checkbox (note that all products components of the bundle must also be made available for sale online in order to sell the bundle through the Online Store in eWeb). The Edit button is available if you need to make any changes to your Bundle.
There is one tab available on the Bundle Profile, the Bundle Products tab. The Bundle Products tab contains one child form, the components child form, that allows you to view and manipulate the components you have selected for this Bundle. This is discussed in more detail below.
Components Child Form
The Bundle Products tab on the Bundle Profile contains one child form that you are able to manipulate; the components child form displayed below.
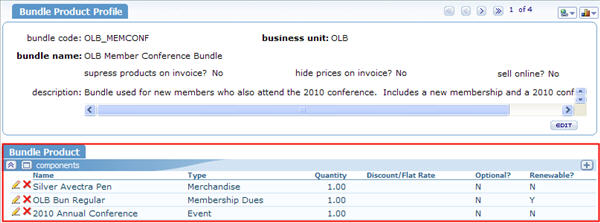
Now that you have created your Bundle, this child form enables you to add view or add more products to your Bundle. For example, in the screenshot above the OLB business unit has decided to offer a membership, attendance at the 2010 conference and an Avectra pen for sale in this bundle. To add products to a Bundle, click the Add Record or ![]() button. The Add Bundle dialogue box displays as pictured below.
button. The Add Bundle dialogue box displays as pictured below.
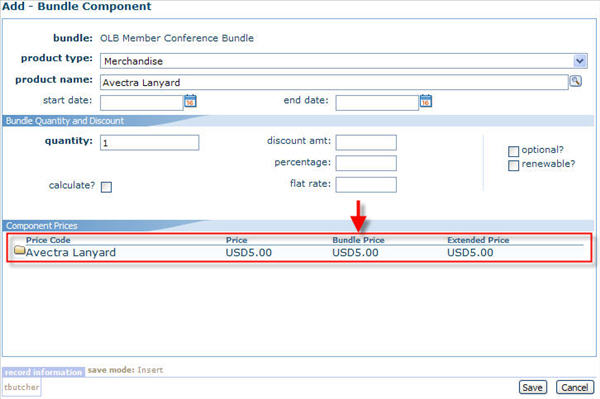
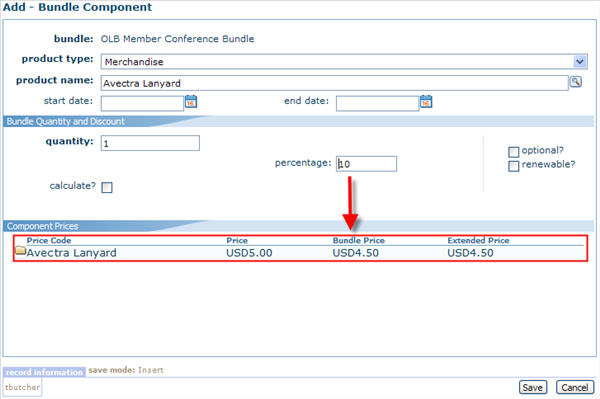
When adding a new product to your Bundle, choosing the Product Type in the drop-down and then the subsequent product name are required. Start date and end date refer to pricing controls if you choose to make this product available for the discount you specify - if you specify one - for the dates you enter.
In the Bundle Quantity and Discount section, you must decide how many of the product you want to include in this Bundle and if you want to offer them at the price they normally sell for or if you want to discount them. Notice in the screenshot above that when you first add your product to your Bundle it is entered for the price it normally sells for. In other words, the price you set when you enter the product into inventory. You have three discounting options available to you when you enter products into Bundles:
- Discount Amount - An amount you want to take-off the base price of the bundle
- Percentage - A percentage you want to take off the base price of the Bundle
- Flat-rate - A flat rate you want to sell the Bundle for instead of its original price.
When you enter an amount in one of the boxes, the other two boxes will disappear and only the discount you have selected will remain as displayed in the screenshot below. You can see that a discount of 10% has been selected. If you want to sell the product for its original amount, leave all boxes blank and click the Save button to save the product into your Bundle.
For detailed information on adding products to your bundles, review the Adding a Bundle Product help topic.
Ordering a Bundle Through Centralized Order Entry
Once your Bundle has been set-up within NetForum , you may begin to sell it on your Website through the Online Store in eWeb or use the Centralized Order Entry (COE) process in NetForum to sell Bundles yourself to individual customers.
This process is described in detail on the Selling a Bundle Product page. Once you have completed your sale, review the Invoicing a Bundle page to complete your sale.
Technical Information
- COEBundles system option. Default is true. Ensure value is true in order to sell bundles in COE.
- BundleProductTypeGuid - system option. This option should never be changed.