My Chapters (eWeb)
The My Chapters page in eWeb displays a logged-in user's Chapters. Regular eWeb users will have the ability to only view their chapters, while users with the appropriate rights will have the ability to modify information on the My Chapters page.
My Chapters
To access the My Chapters information on eWeb, complete the following steps:
- Click the My Account tab located in the top-navigation bar of the eWeb page.
This will open your My Profile page.
- Click the My Chapters hyperlink located in the My Account Links section of the page.
The My Chapters page displays. This page displays a list of all of the chapters you currently belong to. Your role within each chapter will also be listed.
Note: You can also access the My Chapters page by hovering your mouse over the My Account tab and expanding the My Account fly-out menu. Once the menu is expanded, click the My Chapters hyperlink to view the My Chapters page. If you are not already logged in, you will be prompted to log in before you can view your My Chapter information.
- Click the hyperlinked chapter name to view the information for that chapter.
There are two types of views for the My Chapter page. These two views are based on the relationship type the individual has to the chapter.
Those individuals that have the chapter/individual relationship type will see the following options:
- Edit Chapter button - allows you to edit the detailed information for the chapter as it displays on eWeb.
- Email hyperlink - allows you to Email an individual member.
- Email All Officers button - allows you to send a group Email to all officers of the chapter.
- Email All Members button - allows you to send a group Email to all members of the chapter.
- Hyperlinked Member Names - clicking a hyperlinked member name will take you to their membership profile page. Here you can modify their position within the chapter (i.e. make them an officer.)
- Add a New Relationship button - allows you to add a new relationship to the chapter.
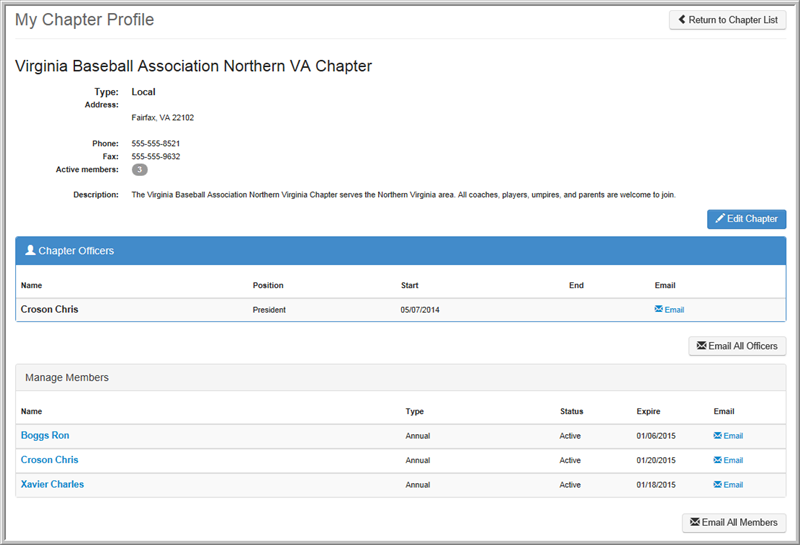
Those individuals that have the individual/chapter relationship type will only see the chapter details and a listing of officers and members for the chapter. Regular members will also have a hyperlink next to each officer's name that will allow them to email that officer.

Adding Chapter Officers on eWeb
Individuals who have the appropriate relationship type with the chapter, will have the ability to add officers to the chapter while on the My Chapters page in eWeb.
To modify records within the chapter on eWeb, complete the following steps:
- Navigate to the Chapter Profile page for the chapter to which you will be adding the officer.
- Click the hyperlinked member name, located in the Manage Members section of the page.

This will open the Chapter Member Profile page. From this page you can review the individual's contact information and/or assign the individual to an officer position within the chapter.
- Click the Assign Position button.
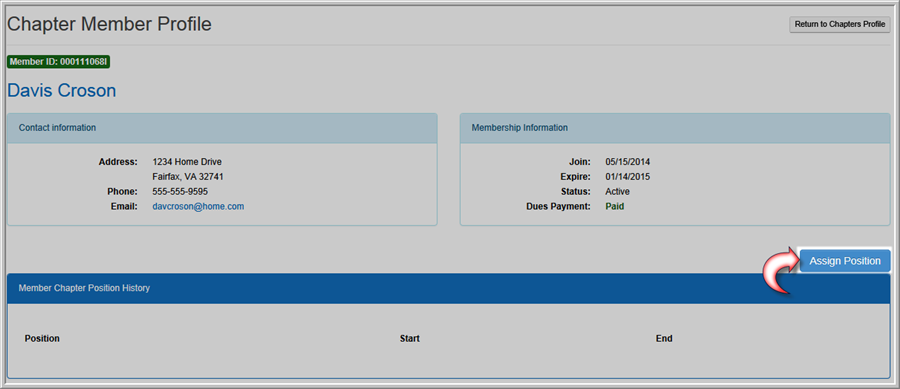
This will open the Add - Chapter Officers pop-up window.
- Select the position that you are assigning this member to by clicking on its name in the position drop-down menu.
- Enter the start and end dates in the start date and end date fields using the MM/DD/YYYY format.
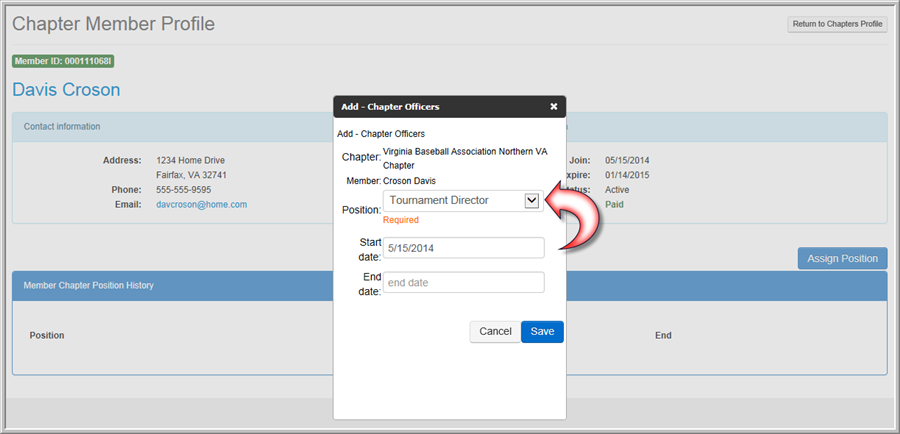
- Click the Save button.
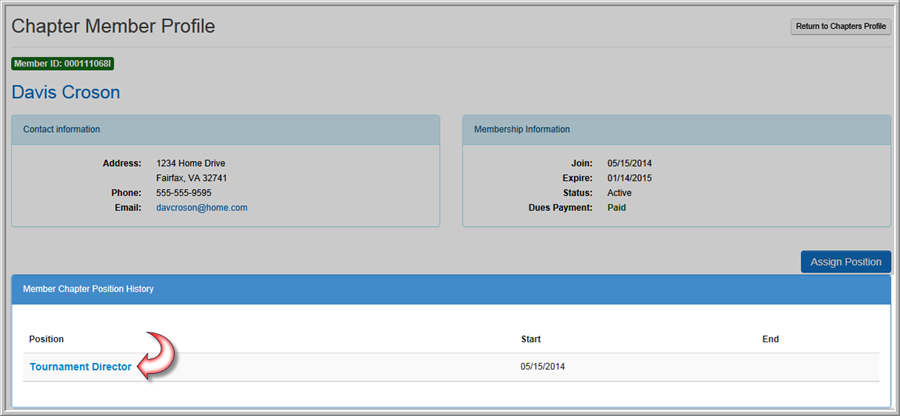
The individual record page will update and show the newly assigned position.
- Click the Return to Chapter Profile link located at the top of the page. This will take you back to the chapter profile on eWeb.
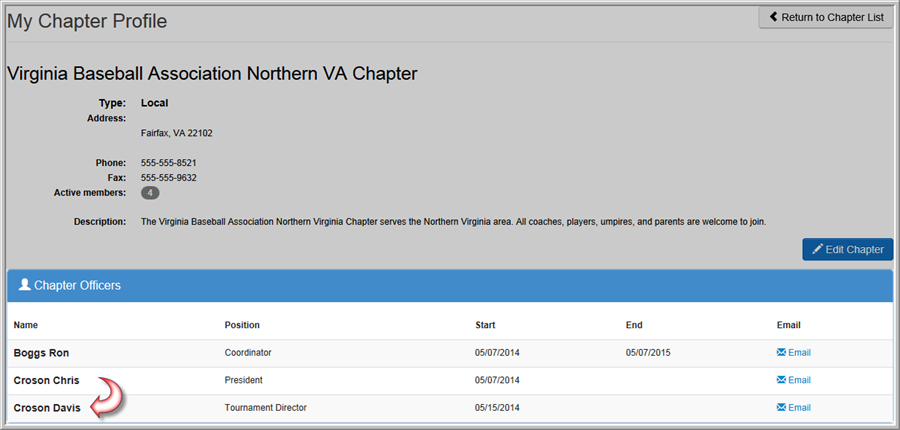
You will see that the new officer you just added, is now displayed (provided the current date is after the start date you set and before the end date.)
Adding Chapter Relationships on eWeb
Chapter relationships can be added on eWeb by chapter members who have the chapter / individual relationship type.
To add a chapter relationship, complete the following steps:
- Navigate to the Chapter Profile page for the chapter to which you will be adding the relationship.
- Click the Add a New Relationship button located in the Chapter Relationships section of the My Chapter Profile page.
This will open the Add a Chapter Relationship page.
- Enter the search criteria for the individual to be added as a chapter relationship.
- Click the Search button.
The Chapter Relationship Individual Search Results page which contains a list of individuals matching your search criteria is displayed.
Example: If the individual you are searching for is not returned in your list of results you can click the Return to Search button to return to the search page and modify your search criteria. From the Search page you can also click the Add a New Individual button to add a new individual to the system and add them as a chapter relationship.
- Click the Add a Relationship button next to the individual whom you wish to add as a chapter relationship.
This opens the My Chapters - Add Relationship page.
- Expand the Type drop-down menu and select the type of chapter relationship you are adding for this individual.
- ind/chapter - This chapter relationship type can view the chapter details but not make any changes. This relationship type also has restricted email abilities.
- chapter/ind - This chapter relationship type has full edit access, email abilities, and relationship management rights.
- Enter the Start Date and End Date for this relationship (if applicable.)
- Click the Save button.
You will receive a confirmation that the relationship has been successfully added to the chapter.
- Click the Finish button.
You are taken back to the My Chapter Profile page where you will see the individual you selected has been added to the Chapter Relationships section of the page.
See Also