Drill Down
|
Access this feature while running reports using Reports>{Any applicable drill down report}> |
Use this form to view report data from the report balances level, down to the individual debits and credits that make up the balance. This helps you quickly identify supporting data related to numbers on a report.
This feature is based on the report setup criteria that was entered on the Report Setup form. (Columns were selected on the Content tab.) Initially, the organization and grouping of data is the same as the printed report. However, columns can be rearranged.
Note: All column headings are dynamic according to what was selected on the Content tab.
You can click the plus (+) sign next to an item to expand the outline and view underlying data. When an item has been expanded, the plus (+) sign becomes a minus (-) sign. To collapse an item, simply click the minus sign. Even though a plus (+) sign appears next to an item, it does not necessarily mean that item is expandable; see Level 5.
Account Level Security allows you to define the account codes and related amounts a user can view in a report. It is available for Level 1 (Balances), Level 2 (General Ledger), and Level 5 (Transaction Detail) of the Drill Down form. Level 5 is always available, while Level 2 only appears when the GL account is not in Level 1. Account Level Security is applied indirectly to Level 3 (Numeric Columns) and Level 4 (Document Detail) from the other levels. When account level security is activated for the organization (Security>Set Up Account Level Segments) and enabled for a user (Security>Set Up Account Level Security), the report only prints and displays account information the user is allowed to see. Note that if a user does not have Account Level Security enabled, they can view all account codes.
If a non-functional Currency is selected on the Options tab, this button is not available for selection.
- You cannot drill down on all columns.
- Section Totals for financial statements (Create Statement Formats>Create Outline tab), do not appear in the drill down.
- Currency fields follow the formatting of the organization's functional currency. The functional currency was determined by the Administrator when the organization was created (File>New Organization>Functional Currency panel).
- Use the following keys to navigate around the form:
- Right Arrow - Expand a section
- Left Arrow - Collapse a section
- Up/Down Arrows - Navigate from one section to the next
- You can find specific transactions by amount using the "Custom" filter on numeric data columns.
- You can click on any column heading to sort it. The column on which items are sorted has
 (ascending order) or
  (descending order) in the column heading. You can also drag and drop the column headings to re-arrange them.
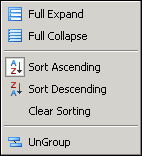
 - There are several options that can be implemented by right-clicking. The following will appear when you right-click on a Level 1 column heading that has been grouped.
- For financial statements, you are not limited to just analyzing revenue and expense data. To drill down on your entire Trial Balance, follow these steps:
- Create a Financial Statement Format (Reports>Financial Statements>Create Statement Formats):
- Statement of Financial Position - with a Statement Type of S/P, and one section with the Section Account Categories set as Net Assets.
- Balance Sheet - with a Statement Type of B/S, and one section with the Section Account Categories set as Current YTD Net Income.
- Statement of Revenues and Expenditures - with a Statement Type of R/E, and one section with the Section Account Categories set as Revenue.
- Assign all General Ledger accounts to that section on the Assign Accounts tab.
- Create a new report that uses the newly created format:
- Reports>Financial Statements>Statement of Financial Position
- Reports>Financial Statements>Balance Sheet
- Reports>Financial Statements>Statement of Revenues and Expenditures
- Set up the report and begin analyzing.

The Full Expand opens all of the rows on the form and Full Collapse closes all of the rows on the forms into the first grouping; Sort Ascending or Sort Descending can be applied to any column and use Clear Sorting to any column that Sort Ascending or Sort Descending has be applied. Use the Group By This Column and UnGroup to organize how the report data is displayed.
 Drill Down.