Deferral Use Cases
This section helps you to understand how the different Deferral Scenarios work using use cases.
One-Time Deferrals Scenario
For non-term-based products such as event registrations, exhibits, and merchandise, you can use one-time revenue deferral by specifying a date in the recognize revenue after date option.
The date in the ‘recognize revenue date’ field for Events or the ‘recognize after’ field for Merchandise determines when NetForum recognizes the revenue from the sale. If the registration or product is sold before the specified recognition date, the revenue is not recognized, and the money goes into deferred revenue. Any money in deferred revenue is recognized when the recognition process is run for the period that ends after the recognition date for the event or product. If the registration or product is sold after the recognition date, closing the batch sends the money directly to revenue for the period ending after the recognition date.
Note: When you close a batch, NetForum creates ledger entries. When you close a period, NetForum recognizes deferred revenue for the recognition dates contained in that period.
Prerequisites
To start this process, you must have accomplished the following in NetForum first:
- Add your Association
- Add a Business Unit for your Association
- Create Fiscal Years and Accounting Periods
- Create G/L Accounts for the Business Unit- the G/L account types must include Deferred, Revenue, and Liability
- Create Invoice Terms in the Invoice Terms tab
- Add Payment methods in the Payment Method
To Create a Deferred Event:
- Go to Event Modules, click Add event and then click Create Event.
- On the Quick add event form, add Event code.
- Select an Event type as required.
- Add a title in the Event Title field.
- Select a Business Unit.
- Enter an amount in the Price/rate field.
- Select G/L Accounts.
- Select Deferred? check box.
- Select deferred G/L Account from the drop-down field.
- Set the date for Recognize Revenue Date.
- Click Save.
To Purchase a Deferred Event:
- Login to iWeb.
- Go to CRM module and expand the Individuals group item and then Find Individual. Search or List individuals to select an Individual.
- On the Individual profile page, click the Event Registration icon.
- In the Add Registration page:
From the Event drop down box select above created event.
Make sure individual name and address are prepopulated.
Select Reg Date.
Click Next.
- In the Add Event Fees from, ensure Fee is selected and then click Skip to Agenda.
- In the Add - Event Registration Wizard, click Review Registration.
- In Centralize Order Entry, make sure there is an event listed in the Line Item section and then click Next.
- In the Individual Event Registration Wizard page, select or create a new batch for the same business unit as used for Event. Select Terms or Prepaid in the type field and fill in the Invoice Terms or Payment Information, as desired. Click Save.
- Go to Invoice Detail Profile page to verify the deferral details.
Deferral Details:
The expected result is shown in the screenshot below:
- Status: Expected (this indicates that the revenue has not been recognized yet and the transactions has not been cancelled or voided)
- Available: This will be the full amount of the deferred line item
- Voided: This should be $0
- Cancelled: This should be $0
- Total Recognized: This should be $0

To complete the Deferral Process and recognize the revenue, close the Batch and the Accounting Period used. Closing the batch will create the G/L entries. Closing the period will recognize the revenue if the recognition date was in the period being closed.
To Close the Batch:
- Go to Accounting module > Batch group item> Find Batch, search/locate your batch based on Business Unit and Accounting Period.
- On the Batch Profile page: close this batch by completing steps below:
Click Edit > populate control total amount and control total count values and click Save.
Select pre-process icon and complete this step.
Select close batch icon and complete this step.
Select post batch icon and complete this step.
- To check the deferral records in the batch, go to the Invoice Tab on the Batch Profile, expand the Deferrals child form.
- Verify the deferral records have been created under deferral child form and verify the following information in Line Item (Subscription):
Recognized
Recognitions Remaining
Amount Recognized
Balance
Adjustments
Next Recognition Amount
To close the Accounting Period:
- Go to the Accounting module > Business Unit group item and click Fiscal year.
- On the Accounting Period profile page, close the period by completing below steps:
Select pre-process icon and complete this step.
Click the recognize revenue icon. Create a new batch to process the revenue recognition process within the same accounting period and then click Save.
Into the Batches child form, locate your recognize revenue batch and click the GoTo arrow to navigate to the Batch Profile. Close the Batch and go back to the Accounting Period profile.
Close the period.
Select pre-process icon and complete this step.
Select close batch icon and complete this step.
Select post batch icon and complete this step.
Select close-period icon and complete this step.
Check the deferral records again - go to the Invoice Tab on the Batch Profile, expand the Deferrals child form.
Verify the deferral records have been created under deferral child form and verify the following information for the line item (event, exhibit, or product):
Recognized (should be 1)
Recognitions Remaining (should be 0)
Amount Recognized (should be the full amount)
Balance (should be 0)
Adjustments (this will vary, but in this simple use case, this will be 0)
Next Recognition Amount (should be 0)
You will notice that the Recognized field shows value as of when the accounting periods are closed.
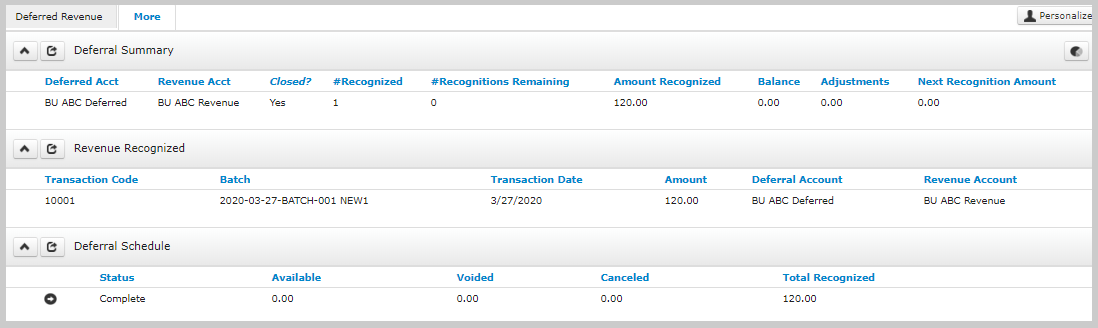
After Closing the Batch and the Accounting Period, verify the deferral details on the Invoice Detail profile. In the Deferral Schedule section, you will see that the Status has changed to Complete and the Total Recognized amount shows full amount. There is no longer anything Available to recognize.
Term-Based Deferrals Scenario
A term-based product is a product that terminates or expires after a set period. A 12-month subscription is an example of a term-based product. Revenue is recognized in increments starting with the term startdate and ending with the term end date, based on the selected recognition frequency: monthly, quarterly, semi-annually, or annually.
If the term dates for a deferred product are changed, as could be the case with a prorated membership, the term length will be either reduced or extended, as appropriate. The amount recognized each month will change to the amount that would be recognized based on the new term. If the term is extended, less will be recognized in the next month(s) as too much revenue has now been recognized. If the term is reduced, additional revenue will be recognized in the next period to catch the deferral up based on the new recognition term.
Note: When the batch closes, revenue is deferred; When the period closes, revenue is recognized.
Prerequisites
To start this process, you must have accomplished the following in NetForum first:
- Add your Association
- Add a Business Unit for your Association
- Create Fiscal Years and Accounting Periods
- Create G/L Accounts for the Business Unit- the G/L account types must include Deferred, Revenue, and Liability
- Create Invoice Terms in the Invoice Terms tab
- Add Payment methods in the Payment Method
To Set Up a Deferred Term-based (Calendar based) Subscription Product:
- Go to Subscriptions module click Add Subscription.
- Fill all the required fields in the Add – Subscription form:
Product Code
Product Name
Price Rate
Issues per Year
Grace issue (if required)
Term length (as required)
Start Date
Select Calendar Based check box
Start month
Sell for next year after month
Sell for next year after day
Business Unit
Select GL Accounts
Select the ‘Deferred?’ check box
Select a deferral GL Account
Revenue recognize frequency
- Click Save.
To Purchase a Deferred Term-based Subscription:
- Go to Individual Profile and click Invoice button.
- From the COE page, click Add Product button and click Subscription.
- Select the subscription created in the above steps.
- Click Save and Finish button.
- Select a Business Unit and create or select a Batch for the same Business Unit.
- In the Type field, select Term or Prepaid.
- Complete Invoice Terms or Payment Information, as needed
- Click the Add Order button.
- Go to Subscription tab > Active Subscription child form, an added subscription will be listed.
- On the Subscriber Profile page, verify that the data match with the set at purchase - Pay close attention to the Terms (start date and end date).
Go to Invoice Detail Profile page to verify the deferral details.
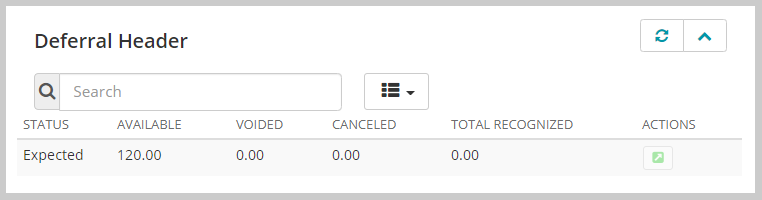
Deferral Details:
The expected result is shown in the screenshot below:
- Status: Expected (this indicates that the revenue has not been recognized yet and the transactions has not been cancelled or voided)
- Available: This will be the full amount of the deferred line item
- Voided: This should be $0
- Cancelled: This should be $0
- Total Recognized: This should be $0
To complete the Deferral Process and recognize the revenue, close the Batch and the Accounting Period used. Closing the batch will create the G/L entries. Closing the period will recognize the revenue IF the recognition date was in the period being closed.
To Close the Batch:
- Go to Accounting module > Batch group item> Find Batch, search/locate your batch based on Business Unit and Accounting Period.
- On the Batch Profile page: close this batch by completing steps below:
Click Edit > populate control total amount and control total count values and click Save.
- Select pre-process icon and complete this step.
- Select close batch icon and complete this step.
- Select post batch icon and complete this step.
- To check the deferral records in the batch, go to the Invoice Tab on the Batch Profile, expand the Deferrals child form.
- Verify the deferral records have been created under deferral child form and verify the following information for the applicable Line Item (Subscription):
Recognized
Recognitions Remaining
Amount Recognized
Balance
Adjustments
Next Recognition Amount
To close the Accounting Period:
- Go to the Accounting module > Business Unit group item and click Fiscal year.
- On the Accounting Period profile page, close the period by completing below steps:
- Select pre-process icon and complete this step.
- Click the recognize revenue icon. Create a new batch to process the revenue recognition process within the same accounting period and then click Save.
- Into the Batches child form, locate your recognize revenue batch and click the GoTo arrow to navigate to the Batch Profile. Close the Batch and go back to the Accounting Period profile.
- Close the period.
- Select pre-process icon and complete this step.
- Select close batch icon and complete this step.
- Select post batch icon and complete this step.
- Select close-period icon and complete this step.
-
Check the deferral records, go to the Invoice Tab on the Batch Profile, expand the Deferrals child form.
-
Verify the deferral records have been created under deferral child form and verify the following information in Line Item (Subscription):
-
Recognized
-
Recognitions Remaining
-
Amount Recognized
-
Balance
-
Adjustments
-
Next Recognition Amount
You will notice that the Recognized field shows value as and when the accounting periods are closed. As each Accounting Period is closed, NetForum will complete the remaining recognitions.
-
After Closing the Batch and the Accounting Period, verify the deferral details on the Invoice Detail profile. In the Deferral Schedule section, you will see that the Status has changed to Recognizing and the Total Recognized amount shows a partial amount. The remaining balance will still be Available to recognize.
Issue-Based Deferrals Scenario
A subscription can be set up either as a term-based product, which means it terminates or expires after a set period (e.g., 12-month period), or based on a specific number of issues to be fulfilled.
Issue-Based deferrals are only applicable for Subscriptions that are set on certain terms to fulfil (number of issues). This section will explain the issue-based subscription scenario and their deferred revenue recognition.
Prerequisites
To start this process, you must have accomplished the following in NetForum first:
- Add your Association
- Add a Business Unit for your Association
- Create Fiscal Years and Accounting Periods
- Create G/L Accounts for the Business Unit- the G/L account types must include Deferred, Revenue, and Liability
- Create Invoice Terms in the Invoice Terms tab
- Add Payment methods in the Payment Method
To Set Up a Deferred Issue-based Subscription:
- Go to Subscriptions module click Add Subscription.
- Fill the required fields as listed below and select the Deferred check box.
Price – 120
Shippable – Selected
Track by issue – Selected
Issues per year – 6
Term Length – Yearly
-
Set the Deferred Account option in Deferred Account field.
-
Click Save. You will be redirected to the Subscription profile.
-
On Subscription Profile, Click the Issues link.
-
On Issues popup form, Click Add Record icon on the issues grid.
-
Fill issue fields as following:
-
Issue number – 1
-
Issue start date – 1/1/2018
-
Issue end date – 2/28/2018
-
Fulfillment start date – 1/5/2018
-
Fulfillment end date – 2/25/2018
-
-
Click issues button and add the remaining five issues in the same manner.
-
Verify Issues added have correct dates, one issue each two months
-
Set the fields and click Save.
-
Price – 20
-
G/L Account Information
-
-
11. On subscription profile update the issue to sell and issue to fulfil.
-
Click on the edit link, set the following fields:
-
Current issue for fulfillment is the first issue that was created.
-
New subscriber start issue is the first issue that was created.
-
-
Click on Save button.
The issue-based subscription is created and is ready to sell.
-
To Purchase an Issue-Based Subscription:
- Go to Individual Profile, click on Invoice button.
- From the COE page, click Add Product button and Select Subscription.
- Set Transaction Date field within the range of the ‘issue fulfill’ range dates set up above.
- Set the other required fields.
- Click the Save & Finish button.
- Select a Business Unit and create a batch for the same Business Unit.
- In the Type field, select Terms.
- Select a required option in Invoice Terms drop-down field.
- Click the Add Order button.
- Go to Subscription tab > Active Subscription child form, an added subscription will be listed.
- On the Subscriber Profile page, verify that the data match with the set at purchase - Pay close attention to the Terms (start date and end date).
- Go to Invoice Detail Profile page to verify the deferral details.
Deferral Details:
The expected result is shown in the screenshot below:
-
Status: Expected (this indicates that the revenue has not been recognized yet and the transactions has not been cancelled or voided)
-
Available: This will be the full amount of the deferred line item
-
Voided: This should be $0
-
Cancelled: This should be $0
-
Total Recognized: This should be $0
To complete the Deferral Process and recognize the revenue, close the Batch, fulfill the Subscription issues.
To Close the Batch:
- Go to Accounting module > Batch group item> Find Batch, look for the batch created for the purchase.
- On the Batch Profile page: close this batch by completing steps below:
Click Edit > populate control total amount and control total count values and click Save.
Select pre-process icon and complete this step.
Select close batch icon and complete this step.
Select post batch icon and complete this step.
-
Check the deferral records, go to the Invoice Tab on the Batch Profile, expand the Deferrals child form.
-
Go to the Invoice Detail Profile and Select the Deferred Revenue and then expand the Deferral Schedule section.
-
Verify deferral record created under deferral schedule child form and verify the following:
-
Status - Expected
-
Available - 0.00
-
Voided - 0.00
-
Canceled - 0.00
-
Total Recognized - 0.00
-
-
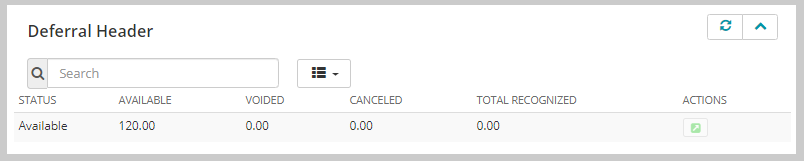
Go to Deferral Header Profile.
-
Verify the deferral record created under the deferral schedule child form and verify the following:
-
deferral status - Expected
-
total recognized - 0.00
-
deferral price - 0.00
-
To Fulfill the Subscription:
- Go to Subscription module > Overview group item and Select Subscription Fulfillment.
- Set the required fields as follow:
Select the Subscription in the Subscription field.
Fulfillment Code: Auto populated
Create a Deferred revenue recognition batch.
Fulfillment Date: set date in the range of the first issue to fulfil.
Update current issue field must be Selected.
Update start issue field must be Selected.
Select Issues to Fulfill must be Current Issue
-
Click Save and wait until the task gets completed.
-
Go to Subscriber profile, expand the Issues tab
-
Subscriber Profile page gets loaded, Verify the following:
-
At Subscription Information section verify the following fields:
-
Issues - 6
-
Fulfilled - 1
-
Remaining fields - 5
-
-
At Issues Fulfilled child form a record will be listed.
-
-
Click the invoice code link, on invoice profile, select Details Tab, expand Line Items child form click Go to
 icon for the record listed.
 -
Select Deferred Revenue tab on Invoice Details Profile form, expand Deferral Summary child form.
Verify following in the deferral records:
-
Recognized – 0
-
Recognitions Remaining – 0
-
Amount Recognized – 20.00
-
Balance – 0
-
Next Recognition Amount – 10.00
Verify the deferral record created under deferral schedule child form and verify the following:
-
Status - Recognizing
-
Available - 0
-
Voided - 0
-
Canceled - 0
-
Total Recognized – 20.00
Verifying following in the Deferral header Profile page:
-
Deferral Status: Recognizing
-
Deferral Balance - 0
-
Total Recognized - 20
-
Period recognized - 1
-
Period remaining - 1
Verify that records have been created under "Recognized" child form:
-
Recognized period - 201802
-
Recognized amount - 20
-
Repeat the above steps of fulfilling the subscription to complete the remaining issues to fulfil and recognize the deferred revenue.
Note: When you sell an issue-based subscription, the recognition will be done as part of the subscription fulfilment process. In this case the recognition amount will be based on the number of issues being fulfilled divided by the number of issues purchased.
To close the Accounting Period:
- Go to the Accounting module > Business Unit group item and click Fiscal year.
- On the Accounting Period profile page, close the period by completing below steps:
- Select pre-process icon and complete this step.
- Click the recognize revenue icon. Create a new batch to process the revenue recognition process within the same accounting period and then click Save.
- Into the Batches child form, locate your recognize revenue batch and click the GoTo arrow to navigate to the Batch Profile. Close the Batch and go back to the Accounting Period profile.
- Close the period.
Select pre-process icon and complete this step.
Select close batch icon and complete this step.
Select post batch icon and complete this step.
Select close-period icon and complete this step.
-
Check the deferral records, go to the Invoice Tab on the Batch Profile, expand the Deferrals child form.
-
Verify the deferral records created under deferral child form.
You will notice that the Recognized field shows value as and when the accounting periods are closed. As each Accounting Period is closed, NetForum will complete the remaining recognitions.
After Closing the Batch and the Accounting Period, verify the deferral details on the Invoice Detail profile. In the Deferral Schedule section, you will see that the Status has changed to Recognizing and the Total Recognized amount shows a partial amount. The remaining balance will still be Available to recognize