Collective Dues (Union Dues)
Collective Dues (also known as Union Dues) are used to allow an organization to pay the membership dues to another organization for its members.
For example, an individual may belong to the Fairfax, Virginia Association of Umpires. As a part of that membership, the individual also gets a membership in the Virginia Association of Umpires. Rather than the individual paying for the second membership, it is included in their dues to the Fairfax Association and they make the payment to the Virginia Association on the individual's behalf.
Workflow
To enable the Collective Dues functionality, several steps must be taken, as follows:
- Turn on the CollectiveDues-Enable system option.
- Set up the Local Member Relationship type.
- Set up the local organization type.
- Create the organization as a local organization type.
- Add local member relationships to the organization.
- Add a local membership package to an association.
- The local organization (set up earlier) purchases a local membership package from the association.
- Generate the installments for the order that was generated when the local membership was purchased.
- Submit payments to pay the membership dues for all of the individuals that have a local member relationship with that organization.
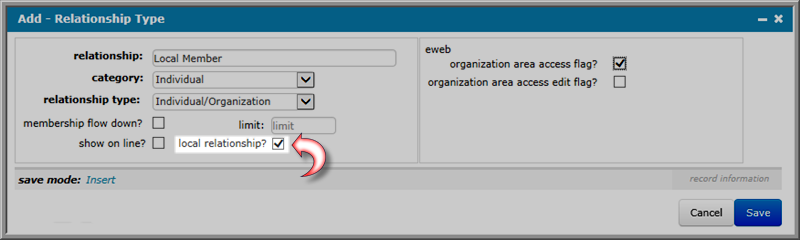
Setting Up the Local Member Relationship Type
Please view the Setting Up Relationship Types help topic for complete details on setting up relationship types.
When setting up a local member relationship type you must click the local relationship check box.
Setting Up the Local Organization Type
Organizations that have been set up as local organizations will have the local member relationship type available. Before you can set an organization up as a local organization you must first set up a local organization type.
Please view the Setting Up the Organization Type help topic for complete details on setting up an organization type.
You must click the local organization type? check box to enable the organization type to be used when setting up a local organization. Local organizations are the only types of organizations that can take advantage of the collective dues functionality.
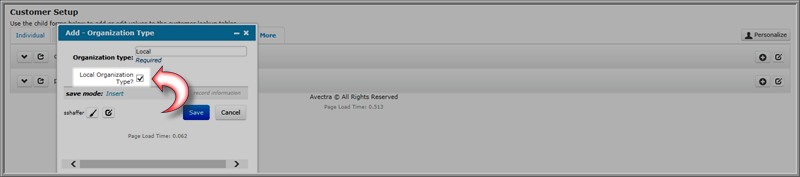
Note: It is a good practice to name local organization types with the word local somewhere in their name. While this isn't required, it does make it easier for users to discern the local organization types from the list of organization types available in the organization type drop-down menu used when setting up an organization.
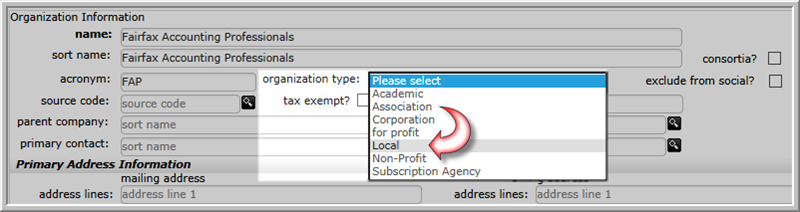
Creating a Local Organization
Local organizations have access to the local member relationship type and are also required when using the collective dues functionality.
Please view the Adding an Organization help topic for complete details on how to set up a new organization.
When creating a local organization you must make sure you select an organization type that has been enabled as a local organization type.
Adding a Local Membership Relationship to an Organization
Individuals who have a local member relationship to an organization are eligible to have their membership invoices processes using the collective dues functionality.
Individuals with a local member relationship to an organization can be viewed on the local member relations child form which is found on the Relations tab in the child forms section of the Organization Profile.

Adding a Local Membership Package
A local membership packages is required for the Collective Dues to function properly. This type of membership package simply affects the way the price is calculated during the initial checkout phase as well as after the invoices have been generated.
Note: All local membership packages must be set to allow for installments.
To add a local membership package, complete the following steps:
- Navigate to the Association Profile.
- Click the Membership tab to view the corresponding child forms.
- Complete the steps needed to add a new member type.
- Click the Dues tab to expand the related child forms.
- Click the Add
 icon located on the membership packages child form.
 - Complete the steps necessary to add a new membership package.
Note: You must click the collective dues package? check box and the allow installment? check box to classify this membership package as a local membership package.
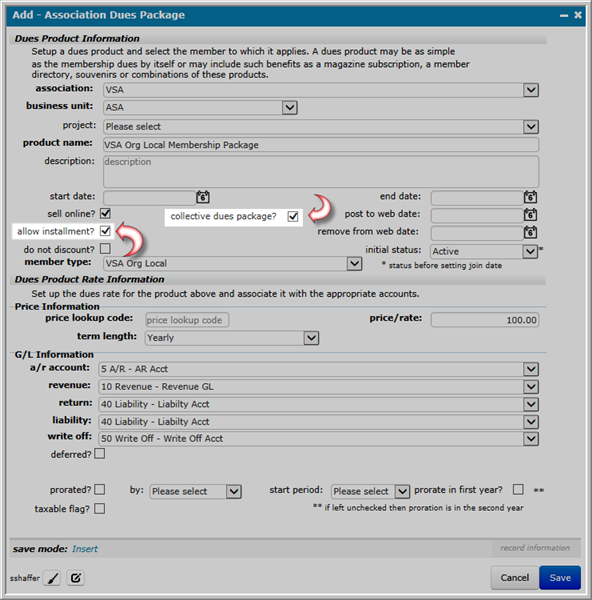 Local Membership Package Check Boxes Highlighted
Note: It is a good idea to use the word "local" in this member type to make it easier to discern in a list of member types. This member type will be tied to the local membership package. In addition, you must also add a status to your new member type in order to use it.
Purchasing a Local Membership
Adding a local membership is required for the collective dues process to function.
Note: Local memberships can only be purchased by local organizations.
To add a local membership, complete the following steps:
- Navigate to the local organization's profile page.
- Click the add membership icon.
 Add Membership Icon Highlighted on the Organization Profile
This will open the Membership Wizard.
- The transaction date will default to today's date but can be modified if necessary.
- Enter the first few characters of the source code in the source code field and click the search icon (if applicable.)
- Expand the association drop-down menu and select the association that is offering the local membership you are purchasing for the organization.
Once the association has been selected, the member type, member status, and member package drop-down menus will become available and will be populated with the member types, member statuses, and member packages the organization qualifies for.
- Expand the member type drop-down menu and select the member type that has been set up for a local organization.
- Expand the status menu and select the status that those receiving this membership will have initially.
- Expand the member package drop-down menu and select the membership package that has been set up for local organizations.
Once a member package has been selected, the renewal package and linkable membership drop-down menus will become available.
- The renewal package drop-down menu will auto-populate with the package being purchased, but can be modified if a different package will be offered upon renewal.
For example, perhaps an "introductory" package is being purchased and is only available for first time members and the "standard" package will be used when the membership renews.
- Expand the linkable membership drop-down menu and select the membership that this newly purchased membership will be linked to (if applicable.)
- Click the auto-pay membership? check box if this membership should be automatically paid upon renewal.
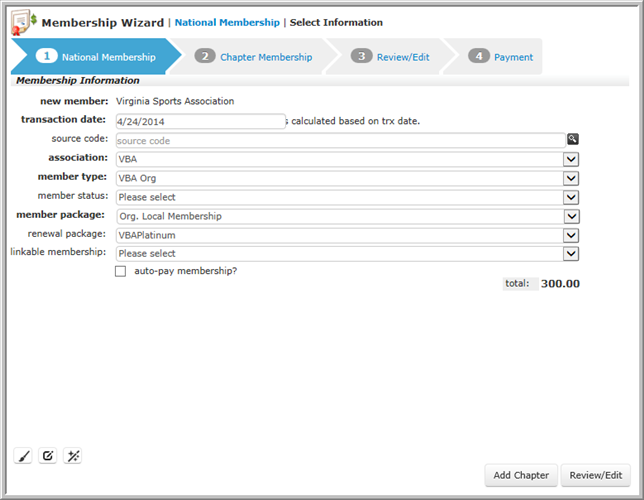 Membership Wizard Form Completed with Local Membership Information Completed
 - Click the Add Chapter button if you wish to add a chapter membership to this membership purchase.
- Click the Review/Edit button to proceed to the checkout portion of the Membership Wizard.
This will open the Review/Edit step of the Membership Wizard.
- Review the Bill To and Ship To information and make any corrections that are needed.
Note: You will notice that the net balance for this order shows as zero initially. This is because that local membership package costs are calculated based on the number of local member relationships the organizations has at the time the invoice is generated. At this point, no invoice has been generated so there is no balance due.
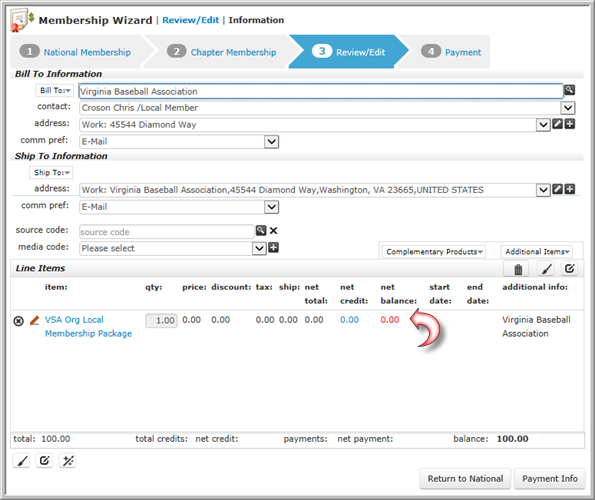 Review/Edit Step of the Membership Wizard with the Zero Net Balance Highlighted
 - Clicking the Return to National button will take you to the previous step in the wizard.
- Click the Payment Info button to proceed to the payment information step.
- Complete the payment steps to complete the order.
Note: You must select installment as the payment type in the type drop-down menu.
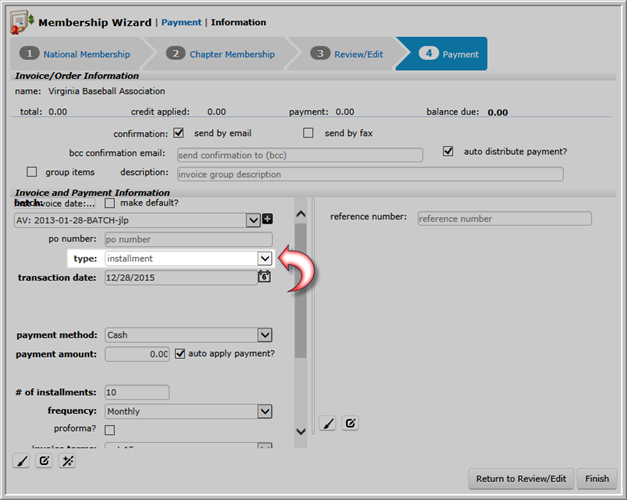 Payment Type Set to Installment
 - Click the Finish button.
You will be taken back to the Organization Profile.
Generate the Invoices for the Local Membership Purchase
To generate the invoices for the local membership purchase, complete the following steps:
- Open the Orders tab on the Organization Profile. You may need to click the More tab to view the profile fly-out menu that lists all of the available tabs.
- Expand the installment orders child form. This displays all of the current installment orders the organization currently has.
- Click the GoTo
 icon next to the installment order for the local membership purchase.
 Installment Orders Child Form with Local Membership Order Highlighted
This will open the Order Profile for that order.
- Click the generate next installment icon.
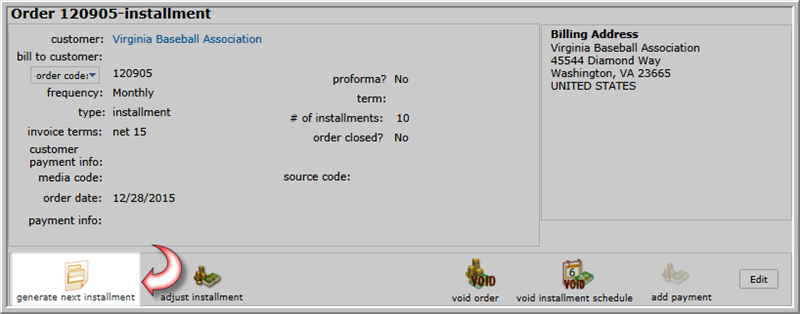 Generate Next Installment Icon Highlighted
This will open the Generate Next Installment pop-up window.
- Expand the batch drop-down menu and select the batch that will be used to process this transaction.
- The transaction date field will default to the date the next installment is due. You can modify this date if needed.
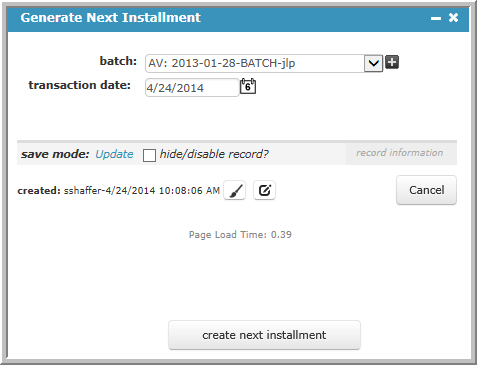 Generate Next Installment Window with Fields Completed
 - Click the create next installment button.
You will be prompted to confirm this action.
- Confirm that you wish to generate the next installment.
The newly generated installment will now be visible as an invoice on the invoices child form (located under the Invoices tab on the Order Profile.)
Submitting a Collective Dues Payment
A collective dues payment can be submitted via the Organization Profile or the Invoice Profile. Both profiles have the collective payment icon available.
To submit a collective dues payment, complete the following steps:
- Navigate to the Organization Profile for the organization that purchased the local membership, or the Invoice Profile for one of the generated installments for the local membership order.
- Click the collective payment icon.
This will open the Centralized Order Entry - Distributed - Select Invoices to Pay pop-up window.
- Enter the first few numbers for the invoice you wish to pay in the invoice number field. (If accessing this page from the Invoice Profile this number will be pre-populated for you.)
- Enter the purchase order number in the po number field if applicable.
- The customer name field will auto-populate with the name of the organization that purchased the local membership.
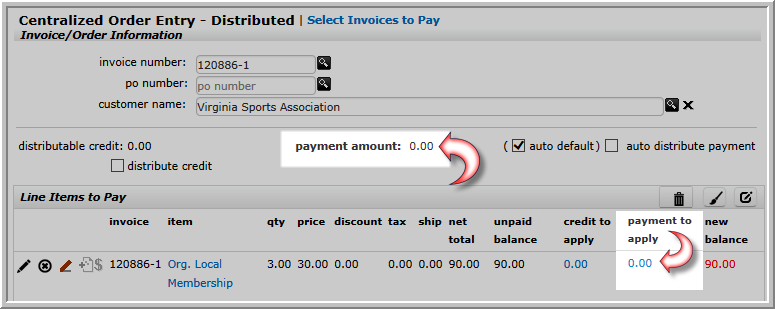
The Line Items to Pay section will display the line items from the selected invoice.
The qty column displays the number of local member relationships the organization currently has.
The price column displays the total cost of the local membership divided by the number of installments.
The net total column displays the qty x price. This will be the total amount due for this installment payment.
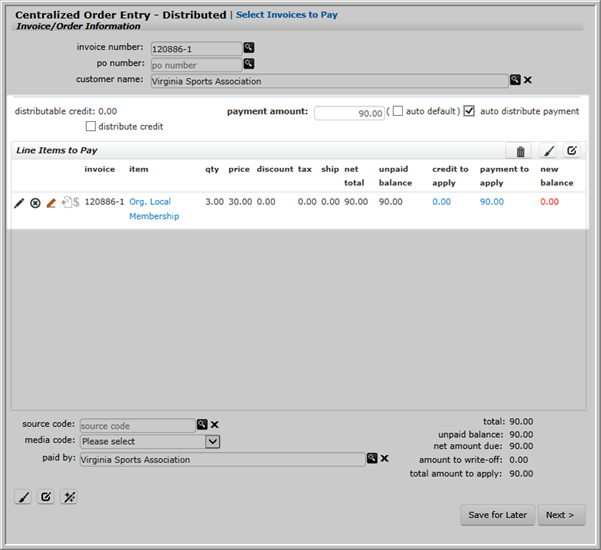 Centralized Order Entry Screen Showing Installment Amount Due
Example: In the image above, you see the qty column displays a 3. This means there are three individuals with a local member relationship to the organization. The price column displays $30.00 which is calculated based on 10 installments for a $300.00 local membership. The net total column displays $90.00 which is reflective of the three individuals with the local member relationship times the price.
Payment Options
There are three payment options available to you when using the collective dues process, as follows:
- Auto Default and Auto Distribute Payment CheckedChecking both the auto default and auto distribute payment check boxes will enter the full amount of the invoice in the payment to apply field.
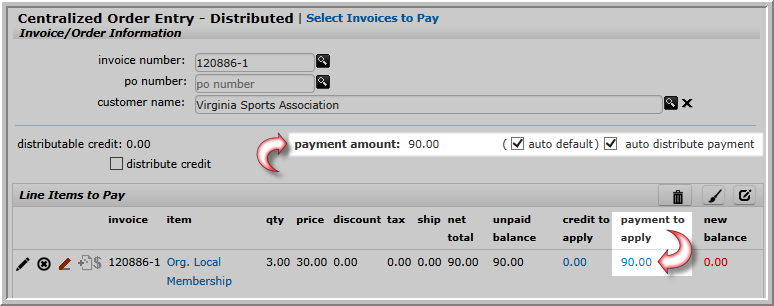 Collective Dues Payment Screen with Auto Default and Auto Distribute Payment Check Boxes Checked
 - Auto Default Unchecked and Auto Distribute Payment CheckedUnchecking the auto default check box will enable the payment amount field for editing. You can enter any amount desired in this field (under paying will cause a balance to remain due, overpaying will create a credit.) Clicking the auto distribute payment check box will distribute the payment amongst the line items for that invoice.
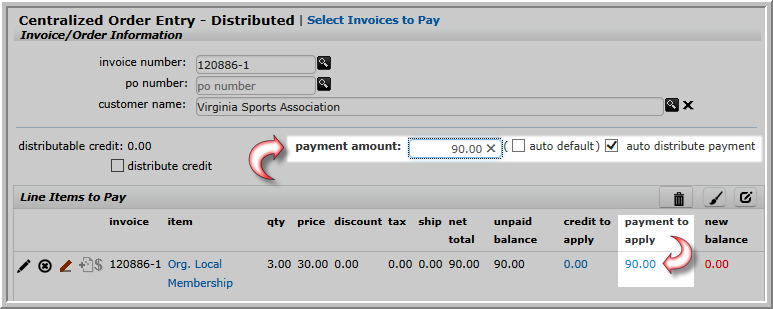 Collective Dues Payment Screen with Auto Default Check Box Unchecked and Auto Distribute Payment Check Box Checked
 - Auto Default Checked and Auto Distribute Payment UncheckedThis is the default setting. In this setting, the payment amount field shows 0.00 and is not editable. To enter a payment:
- Click the hyperlinked amount in the payment to aaply column. This will open the Edit - Invoice Detail pop-up window.
 Payment Settings Shown and Hyperlinked Amount Highlighted
 - You can either enter the amount to be paid in the payment to apply field (entering less than the full amount will result in a balance due for the invoice, overpaying will create a credit) or you can scroll down and manually enter the amounts to be applied to each individual line item on the invoice. Those individual amounts will be totaled after you click the OK button.
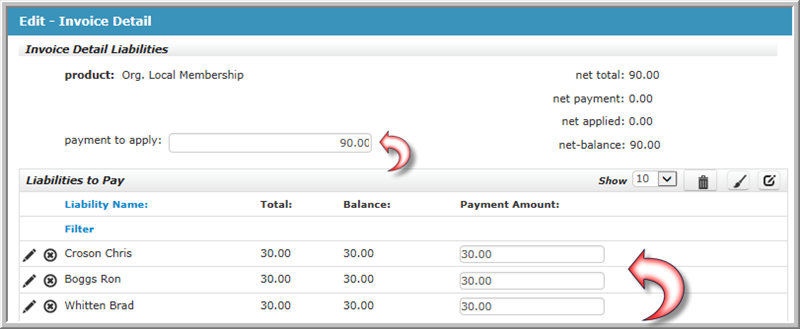 Payment to Apply Amount Entered
 - Click the OK button.
The payment amount field and the payment to be applied column will refresh with the amount that was entered.
 Payment Amount Field and Payment To Apply Column Updated
- Click the hyperlinked amount in the payment to aaply column. This will open the Edit - Invoice Detail pop-up window.
- Auto Default and Auto Distribute Payment CheckedChecking both the auto default and auto distribute payment check boxes will enter the full amount of the invoice in the payment to apply field.
- Click the Next button.
- Complete the payment process as you normally would using Centralized Order Entry.
Purchasing Different Member Types in the Same Order
It is possible to configure the collective dues functionality to process multiple member types in the same order and generate the appropriate installments.
For example, suppose the Fairfax Local Education Association wishes to purchase two professional membership packages and one support professional membership package to the Northern Virginia Education Association. Once the invoice is created, installments must be generated for this order that appropriately pay for the two different member types separately as well as note which members have which membership.
In order for this scenario to work, you must complete the following steps:
- Set up the relationship types.
In this case you are setting up both the professional relationship type and the support professional relationship type as local relationship types
- Set up the organization (Fairfax Local Education Association) as a local organization.
- Add all of the individuals to this organization (Fairfax Local Education Association) with their respective relationship types.
- Create membership packages for the larger association (Northern Virginia Education Association) with the following characteristics:
- Professional Membership - Member Type = Professional, Collective Dues Package = Yes.
- Support Professional Membership - Member Type = Support Professional, Collective Dues Package = Yes.
- The local organization (Fairfax Local Education Association) then purchases the desired quantity of each membership package as part of the same order.
- Create a new stored procedure for every membership package contained in the order that was placed containing multiple membership packages.
This new stored procedure will only contain individuals whose member type = the member type of the membership package purchased.
- Set the new stored procedures in the CollectiveDues-CustomDuesCalculationSP system option.
- Generate the installments for the invoice (for this order.)
The installments will correctly calculate the amount due based on the quantity and type of membership packages purchased in the order as well as list the individuals who purchased each membership package by member type.
Note: The collective dues calculation process works because there is a stored procedure set up to perform these calculations. This stored procedure is set in the CollectiveDues-CustomDuesCalculationSP system option. However, this stored procedure has the ability to be overridden, which is what will be done in order for this scenario to function properly.