
How to Link Directly to a Product in the Online Store
Most often you will want your customers to browse your Online Store so that they may see all your Association has to offer. Sometimes you will also want to link directly to a product through your marketing and e-mail efforts. You may have a large event coming up and, as part of a promotional e-mail, want the customer go directly to the event from your e-mail so that he or she can register right away. Or you might have an exciting and new featured product that you want to showcase to a Mailing List. In each of these scenarios, you can easily set-up a new or existing template to include links directly to those individual products in the Online Store.
This topic will demonstrate how to set up a simple template for a product announcement, such as an event, that links directly to the event from your email and also how to modify it in the future when you have a new product to announce so that you can use the same template multiple times.
To set-up a direct link to a product in the Online Store, the following steps must be taken:
- Obtain the URL of the product you want to direct link to from your marketing templates.
- Modify your marketing template to hyperlink to your product URL.
- Test your template.
Also, you can modify your template as needed by obtaining new Product IDs of items you want to direct link to in the future.
Each step is discussed in more detail below.
Obtain the URL of the Product
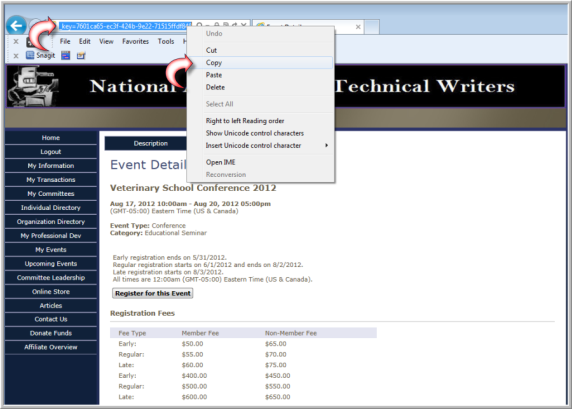
The first step is to find the URL of the product you want to direct link to in your marketing template. This is easily accomplished by going to the Online Store yourself and searching on the product so that you can obtain its URL in your browser’s address bar. In this example, we will be direct linking to an event in our e-mail so, once the event is placed on the Online Store, the URL for that event is found by accessing that event in the Online Store and copying the URL of the product in the browser’s address bar as seen in the image below.
Important: For Events and Sessions, be sure to click the View Event Details or View Session Details link to be in the Details screen before copying the URL address.
Important: Make sure that an entire URL address is highlighted before you copy it.
Once you have copied the URL to your clipboard, proceed to the next step.
Modify your Marketing Template to Hyperlink your Product URL
Once you have set-up a template to use for direct linking to your Online Store you will only need to do so once no matter the type of product you use – assuming that it is generic enough to refer to multiple products. Product IDs are easily obtained and replaced without needing to obtain the complete URL for each product every time.
In the image below, the template has been modified and hyperlinks inserted by using the Insert Hyperlink button so that when “Click here for our newest upcoming event” (you may hyperlink any text you feel is appropriate in your own template) is clicked by the e-mail recipient, the hyperlink will jump directly to the URL that was copied from the Online Store’s browser address bar in the previous step.
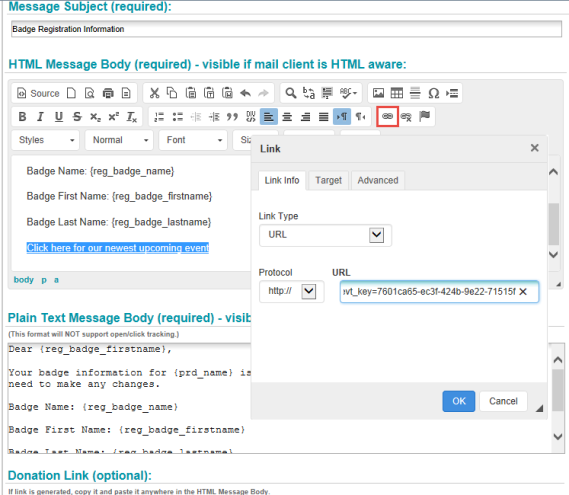
Make sure that you have pasted the entire URL address you copied from your browser’s address bar into the URL field of the Hyperlink window otherwise your e-mail link will not work correctly. Once you have inserted the direct link hyperlinks where appropriate within your templates, you should test it thoroughly before sending it. To summarize, follow these steps to insert a hyperlink:
- Open your marketing or mailing list template
- Highlight the text that your users will click to access the product, event, etc. in the Online Store when they receive the e-mail you send
- Click the Insert Hyperlink button.
- In the Hyperlink dialogue box paste the URL you obtained when you copied the product’s URL address from your browser address bar in step one (see Obtain the URL of the Product for more information)
- Click the Okay button to save
- Repeat this step for each section in your template where you want to direct-link to a product in your Online Store.
Test Your Template
- You should always test your templates and hyperlinks before you send out mass mailings.
- Temporarily set the Recipient Type for this message to Individual.
- Send a test message to yourself.
- After the test is complete, edit this message and reset the Recipient Type back to what you want.

See Sending a Test E-mail for more information.
Modify your Template as Needed by Obtaining New Product IDs
Once you have your templates and hyperlinks set-up, you might decide to feature a different event or product in your marketing efforts. This is easily accomplished by obtaining the Product ID of the new product or event, and then modifying your existing hyperlinks in your template with the new Product ID.
To obtain the Product ID:
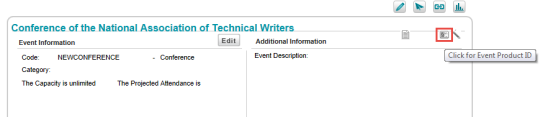
- Navigate to the Profile page for the product.
- Click the Product ID icon.
- On the Product ID Information form, click the Copy to Clipboard icon next to the Product ID key.
- Click Close.

To modify the hyperlink on the template:
- Open the template.
- Highlight the hyperlinked text.
- Click the Insert Hyperlink button.
-
On the Link form, highlight only the Product ID part of the URL.
In the example above, this is the ID after &evt_key=
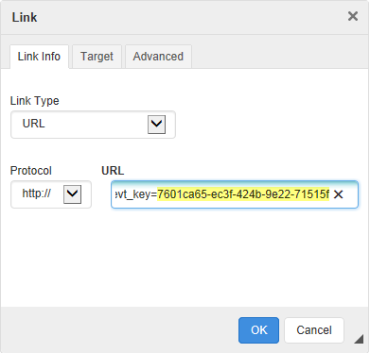
Tip: If you are replacing a product instead of an event, then the Product ID is after &prd_key.
- Right-click and click Paste to paste the new Product ID (which is on your Clipboard) into the URL box.