Open topic with navigation
Using the Membership Demographics Transfer Process
The Membership Demographics Transfer
is a bulk process that transfers the Primary
Membership demographics to an individual’s Customer
Profile. By default, if the individual already has data in
the customer demographics fields, that data will be overwritten with the
membership demographics when this process is run. This process can be scheduled to run in the future, or it can be run
immediately.
Note: To run this process, you must first map the demographics between the
Membership Profile and the Customer Profile. Once the
mappings have been completed, they can be saved and re-used.
To navigate to the Demographic Transfer form and access membership demographics transfer options:
- Hover over the Modules tab in the top navigation bar. In the fly out menu, click CRM.
- On the CRM /
Overview page, expand the Membership Actions group item and click Membership Demographic Transfer.
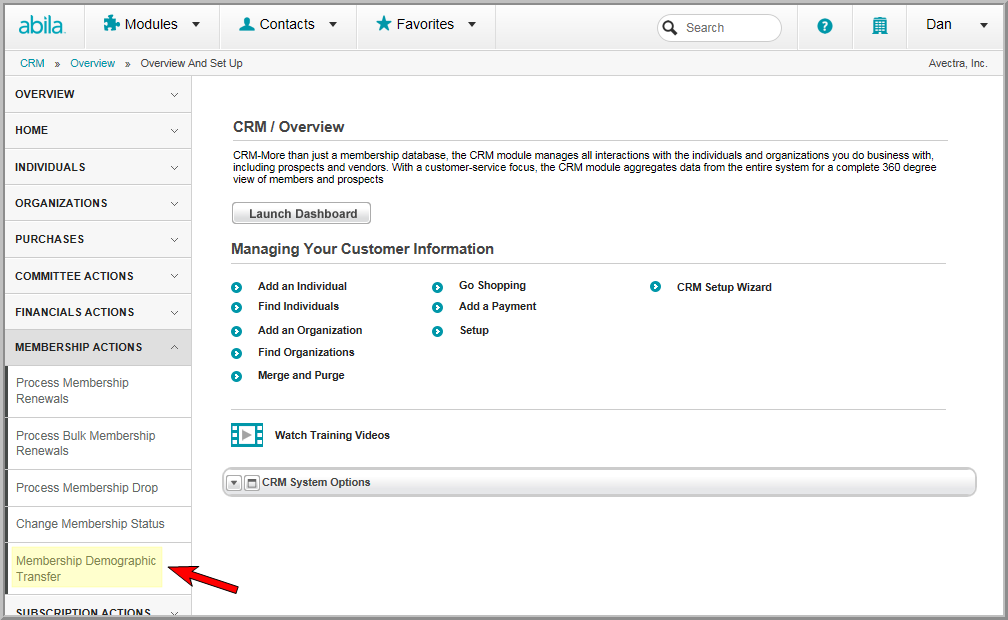
The Demographic
Transfer form will appear. From the Demographic Transfer form, you can add a new demographic mapping and run the demographic transfer process.
Adding a New Demographic Mapping
To add a new demographic mapping:
- On the Demographic Transfer form, click the Add
button to add a new demographic mapping. This opens theDemographic Transfer—Add Demographic
Mapping form.
- Enter the name for the mapping in the Mapping
Name field (required).
- Expand the Memberships
drop-down menu and select the membership that will be used to populate
the individual demographics in the Individual
Profile (required).
Once a Member
Type is selected in the Memberships
drop-down menu, the list of demographics for that Member
Type will be displayed under the Membership
column. Demographics will vary depending on what you have set up in your own system.
If the customer type or the member
type profile is set to individual, available demographics in the Individual Profile
will be displayed under the Customer
column in a series of drop-down menus. Each drop-down menu contains
several options that correspond to the Membership
demographic type (string, date, etc.)
Tip: If the
membership you select does not have any demographics set up,
a warning message will appear on the Demographic Transfer—Add Demographic Mapping form.
Navigate to the Member
Type Profile and set up the necessary demographics.
- Work through the list of Membership
demographics and expand the corresponding Customer
drop-down menu and match the Membership
demographic to the desired Customer
(Individual) demographic.
The Customer
demographic you choose for each Membership
demographic will be the one that is overwritten when a new member registers. Demographics listed in the Customer
drop-down can only be used once per mapping.
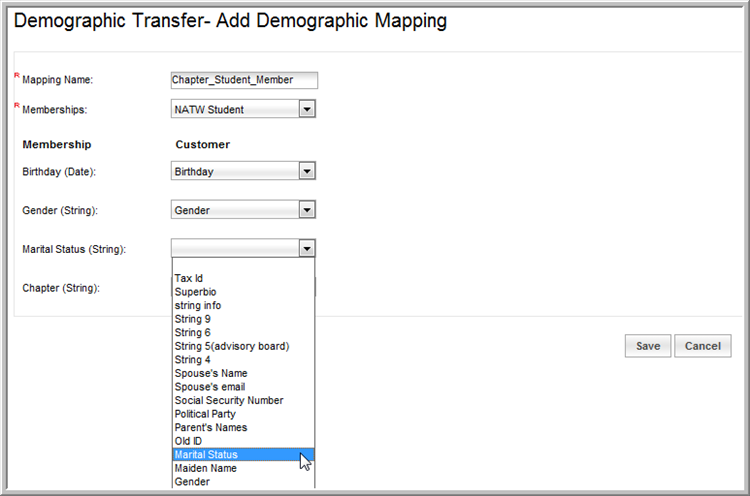
- Once the mapping process is complete, click the
Save button.
The Demographic
Transfer—Membership Demographic Transfer form will appear. From this
form, you can run the demographic transfer process, described below.
Running the Demographic Transfer Process
To run the Membership Demographic Transfer
process:
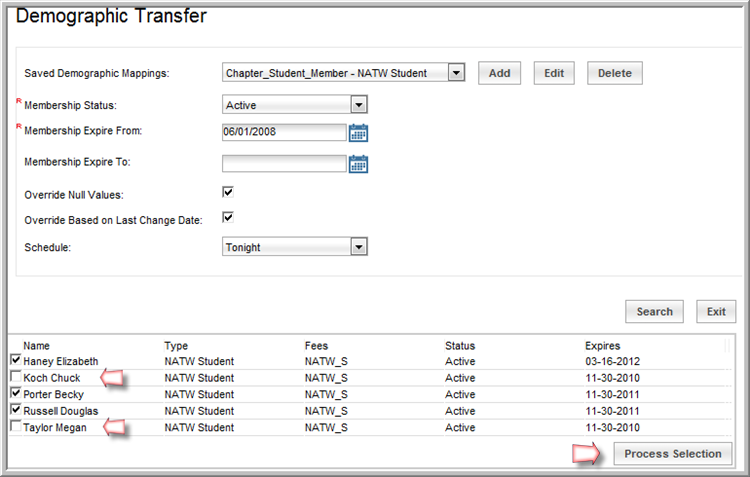
- Navigate to the Demographic Transfer form.
- Expand the Saved
Demographic Mappings drop down menu. This field displays a list of all demographic mappings that have been created
(including, if applicable, the one you completed following the steps in the section above.) Each option in the list displays the mapping
name, followed by the Member Type
with which it is associated.
Select the desired mapping for the Membership
Demographic Transfer.- If desired, click the Edit button to make changes to the mapping. This opens the Demographic Transfer
—Edit Demographic Mapping form. Use this form to change
the name of the mapping, as well as remap all of the demographics— you cannot, however, change the Member Type.
- Click the Delete button next to the Saved Demographic Mappings field to delete the mapping.

- Expand the Membership
Status drop-down menu and select the status of the members
whose individual demographics will be modified by this process (required).
- Use the Membership
Expire From and Membership
Expire To fields to search for non-terminated records with expiration dates falling between these dates.
Enter the date to search
from in the Membership Expire From
field. If you leave the Membership
Expire To field blank, the system will search for all memberships that
note an expire date (even if it is in the future.) If you wish to
specify an earlier date, enter that date in this field.
- Click the Override Null Values check box to overwrite demographics on the Individual Profile with null values from the Membership Profile.
- Click the Override
Based on Last Change Date check box if you would like the process
to compare the date the Membership
Profile was modified with the last date the Individual
Profile was modified. If the Individual
Profile was modified after the Membership
Profile, no update will occur.
If this check box is not selected,
membership demographics will override the individual demographics, regardless
of the last modified date.
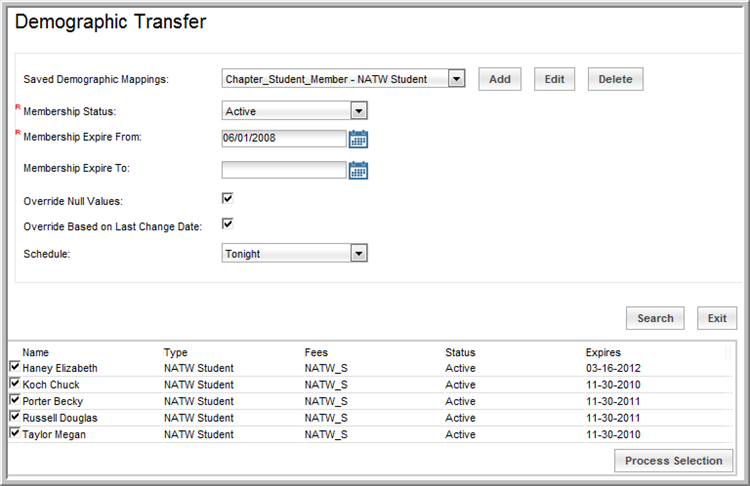
- Click Search
. This returns a list of individuals whose membership
expiration criteria match your settings.
- To process this demographic update for
all of the individuals returned in the search results, expand the
Schedule drop-down menu and
select when the process should run.
- All results are automatically selected. To exclude certain individuals returned
in the search results from this process, deselect the check box next
to their name.
- Click the Process
Selection button. This will run the Membership
Demographic Transfer process on only those individuals who
had their check boxes selected in the search results and exclude those
whose check boxes were not selected.
Tip: While
the example above focuses on individual memberships, the steps
outlined can also be applied to organization
memberships.