Adding Payments
When you select Prepaid as your Payment Type, the payment and order are entered together.
To add a Payment, complete the following steps:
- Go to the Individual, Organization, or Invoice Profile pages.
- On the Actions Bar, click the add payment icon.
- You must now search for the invoice/order information to add the payment to. You can search by invoice number, po number, or customer name.
- Enter the invoice number in the invoice number field if you wish to search by the invoice number.
- Enter the purchases order number in the po number field if you wish to search by the purchase order number.
- Enter all (or a portion) of the customer's name in the customer name field if you wish to search by the customer's name.
- After you enter your search criteria, click the Look Up Button
 to retrieve the list of invoices or orders matching your criteria.
 List of Invoices Returned Based on Criteria, Invoice Selected
 - Click the checkbox next to the invoice or order you wish to add the payment to from the list of results.
- Click the OK button.
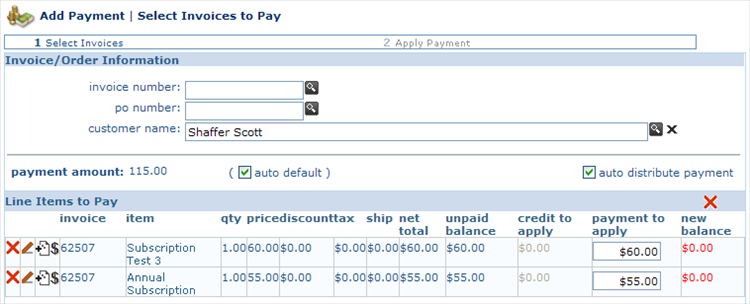
The invoice you selected, and all of the line items in that invoice, are now displayed in the Add Payment | Select Invoices to Pay pop-up window.
 Invoice and Line Items Displayed
You will notice that the payment amount is not editable (initially), and defaults to the full amount of the invoice. If you wish to edit this field and make a partial payment, click the auto default checkbox to deselect it. This will make the payment amount field editable.
In addition, the distribution of the payment cannot be changed (initially). The payment to apply fields appear to be editable, but your changes will not take effect. The distribution of the partial payment is controlled by the order field that is set up in the Inventory module for each Product Type. netFORUM will apply payment against the line items with product types with the lowest order number first.
If you wish to have control of how the payment is distributed among the various line items (in the case of a partial payment), click the auto distribute payment checkbox in order to deselect it. Once this checkbox is not selected, you will have the ability to specify how much of the partial payment each line items receives.
In order to have your distribution changes take effect, left-click anywhere else on the form. Once that field is not highlighted/active, the form will recalculate the distribution amounts.
Note, if you select a payment distribution that is less than the full amount of the invoice, the payment amount will change to reflect the total of the distribution amounts, even if the auto default checkbox is checked.
For example in the image above, you can see that the invoice total should be $115.00 based on the unpaid balance amounts of $60.00 and $55.00. By checking the auto default checkbox, the full amount of the invoice should be applied to this payment, however you can see that amount is only $85.00. This is because the auto distribute payment checkbox is not selected and the payment to apply amounts have been adjusted to $30.00 and $50.00 (for a partial payment amount of $85.00.)
- Once you have the payment distribution set to the desired amounts, click the Next button.
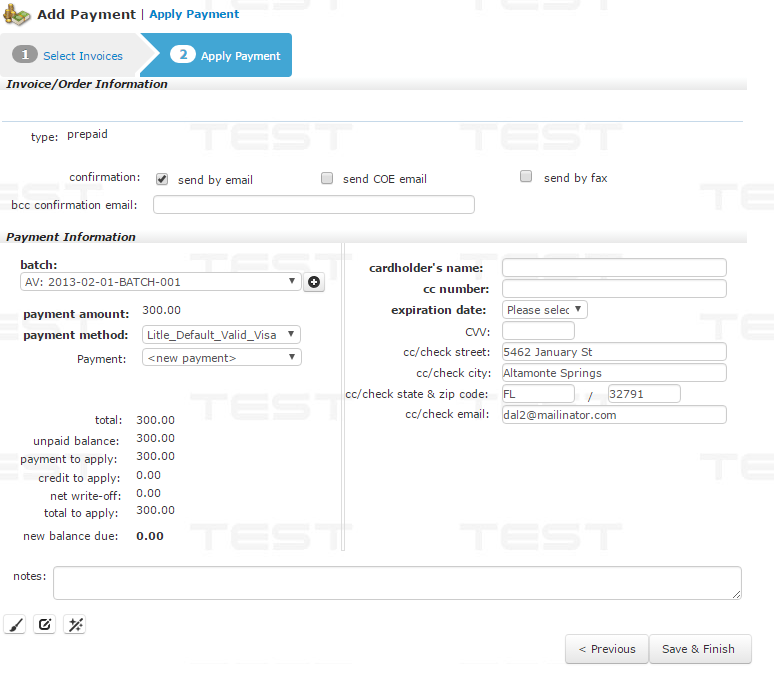
This will launch the Add Payment | Apply Payment pop-up window.
- If you wish to email a confirmation of the payment, check the send by email checkbox or the send by fax checkbox. You also have the ability to CC recipients on an email by adding their email address to the bcc confirmation email field. The confirmation email will go to the primary email on the profile whether individual or organization.
- Select the batch from the batch drop-down menu.
- Select a payment method from the payment method drop-down menu.
Based on the payment method you choose, the Add Payment | Apply Payment form will redraw with any additional fields that might be necessary to complete your payment (for example credit card number if a credit card payment method is chosen.)
 Apply Payment with Credit Card Payment Method Selected
 - Click the Save button to apply the payment to the invoice.
|
|
|
Add Payment Icon in Actions Bar Highlighted
|
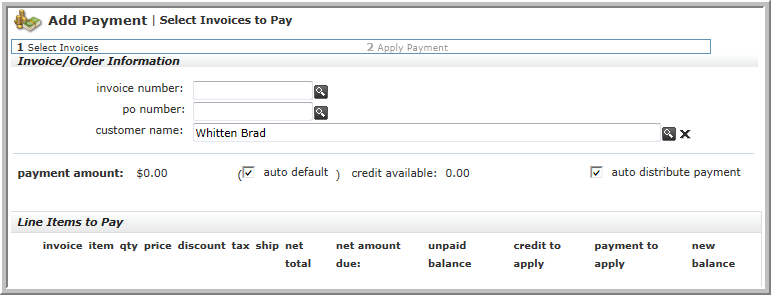
This will launch the Add Payment | Select Invoices to Pay pop-up window.

|
|
Add Payment Pop-Up Window (partial)
|
Note: Depending on which profile you click the add payment icon from, will determine which search field is auto-filled for you. For example, clicking the add payment icon from the individual profile will auto-fill the customer name field, while clicking it from the invoice profile will automatically include the invoice number.
- The fields to be completed in the Payment Information section of the Add Payment | Apply Payment form will vary based on the payment method chosen.
- See COE-Wizard Payment & Payment for further details.
- You may also add a payment from the Invoice Profile.
