Report Builder Setup Tab
When you select the Report Builder Setup tab, the following page displays in the Report Builder for that Report.
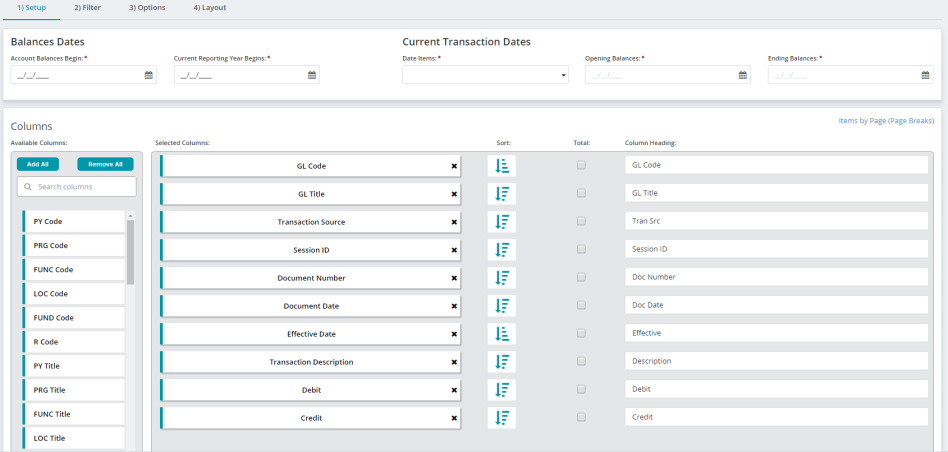
When you click New Report, the Selected Columns, Sort, Total, and Column Heading fields are blank.
Note: Be sure to know and understand what information is available in your MIP implementation for reporting purposes.
Dates
What displays in the Dates section of the Setup Tab (when available) depends on the report in which you are working. Examples of the report Dates section are:
- Balances Dates
- Current Period Dates
- Current Transaction Dates
Note: Use the date drop-down lists and calendar pop-outs to define the date parameters for the report.
Financial Statement Formats
What displays in the Financial Statement Formats section of the Setup Tab (when available) depends on the report in which you are working.
Note: Use the Available Formats drop-down list to select a Financial Statement Formats for Reports Form for the report.
Report Groups
Selecting a Report Group in Columns, Items by Page (Page Breaks), or Filter displays the Select\Edit Group Code dialog box.
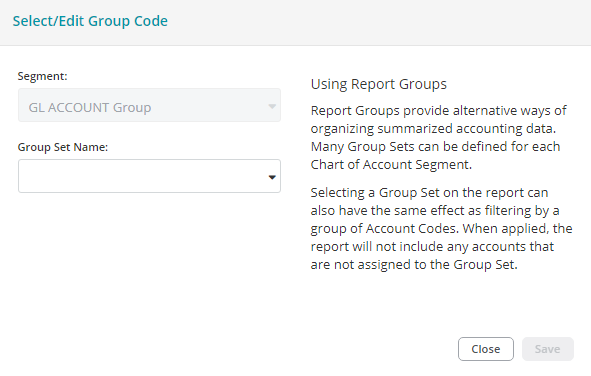
The Segment selected in Columns, Items by Page (Page Breaks), or Filter displays by default in the Segment field.
Use the Group Set Name drop-down field to select a Group Set for filtering the report and click Save.
The Report Groups section displays for the report with the selected Segment and Group Set Name.

Use the Actions field buttons to:
- Edit the Report Groups section using the Select\Edit Group Code dialog box.
- Remove the Report Groups section from the report.
Columns
Columns define what data appears in the report.
Available Columns
Available Columns are what data is available to appear for the report type.
Add All | Remove All
Use Add All and Remove All to quickly add or remove all of the available columns from the Selected Columns field.
Note: Drag-and-Drop individual columns between the Available Columns and Selected Columns fields.
Search Columns
Use Search Columns to quickly find specific Available Columns.
Selected Columns
Selected Columns are what data will appear in the report.
Note: Drag-and-Drop individual columns between the Available Columns and Selected Columns fields.
Sort
There are three sort settings available for reports:
-
 Ascending - Sorts the column data in ascending order.
 -
 Descending - Sorts the column data in descending order.
 -
 No Sort - Does not apply an ascending or descending order to the column data.
Note: Click the sort icons to toggle between Ascending, Descending, and No Sort.
Total
Check the Total box to create a total for that column in the report.
Column Heading
Click in a Column Heading box to customize how the column heading description displays in a report.
Items by Page (Page Breaks)
The report data is divided onto separate pages and starts a new page for each item. Certain items can be printed in the page header of the report.
Use Items by Page to determine how the data is arranged per page. When an item is selected, the report starts a new page for each different item, and the item is printed in the header of each report page. To specify how to divide data, select an item in Available Items and move it to Selected Items.
Once an item is in the Selected Items box, you can specify how you want the item to Print in the header, as well as the Sort type of the report pages. The report might also allow you to show totals for the selected item and/or designate a print type of Page Break or Column. Each page in the report contains corresponding data for just that type of item. If you select multiple items, each page of the report will contain data that fits the criteria of that combination of items. For example, if you printed a Distribution Code list, and wanted all active codes to appear on one page, and the inactive codes on another page, you would select Status in the Available Items box. Similarly, if you wanted each page to contain information for just one distribution code, you would select Distribution Code in the Available Items box.
Available Items
Available Items determine how data is separated by page for the report.
Add All | Remove All
Use Add All and Remove All to quickly add or remove all of the available items from the Selected Items field.
Note: Drag-and-Drop individual items between the Available Items and Selected Items fields.
Search Items
Use Search Items to quickly find specific Available Items.
Selected Items
Selected Items determine how data is separated by page for the report.
Note: Drag-and-Drop individual items between the Available Items and Selected Items fields.
Sort
There are three sort settings available for reports:
-
Ascending - Sorts the item data in ascending order.
-
Descending - Sorts the item data in descending order.
-
No Sort - Does not apply an ascending or descending order to the item data.
Note: Click the sort icons to toggle between Ascending, Descending, and No Sort.
Total
Check the Total box to create a total for that item in the report.
Click in the Print box to print certain items as page headers in the report.
Note: Code items are not available for printing as page headers in the report.
Items by Page & Combining Column (Totals)
In addition to arranging data by page, the combining reports for Financial Statement (and Statement of Activities reports) include combining column totals.
Use Column Totals to subtotal any combination of available codes and to print those subtotals in a column on the report.
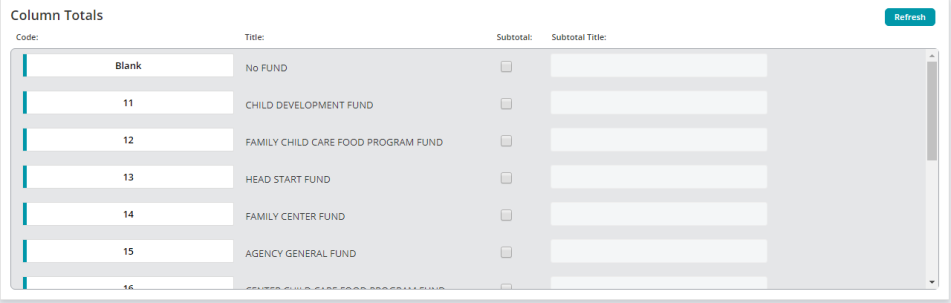
- Code: Lists the code for the report.
- Title: Lists the code title.
- Subtotal: Check the box to include the code in the subtotal combination for the report.
- Subtotal Title: The Subtotal Title field becomes active when the Subtotal check box is checked. Enter a title for the subtotal combination column.