Security setup
Levels of Security
There are two different levels where security can be applied in NetForum; the Link level, and the table / column level.
Link Security
Link security is the simplest way of restricting access in NetForum. It controls where the user is able to navigate to NetForum by making links available or unavailable. For example, some users may be able to see the Accounting tab, while others cannot. Some users may be able to see a link to the invoice profile, while others cannot. The key thing to know about this type of security is that it is not absolute; while you may restrict the Accounting tab from a particular security group, the multiple ways to drill down into your data in NetForum create possible 'backdoors' into the module. In essence, there are many ways to get to any given point in NetForum. In order to completely prevent access to a given point, you must restrict all of the paths that lead to that point.
Table/Column Security
Security on the database table/column level is a much more absolute way of setting security. This level of security is modeled after SQL Server's database table/column security, in which groups have explicit permissions on a table to insert a row, select a row, delete a row, or update a row. Additionally, groups can have granular permissions on specific columns within a table. Using this level of security, access to areas of the database may be restricted more precisely.
Please note, however, that the table/column level of security is much more intensive to set up than link security. NetForum has more than 500 tables (excluding Extender Tables) - if you want to implement this level of security in all of your groups, you must do considerable research to determine which database tables correspond to which functional areas and NetForum forms. For this reason, for most NetForum installations, we recommend issuing 'Grant' permissions on all tables to all groups, and then restricting access through Group/Item/Link security. With this security configuration, all groups will have rights to manage any data, but they will be effectively prevented from doing so by the inability to navigate to the forms that allow a user to manage the data.
You may wish to use table/column security to create a 'read only' level of security, or to hide a single field on a form.
How Much Security is Needed?
This is a question that we can't answer for you — you have to decide for yourself. Baseline NetForum comes with a few security groups already created; you can use these and simply modify them to your needs — or you can start from scratch. If you intend to implement significant table/column level security, it's generally easier to start from scratch.
Managing Security Groups
In general, the easiest way to implement multiple levels of security is to start with the lowest level first and then build upon that using the copy feature. Before you begin, you must consider exactly what security groups you intend to implement. Remember that the security groups stack (or are additive) in the sense that if a user is a member of multiple groups, then they will be eligible for the highest security levels of any of their groups. There is one exception to this - any 'Deny' permissions on permission within a table or a column will override any 'Grant' permissions. The next section of this document will guide you through the steps of creating multiple levels of security groups from scratch — starting with a read only access group.
Creating Security Groups from Scratch — Step 1 — Adding a New Group
- Read Only
- CRM
- Committees
- Events
- SSN Deny
Note: In order to complete the exercises described in the remainder of this content, you must be in the NetForum Admin security group or otherwise have access to the Admin and Toolkit modules.
The first group we are going to create is the read only security group.
To create a new security group:
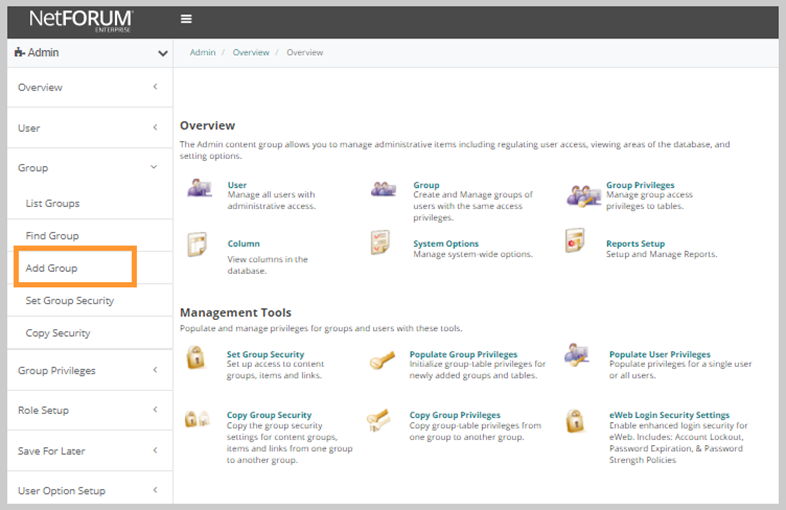
Go to the Admin module, and then click the Group group item link.
Note: You should not delete any of the security groups which are listed below.
From the expanded list, click the Add Group link.
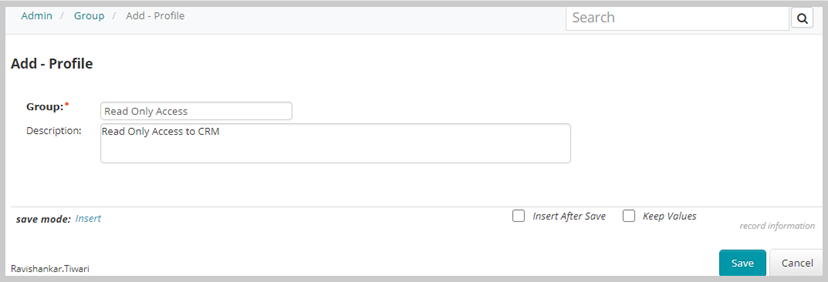
Enter the name of the security group and a short description, then click the Save button.
Creating Security Groups from Scratch – Step 2 – Table/Column Permissions
From the Admin > Overview page, click the Populate Group Privileges icon.

This opens the Group Privilege Populate window. This process will fill in any blanks for all existing security groups. Keep in mind that this process will not overwrite your other groups.
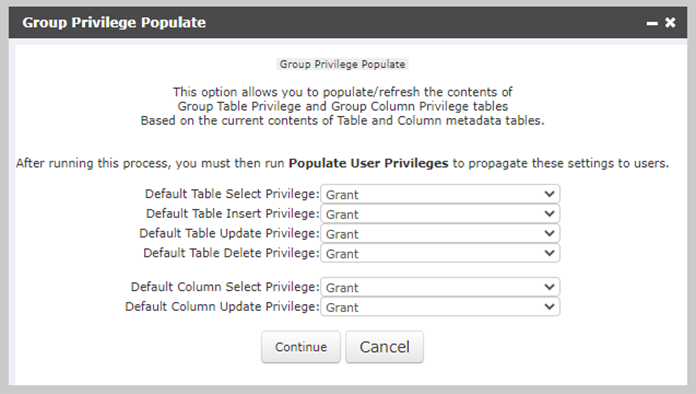
Each drop down contains three options – Grant, Undefined, and Deny.

Grant - a user will be able to perform the command in question.
Undefined – the command in question has neither been granted nor denied. If a user is in one group with an Undefined privilege and another with a Grant privilege, then the user will have the privilege. If the user is only in one group and that group has an Undefined privilege, the privilege will be read as a Deny.
Deny – this means that the group does not have the privilege. If a user is in one group with a Deny privilege and another with a Grant privilege, then the Deny privilege will trump the Grant and the user will NOT be able to perform that command.
See below for a more specific explanation of what a choice of undefined or deny will mean for each privilege.
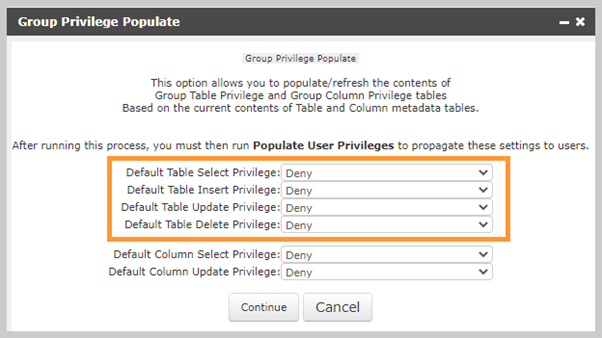
Table Select – user will be unable to select records from that table and the form will not be able to load.
Table Insert – the Save button will be disabled on a form when adding a new record.
Table Update – the Save button will be disabled on a form when editing an existing record.
Table Delete – the Delete button will be disabled on a form when editing an existing record.
In addition to the Table privileges, you must also write the Column privileges.
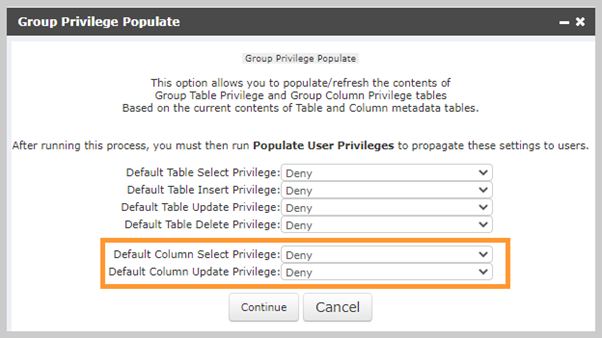
Column Select – the field will not be displayed on forms.
Column Update – if Select permission is granted, then the field will be displayed but it will be read-only and therefore the user will not be able to update the field.
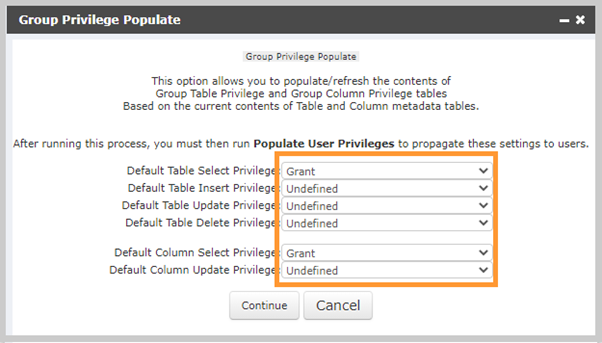
For the read only group you are creating now, choose Grant for the two select privileges, and Undefined for all other privileges – as shown below. This will allow the user to look at everything, but not make any changes, additions, or deletions. Click the Continue button once you have made your selections. The process will run, and you will be prompted to close the window once it has completed.
Creating Security Groups from Scratch – Step 3 – Link Access

A window listing all your current security groups will open.

Using this form (above), you may tailor the link security privileges for the various groups. You may expand each Group to view all the content groups (CRM, Membership, etc.), the group items within each Group, and then the links within each group item.
Click the add icon next to the Read Only Access group to expand the group.

Underneath the expanded Security Group, you will see all the baseline Modules and Content Groups. To the far right of each row, you are presented with two columns of check boxes.
By clicking the Access? checkbox for each content group, group item, or group item link, you will be giving users in that group access to that area.
The Hidden? checkbox denotes that the content group, group item, or group item link has been hidden from view to all users by Avectra. This may be because the area is used only by Avectra research and development, or that section of the database is not compatible with user defined security settings.
The enable all button will automatically check all the Access? checkboxes within an area.
Note: You must first check the Access? box on the top level. You will not be able to enable all or expand a specific Module or Content Group without first checking the Access? box.
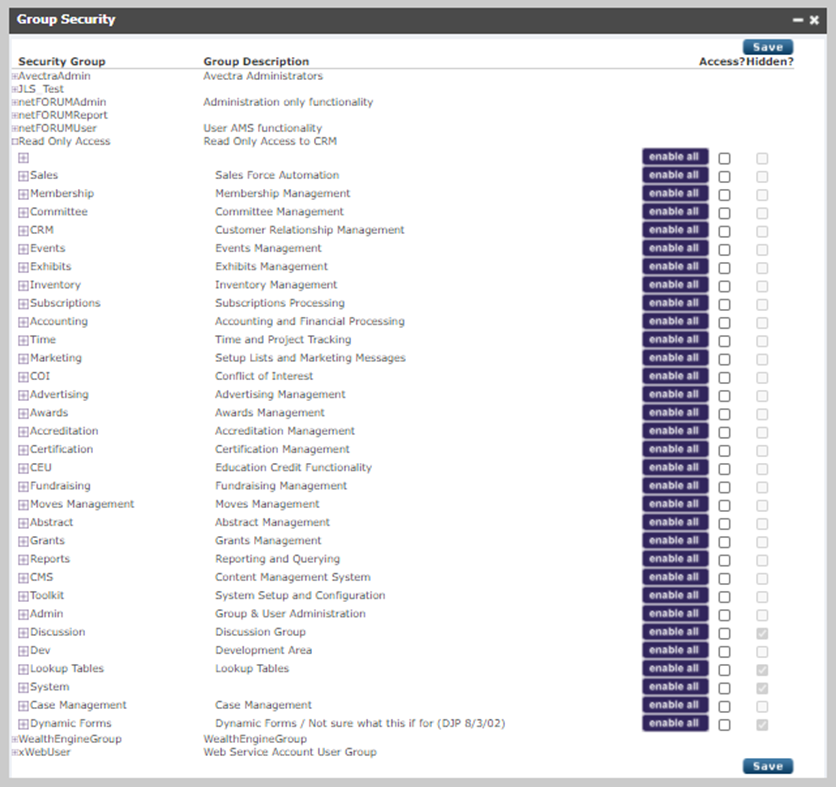
For the Read Only Access group, we are only going to allow access to the CRM module. Check the Access? box next to this module.
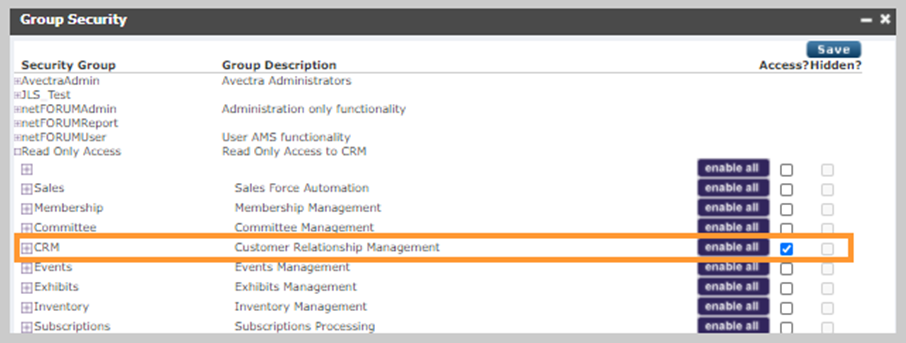
However, we do not want our Read Only group to have access to everything in this module (for example, they should not have access to the various setup tables – even for viewing), so we are not going to use the enable all button.
Instead of enable all we will expand the CRM grouping and check the specific links that they will have access to within each module and content group. A partial screenshot is shown below.
Note: We are focusing only on the Overview content group and we only allow access to the CRM Overview link. In order to expand the links underneath the Overview content group, we must first check the Access? box next to the enable all icon.
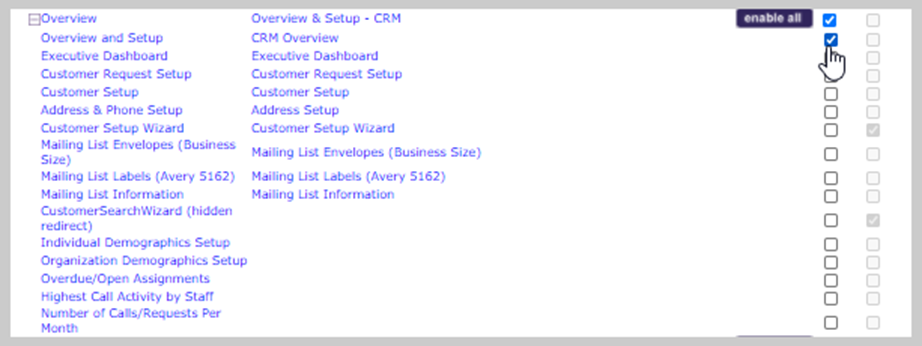
Remember that this security group also has Undefined privileges for inserting and updating records; you can check the box next to the Add Individual link to allow the group to access the Add Individual form, however the Save button would not be enabled on the form. To avoid user confusion, you should not enable any add links for this group. When you are done, click the Save button at the top or bottom of the screen to save the security settings.
Creating Security Groups from Scratch – Step 4 – Locking the Backdoors
“…NetForum by its design is an open system and the multiple drill downs into your data may create possible backdoors into restricted modules. In essence, there are many ways to get to any given point in NetForum. In order to truly prevent access to a given point, you must restrict all of the paths that lead to that point.”
Example: The Read Only Access group has not been given access to the Accounting module. However, they do have access to the CRM content group, which offers navigation to both Organization and Individual records. Under an Organization profile, there are a lot of child forms. Many of these child forms have links and commands associated with them; potentially add, edit, delete, and go to. Each of these links may be removed for a particular security group.

There may also be special links on a child form, such as renew or create claim. These links may only be removed by modifying the SQL code of the child form. Please remember that you may always set the table security such that a user cannot renew something (insert a record in a table). If you would like the link to not be visible, you may request an RFA from NetForum to modify the code such that only certain security groups see the link.
There is one other link that may be visible on a child form – the Edit - Dynamic Form Child. This link is a connection to Toolkit functionality and should only be available to administrators. You will need access to this link in order to close the back-door navigation in NetForum.
To view or modify which groups have access to this link, navigate to the Toolkit module and click Overview group item.
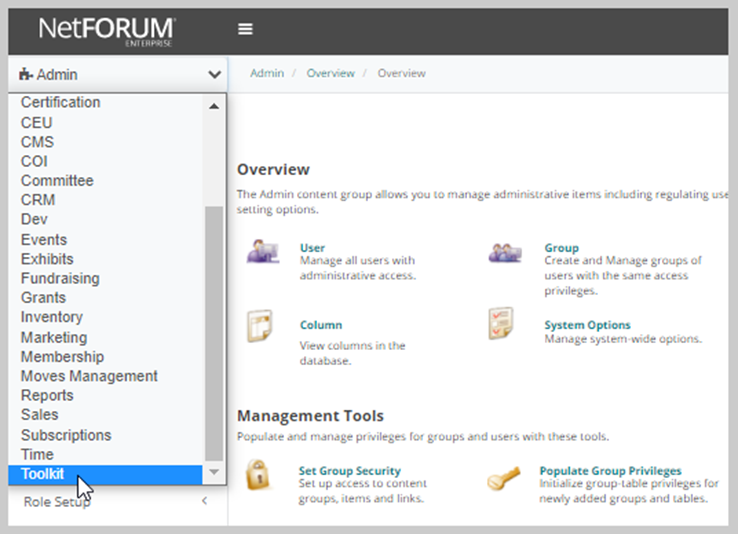
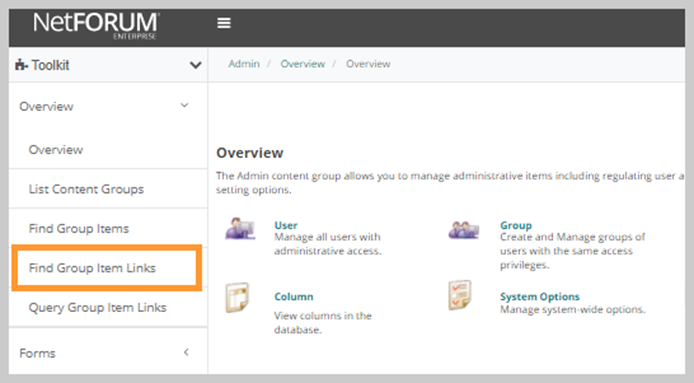
From the expanded list, click the Find Group Item Links link.
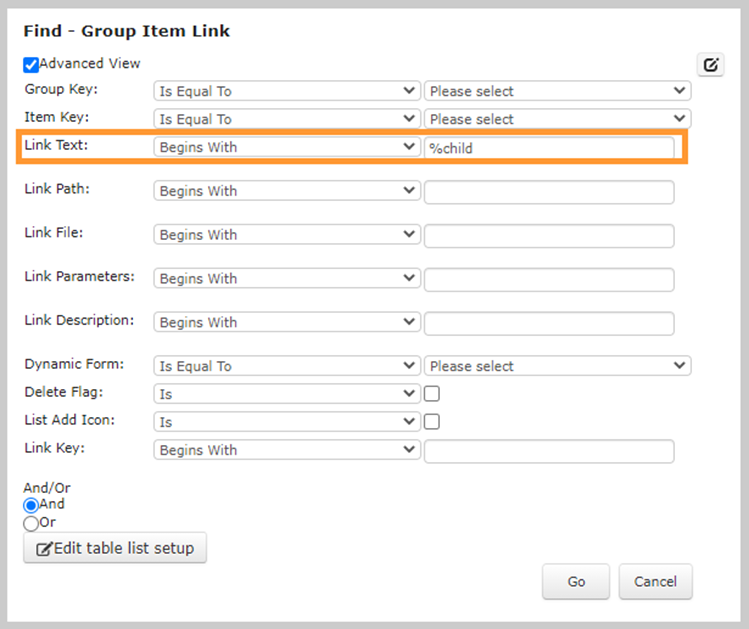
Using the Find Group Item Links search page enter %child in the Link Text field and click the Go button.
When the list is returned, click the Child Form – Add Child Form to navigate to the Link configuration page.

At the bottom of the Link configuration page, you can see which security groups are privileged with access to that icon.

This icon will be used to deny access to the add, edit, delete, and go to links for the child forms.
Navigate to any child form that you would like to modify the rights to and click the Edit Child Form icon.
icon.
Example: The Invoices child form found on an Individual profile page has go to links that will take you to the Invoice detail page within the Accounting module.
In order to complete our task of securing the Accounting module, we will need to disable this go to link.
Click the Edit Child Form icon on the right-hand side of the child form.

The Edit – Dynamic Form Child window will open.
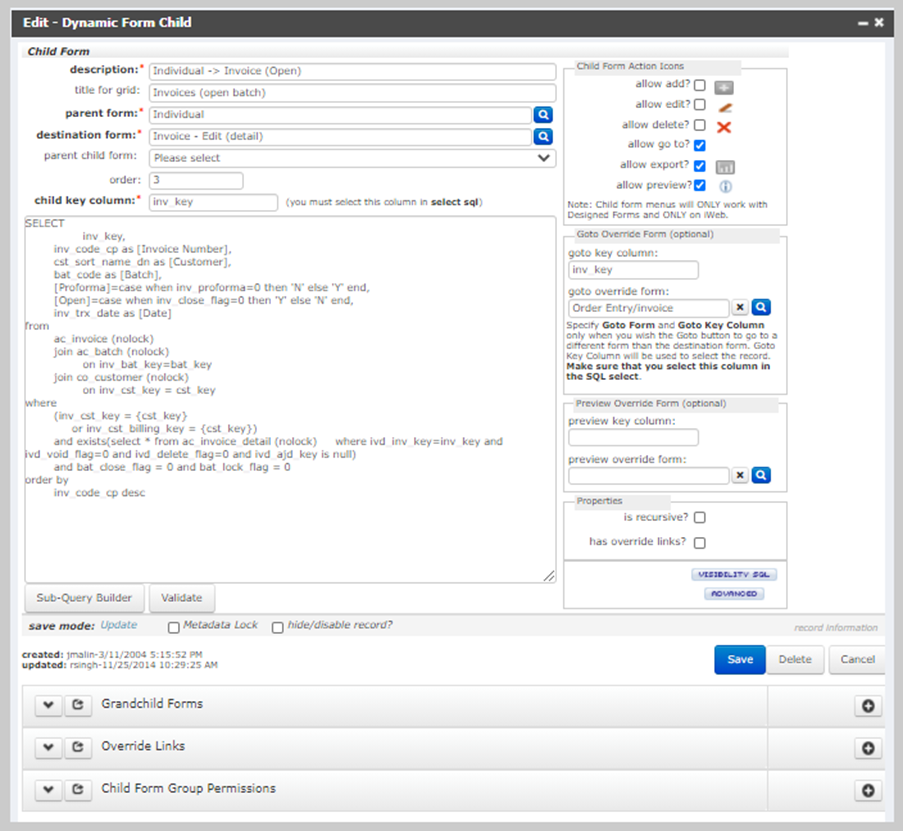
At the bottom of the page there is a child form called Child Form Group Permissions. Using this child form we can restrict access to the go to icon as well as the edit and the add icon.

Using the Add icon for this child form allows us to add a security group and its corresponding security settings. If a security group is not listed here, NetForum grants full rights to the available links on the child form.
In the Group Code drop down, select the Read Only Access group. The value in the child form drop-down is automatically populated; do not modify it. Check the boxes that are appropriate for the security you want to implement for this group. Click Save when you are done.

Next, we will look at another potential connection to the Accounting module through grandchild forms. Grandchild forms are found whenever you see a folder next to a record in a child form. One example of this is shown below.

Click the  icon to access the Edit – Dynamic Form Child window.

Click the go to link on the Grandchild Form’s record.
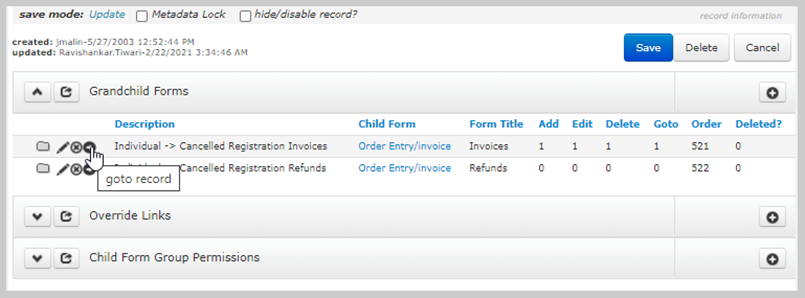
This will bring you to the Edit – Dynamic Form Child window for the grandchild form. Scroll down to the bottom of the form and add a record for the Read Only Access group in the Child Form Group Permissions.
After saving your changes, click Save on the Edit – Dynamic Form Child window to exit the form and return to the profile page.
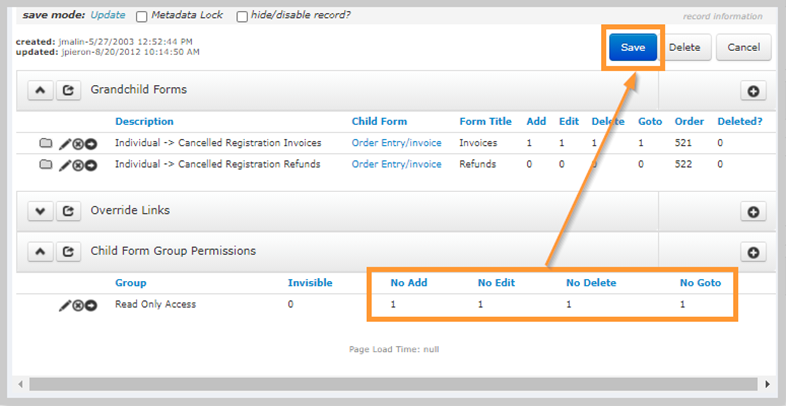
You will need to repeat this process on every child and grandchild form that you wish to secure. Remember that the child forms lead to many areas of the database that you don’t want a particular group to have access to; remember also that each profile has child forms. For example, you would need to secure the Membership child form on both the Organization profile and the Individual profile.
Creating Security Groups from Scratch – Step 5 – Test and Tweak
In order to test the group, you will need to add a user to the group. Navigate to the Admin > Overview page and use the Add User link found under the User group item.
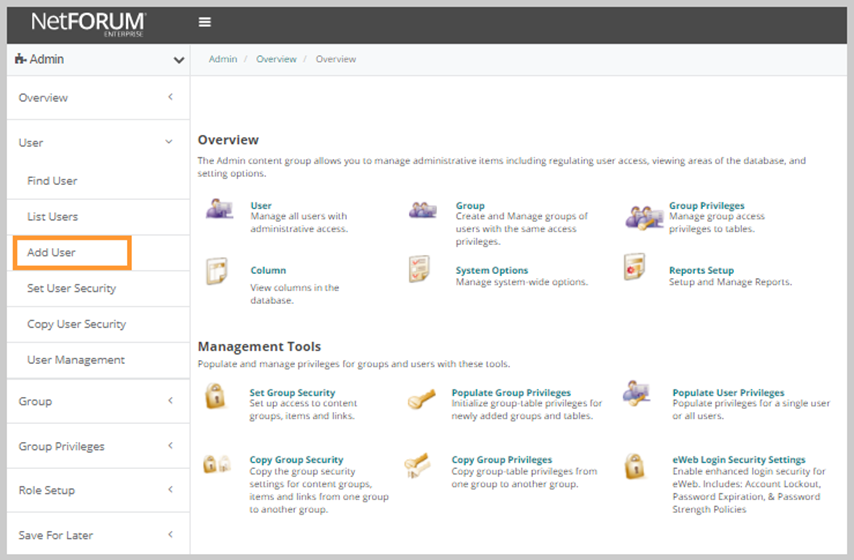
Using the Add User Wizard. complete the steps of the wizard to establish a login name for your custom security group. Be sure that your User Code and User Name match with the User Name found in the Active Directory.
As an alternative to creating a new username, you could move an existing username into your custom group. If you chose this alternative, be sure to remove any competing security groups that this user may already belong to. This limits any interference from overlapping security settings.
Caution! Do not test security groups with your Admin login! You will need your administrator rights in order to access this area again to make further changes or troubleshoot errors– Do not take away your own rights!
Before you are able to test this user’s new security settings, you will need to populate the table/column privileges for this user. This is done by clicking the Populate User Privileges link found on the Admin > Overview page.

The User Privilege Populate window opens.
Select the name of the user for testing and click the Continue button.
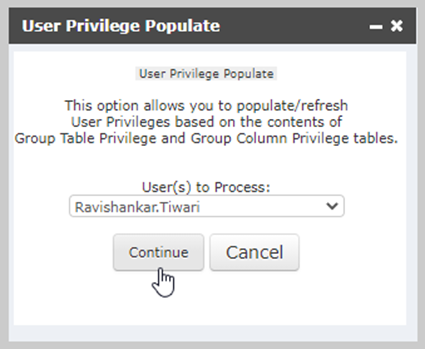
When the process is completed, a message displays and a Close Window button appears.
To test on either a second machine or in a second browser on the same machine, log in as your test user. Navigate throughout the system; try to find backdoors. Try adding and editing records. Be sure to look at profiles which have records in all the child forms. As you test, note any areas which need to have the security modified. Switch back to your admin login and make those changes.
Note: If you make changes only to the link security (either through set group security or the child form permissions) the test user login session merely needs to be refreshed for the new permissions to take effect. To do this, click the NetForum name icon in the top left-hand portion of that user’s screen.

Since this is a read only group, you will likely not be making any changes to the table/column level security.