Individual Demographics Setup
The Demographics Setup page allows you to choose the screen elements that will display on the Individual User Defined Demographics window.
The Demographics Setup page presents you with lists of screen elements that you can choose to be displayed on the Individual User Defined Demographics window. You can also choose the order in which the screen elements display on the page.
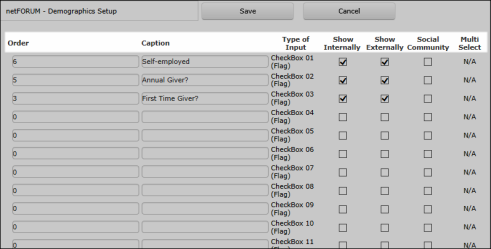
Demographics Setup Page
Workflow
To set up the Individual User Defined Demographics window using the Demographics Setup window, use the following steps:
- Choose the Type of Input. The Type of Input column lists several screen elements like CheckBox, DateTextBox, and DropDownList.
- Assign an order. The Order column allows you to assign a number to your chosen element. This number determines the order of your screen element on the User Defined Demographics window.
Example: If you enter 1, that screen element appears first. If you enter 6, that screen element appears sixth.
- Enter a Caption. The Caption is the text that displays before the element to name it.
- Choose where to show your element. Select Show Internally to show this element on iWeb. Select Show Externally to show this element on eWeb. Select Social Community to show this element on social community sites.
- Setup the Multi Select feature. Some elements, such as Textboxes and DropDownLists, allow a Multi Select feature. When the Multi Select feature is available, a checkbox and a Setup button display in the Multi Select column.
- Select the Multi Select check box.
- Click the Setup button. A new window opens. Enter the values you want available to be selected separated by semicolons with no spaces. The values display as a list in the User Defined Demographics window.
- Click the Save button. Scroll to the top or the bottom of the Demographics Setup window to see the Save and Cancel buttons.
Fields and Buttons
The following fields are available on the Demographics Setup window:
- Order: The Order column allows you to assign a number to your chosen element. This number determines the order of your screen element on the Individual User Defined Demographics window.
- Caption: Enter free text in this file for you chosen element. The Caption is the text that displays before the element to name it.
- Type of Input: The Type of Input column lists the screen elements that are available to display on the Individual User Defined Demographics window, like CheckBox, DateTextBox, and DropDownList.
- Show Internally: Select Show Internally to show this element on iWeb.
- Show Externally: Select Show Externally to show this element on eWeb.
- Social Community: Select Social Community to show this element on social community sites.
- Multi Select: Some elements, such as Textboxes and DropDownLists, allow a Multi Select feature. When the Multi Select feature is available, a checkbox and a Setup button display in the Multi Select column.
The following buttons are available on the Demographics Setup window:
- Setup: The Setup button displays only for elements that have Multi Select functionality. Click the Setup button to open a window that allows you to list values for the text box or drop-down list.
- Save: Click the Save button to save your changes so that your screen elements display in the Individual User Defined Demographics window.
- Cancel: Click the Cancel button to ignore your changes and return to the previous window.