Correspondence Template
A Correspondence Template enables you to create a form letter or communication template, such as a newsletter, that can be used over and over again, or sent as part of a mass mailing to a group of people where each person that receives the mailing also has their individual details within such as their name, organization, and membership details, if desired.
Uses of a Correspondence Template
Correspondence Templates are used throughout NetForum. Some of their uses include:
- Customer Requests
- Calls to Action where you expect a response on the part of the recipient
- Communication with lists such as Mailing Lists and Prospect Lists
- .NET Code: In Visual Studio .NET programming, you can send an email using a template.
- Event Registration Confirmations: You can configure an Event to send an automatic confirmation e-mail to every Registrant. The e-mail will be based on a template. You can have a general template for all event registrations as a default, and then set up special templates for each event as needed.
There are several baseline templates installed with the NetForum application for you to begin using immediately or you can also add/create your own. How to Find a baseline or existing template and how to Add your own template are described in more detail in the following sections.
The standard Group Item Links (Add, Find, List, Query, Query Central), are available in the Templates group item.
Adding a Correspondence Template
There are several baseline templates that have already been created when you begin using NetForum. However, there may be a time when you need to create your own template if a baseline template does not meet your correspondence needs.
Creating a Correspondence Template
To create a correspondence template:
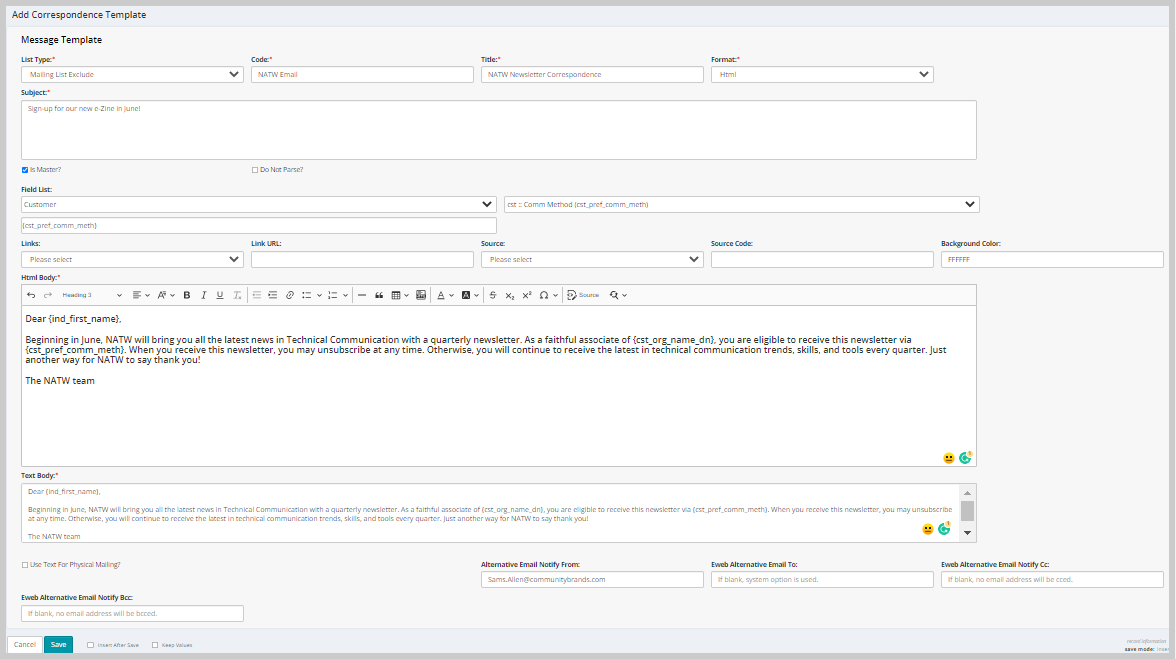
- Go to the Marketing module.
- In the Templates group item, select the Add Template group item link. The Add Correspondence Template form displays.
- List Type: Choosing a list type dictates what type of list the template will be used for and, further, the fields that will be available for you to use in the field list drop-down when using personalization. If you plan to create a template that addresses mostly Membership items (for example, an e-mail to Members asking them to renew), you would likely choose Membership as the list type because this means that variables such as {mbr_expire_date} become available in field list and you can inform the member receiving the email that their expiration date is nearly at hand. Further, keep in mind that you also need to choose the correct list type because your template will only be available in those areas. For example, choosing Request Detail as a list type ensures that your template is available for selection when sending to Mailing Lists. (Technically, the List Types are Objects.)
- Code: Create a template code for your template that is easy to remember and find within the system. It is a good idea to come up with your business rules for template codes and titles so it is clear which templates (at a glance) your staff will be using.
- Title: This title is what your template will be called within NetForum. Should be simple and descriptive.
- Format: If your customers can receive HTML email, such as Outlook, choose this format. Otherwise, choose text. HTML is the most common.
- Subject: This will become the subject line of your email.
- Is Master checkbox: Templates can be designated as a master template. Only master templates can be copied and, as a result, will appear in the copy from template drop-down field when you attempt to copy a template. Master templates can also be copied from the Copy Template shortcut on the Overview page.
- Do Not Parse: Select this check box if you want to send the same email (non-personalized) to everyone on the list. (The system will NOT search the database to pull data into the correspondence to replace your fields in this case as in the member's expire date example above. If your template body has a field reference, the sent email will display the field reference code instead of the value from the database.) If the body of your email does not contain any parsed values such as {ind_first_name} then clear this check box to increase the speed of processing the email.
Note: The Do Not Parse functionality only works for email messages sent using the Call To Action feature. Messages sent through the Communicate page will still be parsed.
- Field List: This field list will be populated with fields to use within your template's HTML or text body based upon the List Type you choose. Only fields that belong to Data Objects of the List Type are available. This is a Toolkit setting that cannot be changed . Once you pick a field or variable to use within your message, such as choosing to use the Individual's Full Name from the List Type - Individual, the Full Name variable will be selectable in the drop-down. Once you select it, you may then copy the {ind_full_name_cp} variable from the text box beside the drop-down for use within your template. In this manner, when you begin your correspondence with Dear {ind_full_name_cp}, NetForum will then reference each Individual's full name in the email instead of the field itself. (Unless you have the Do Not Parse check box selected as noted above).
- Links: Select the messaging link form the drop-down list. You can set up a messaging link using the Messaging Link group item in the Marketing module. The selected Messaging Link URL displays in the Text Body field and reflects in the recipient’s text format message.
- Link URL: This field automatically displays the URL of the messaging link selected. The Link URL will be displayed in the Text Body.
- Source:To enable Source Codes for a direct mailing you must create Source Code placeholders in your Correspondence Template. Source Code placeholders are created by adding the Source Code tag to your template. These Source Code tags will be parsed during the Call to Action setup and allow a Source Code to be associated with these tags.
- Source Code: This field will automatically populate the correct Source Code tag for the selected Source Code once you select a value in the Source field. You may copy/paste that tag into your Correspondence Template in the desired location(s).
- Background Color: Use this field to add background color to this template. By default, this field populates FFFFFF (for white color) as background color.
- HTML Body: Type the body of your correspondence in this text box using the List Type and Field Lists in conjunction with each other to customize your message to your customers.
- Text Body: Even if you have specified that your correspondence should be in HTML format, you should copy/paste your finished message to the text body message as well in the event that some customers cannot receive HTML mail. They will receive the message in text format instead.
Note: Your message should always be entered in both the HTML and the Text body boxes. If your recipients only accept plain text emails or have marked on their customer record that they only want to receive plain text email, they will receive a blank email if the Text Body is blank.
- Use Text For Physical Mailing: Select this check box if you wish to use the text in the template for physical mailing purpose.
- You may enter sender and recipient information into the following data fields (or leave them blank to use the pre-set system options):
- Enter an e-mail address in the Alternative Email Notify From field. If you leave this field blank, the system option is used. This is used only when the template is used for a confirmation email after a transaction. This is NOT used in Call to Action or Communicate. For Confirmation emails, it overrides the default email address entered in the EmailNotifyFrom system option.
- Enter an email address in the Eweb Alternative Email To field. If you leave this field blank, the system option is used. This value can be used to send a template to a staff user as a customization by calling the SendTemplate with an empty value for szEmail.
- Enter an email address in the Eweb Alternative Email Notify Cc field. If you leave this field blank, no cc email will be sent. This is used when the template is used for a confirmation email. The email address entered here will be automatically cc'd.
- Enter an email address in the Eweb Alternative Email Notify Bcc field. If you leave this field blank, no bcc email will be sent. This is used when the template is used for a confirmation email. The email address entered here will be automatically bcc'd.
Note: Additional information related to these email addresses can be found by reading the System Option: EmailNotifyFrom.
- Click Save. You will be directed to the newly created Correspondence Template profile.
The Source Code tag is nothing more than the name of the Source Code inside two brackets, such as {SourceCode1}. Adding these tags will create a placeholder for one or more Source Codes in your Correspondence Template.
To get the correct Source Code tag for the Source Code you wish to use, expand the Source drop-down menu, and select the Source Code you would like to use from the drop-down menu.
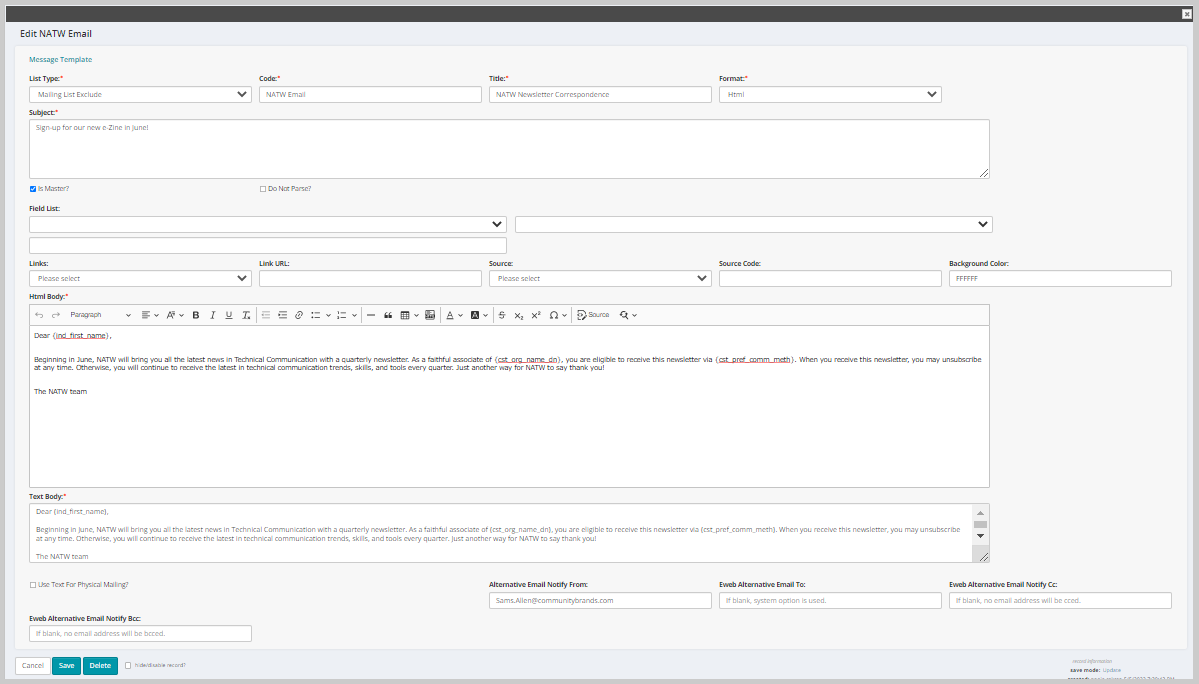
Editing a Correspondence Template
To edit a correspondence template information:
-
Go to the Marketing module.
-
In the Templates group item, use the Find, List, or Query Template group item links to open a Correspondence Template profile.
-
Click the Edit profile menu and then click the Correspondence Template link. The Edit Template form displays.
-
Edit the appropriate details in the relevant fields.
-
Click the Save button to update the Correspondence template information. Click the Cancel button to return to the Profile without saving the Correspondence template information. Click the Delete button to delete the Correspondence template record.
Using the WYSIWYG Tool within the HTML Body
netFORUM has a What You See Is What You Get (WYSIWYG) tool that can be used to help format your message when creating it inside the HTML body field for those that are not familiar with straight HTML coding. It is similar to other WYSIWYG or HTML editing tools available.
The first features on the HTML editing bar are for text editing and are standard in any Word Processor. Notice that you can change the font, size, and color as well as choose to make it bold or italics and so forth. You can also choose indent and alignment options along with bullet and numbered list options.
Use the Paste From Word icon if you have text that has been written in Word first for review and spell-checking. This icon makes it easy to copy in that text while at the same time removing the formatting used specifically in Word. To use this feature, simply copy the text in your Word document, then click this icon to paste it in the HTML Body field.
The remaining three icons enable you to use HTML-specific features such as linking and graphics without having to know the specific code. Specifically:
- Insert Horizontal Rule: Inserts a horizontal rule that is often used for separating sections of large documents.
- Insert Hyperlink: Inserts a hyperlink to a Web Site. Most communication will highlight the text that should be linked then use this button to link out to the Web Site.
- Insert Image: Inserts a graphic image. Remember that any pictures need to be stored in your eWeb documents folder so that they can be viewed by your customers.
The final options available to you through the HTML editing bar concern how you view the message you are creating. For example, if you prefer to write your e-mail and formatting directly in HTML or you are using software that provides the HTML version, you may check the Show HTML check box so that you can then copy the HTML (or write it) directly into the HTML box (or update the HTML created by the system). To enlarge the text box so that it is easier to view and enter the full text of your message, click on the Full Screen button. This will open a larger window. If you are using the full screen mode, make sure to click the OK button at the bottom of the page when you are done and want to return to the template.
Adding Source Code Placeholders to a Template
Adding a Single Source Code Placeholder for the Entire Template
To enable Source Codes for a direct mailing you must create Source Code placeholders in your Correspondence Template. Source Code placeholders are created by adding the Source Code tag to your template. These Source Code tags will be parsed during the Call to Action setup and allow a Source Code to be associated with these tags.
The Source Code tag is nothing more than the name of the Source Code inside two brackets, such as {SourceCode1}. Adding these tags will create a placeholder for one or more Source Codes in your Correspondence Template.
To get the correct Source Code tag for the Source Code you wish to use, expand the source drop-down menu on the Add/Edit - Correspondence Template pop-up window. Select the Source Code you would like to use from the drop-down menu. Once selected, the text field next to the source drop-down menu will populate with the correct Source Code tag for the selected Source Code. You may copy/paste that tag into your Correspondence Template in the desired location(s).
Once you have the correct Source Code tag, it can be added to your Correspondence Template. Source Code placeholders may be added once to cover the entire message, or added to individual links/elements within the message.
When this template is used in a Call to Action, the Source Code placeholder will be parsed out. If a Source Code exists with the same name as the placeholder (in this case "Winter Funds", it will automatically be mapped to the placeholder.) If no Source Code exists by that name, you will have the ability to map it to the desired Source Code.
Adding Multiple Source Code Placeholders to a Template
It is also possible to add multiple Source Code placeholders to a Correspondence Template. An example of this might be if the template had several hyperlinks and each needed to be tracked separately.
Multiple Source Code placeholders can be added to a template by simply adding multiple Source Code tags in your Correspondence Template as outlined above.
The Correspondence Template might also have several links that you would like to track separately. To add multiple Source Code placeholders to multiple links in a Correspondence Template, simply type in the text you wish to be "clickable" by the user followed immediately by the Source Code tag you wish to use.
Finally, if the message is not being delivered in a format that allows for links to be clicked on and you would like the readers to manually visit a Web site, you can include the Source Code placeholder in the URL. When adding the Source Code placeholder to a URL in a Correspondence Template, add the ?src_code= attribute to the URL, such as:
Example: http://www.abilaa.com?src_code={JRFSource}
Finding a Template
Finding a template that has been created is easily accomplished. The Find function is universal throughout NetForum and detailed in the Find topic.
Finding a template within the Marketing module follows the same format and function.
You may search by the following:
- Object Key (Which will find all templates based upon the list type used when added)
- Correspondence Code
- Correspondence Title
- Correspondence Key
The Advanced View checkbox allows you to conduct boolean searches to broaden and narrow your search as needed. If you are uncertain with what you are looking for, use the NetForum wildcard character, the percent sign (%) to help you with your search.
Managing Templates
- Click on the Marketing module from the Module Menu drop-down.
- On the Group Item menu, click Templates. You can then choose to List Templates or to Find a Template.
- You can also choose to click on the Manage Templates icon on the EMarketing Overview page to display the List - Correspondence Template page.
Depending upon which list you choose, the Edit - Correspondence Template page will display. (A template does not have a traditional profile page like many modules do in netFORUM. Instead you go right to editing mode when you select one).
You may make changes to your templates such as:
- Select a new list type.
- Change the template code.
- Enter a new title.
- Enter a new subject.
- Edit fields.
- Change the body of the message.
Using Templates in Correspondence
Once you have created your template, there are a number of areas that it will be available for use depending upon the list type (if any) that you chose when you created it. This may include from an Individual profile (list type Individual), from a generated list of records - usually from a Find or Query - the Committee Profile, Calls to Action, and Mailing Lists to name a few. Some of the more popular uses of templates are described in the following sections.
E-Mailing a List Using a Template
One of the more popular uses of templates is to e-mail a list that is generated through a Find or Query. For example, using Query Central, it is possible to generate a list of Individuals by specific Member Type. Using this query, therefore, a list of Sr. Members of the Association could be generated.
Click the e-mail this list icon on the List page to send correspondence to any list you generate. Clicking this icon spawns the Send Correspondence window.
In the template drop-down, all templates that were created using the Individual List Type will appear. When you select a template, you will notice that the HTML body and the Text body fields will immediately populate with text that was designed for the template's purpose - such as a membership renewal for the Sr. Members we searched for. You may modify the text if you wish before you send the message. Note that this will not change the original template if you do so. This must be changed on the template itself in the Marketing module.
Note: For more information on using the Send Correspondence form, visit the topics Communicating with a Mailing List and E-mail to This List.
Once you have sent your communication, it will be recorded in NetForum on the Correspondence tab on the Individual's profile. Additionally, the Last Email Date on the Individual's demographics will be updated to reflect the e-mail's date.
Templates in Drop-down Fields
You have already noted that when using Mailing Lists or the Send Email to this List icon after generating an Individual List, you are able to select a specific template using the template drop-down menu.
As explained in preceding sections, which templates appear in the drop-down field depends upon how the template was created and what list was used to generate the fields. For example, Individual List Type templates will appear when you attempt to send correspondence to a list generated from an Individual query whereas if you attempt to send to a Mailing List, templates that are created using Request List Type will be available.
This same rule applies elsewhere in NetForum where you see the template drop-down menu. For example, on the Committee Profile page, you are able to send communication to your committees using the Communicate icon on the Actions Bar. The Send Committee Correspondence form appears which mirrors the previous correspondence forms you have seen. For a template to appear in the Committee Correspondence drop-down, however, it must have been created using either the Committee Nomination or Committee Participation List Types.
If you encounter a blank template drop-down field, this means that a template with this list type has not been created. See the section on Adding a Template for more information.
Templates and Microsoft Word Merges
In addition to e-mail and mailing list correspondence, templates can be used to create merge letters within Microsoft Word as well. This is similar functionality to Microsoft mail merges in that you may generate a list of Individuals, choose an Individual List Type template, and create a document in Word that will merge that template and the list of Individuals you generated into a personalized list of letters or correspondence (depending upon the template you use) that can then be edited or printed directly from Microsoft Word.
To create a Word Merge:- Generate a List of Individuals through the Find, Query, or Query Central functionality.
- Once you have generated the list, click the Create Word Merge icon in the upper right hand corner.
- The MSWord Mail Merge Window appears.
- In the Correspondence Template drop-down, choose the template you want to use. In this case, a renewal template encouraging the Individuals to renew their memberships has been selected. You may choose to modify your text now if you like. This will not modify the template itself if you do so. That must be done in the Marketing module. Remember, a list of Individuals was generated so only Individual List Type templates will be generated. If you do not see a template you want, you must create one yourself and make it of Individual Type.
- Select the Preserve absolute path for links check box if you have any hyperlinks in your message. This means that the full HTML path must be specified for your links.
- Click the Generate button.
- You will be asked if you want to Open or Save your file. If you want to print immediately with no desire to save or edit the file for later use, you may open it. Otherwise, choose Save.
- Choose a more user-friendly name for your document and click the Save button.
- You now have a Microsoft Word document, complete with your customer names if field names are used in the template, that you may edit and print.
Setting Default Correspondence Templates
Default templates are sent by netFORUM when certain actions are completed such as a sale being made through COE or when someone registers for an Event. You may decide that you want a different template set as a default template other than a baseline template. Or, a previously set default template may inadvertently be deleted and need to be reset.
Default templates are set using the correspondence template system options child form and the correspondence template keys child form, found in Marketing Setup. See Setting a Default Correspondence Template for more information.
Technical Information
Advanced Features
Correspondence Template Child Form HTML
Correspondence Templates can use Correspondence Template Child Form HTML to display a grid listing multiple detail items.
If/Else Conditions in Templates
Correspondence Templates can conditionally display information based on a test case using the following syntax:
{? condition_to_evaluate_true_or_false ? output_when_true ? output_when_false }
In place of condition_to_evaluate_true_or_false, you must have a valid control contained in the field list of the template, followed by an operator, followed by a test value enclosed in double quotes.
For example, see below. Note there are two equal signs (==) as the operator and do not include additional braces around the control you want to parse in the condition section:
{?pin_cc_auth==""?Invoice Date: {inv_add_date}?Transaction Date: {pin_add_date}}
In this example, if the Parsed Value of pin_cc_auth is empty, then the contents between the 2nd and 3rd question mark character will be output; otherwise the contents between the 3rd question mark character and the last brace will be output.
You can skip the second ? if you just want to output the "true" value if the tested condition evaluates to true:
{?ind_int_code=="Student"?Thank you for your Student membership.}
{?evt_start_date!=""?{?evt_end_date!=""?This event is scheduled from {evt_start_date} through {evt_end_date}?}?}
In this example, if the Parsed Value of evt_start_date is not empty then the statement after the second question mark is executed, which is another conditional that checks to see if evt_end_date is empty, and if it is not empty then it outputs the scheduled dates.
Be aware that all values parsed by netFORUM are returned as a String data type. Therefore, if you are trying to parse dates or numbers, you need to enclose them in double quotes. For example, the value for member flag (which can be 1 or 0) must be enclosed in double quotes:
{?cst_member_flag=="1"?Thank you for your membership.?We invite you to join our organization.}For dates and numbers, any > or < operators evaluate based on alpha, not numbers or dates. This can be problematic because "7" will be greater than "60". For this reason, if you need conditional logic based on numbers or dates, a different solution is required.
Statistics
See Messaging Campaign: Statistics for guidelines on how to embed special tags in the HTML body to track certain statistics.
Tracking Click-Throughs
Google Analytics Tip: Track Click-Throughs from Your Messaging Campaigns If you use Google Analytics, you can track click throughs easily by embedding your hyperlinks with certain codes. See link for an example of a netFORUM client who used this feature.
Troubleshooting
Some Templates Never Send, Others Work
Issue: some templates, especially HTML templates, don't get delivered by the mail server. Other templates do get sent. Sometimes the template will be delivered on one mail server, but not on another. This (currently) does not seem to happen on Abila's mail server, but can happen on certain client mail servers.
For the templates that fail to be sent by the mail server, but appear to be logged in the Customer Activity area, ensure that you do not have long amounts of text with no carriage returns in the Template. Note that we are NOT talking about < BR > or < P > HTML tags. We mean actual carriage return/line feeds. Depending on the security settings, many SMTP mail servers will reject these requests thinking that they are injection attacks, spam attacks, etc.
This can be a problem especially when text from MS Word is copied from MS Word and pasted into a Template as this will leave you with meters of non-breaking text caused by the verbose and complicated MS Word/Office style classes.
How to Test For This - Does the plain text version of the template work, but not the HTML version? If you replace the HTML text with some simple text, does the email now go out? If this is the case, then you may be experiencing this problem. Can you get your system administrator to look into the mail server queue and see these rejected messages?
See also Correspondence Template Child Form HTML for more on this topic.
The Test Condition is not Evaluated
When using conditionals in a template if the condition is never evaluated or always evaluates incorrectly check to see if there are spaces between the operator. For example:
{?evt_end_date == ""? No end date set ? The event will end someday ?}
Will not evaluate correctly because of the extra spaces on either side of ==. The statement should read:
{?evt_end_date==""? No end date set ? The event will end someday ?}
Make sure HTML templates are well formed
Issue: not all programs that render HTML are forgiving of malformed documents. For example, an e-mail reader may display raw HTML tags rather than properly formatted text, styles and images. Other programs may be able to workaround the issue when rendering the same template. Internet Explorer is fairly forgiving and therefore perhaps not the best tool for testing email templates.
Recommendation: Make sure your HTML templates are well formed. This should facilitate proper and consistent rendering in any reasonably capable email reader or web browser.
HTML Tidy is one of many open source tools that can be used to check and correct common HTML errors. It might help if you attempt to validate the HTML of your templates before putting them into production. There is also an online tool provided by the W3C at the following URL: http://validator.w3.org
Missing Fields
Suppose you want to add fields to your template, but they are not available in the field list dropdown-list.
First, we need to understand which fields are available. Only fields in the Data Objects of the List Type's Object are available. This is a Toolkit configuration. You have a couple of options. One option is to add more Data Objects to the Object. This option is problematic, however, for several reasons. One reason is if the Object is a static facade object, then you cannot add more data objects through the Toolkit because the data objects are initialized in specialized .NET programming code that is not accessible. If the Object is a dynamic object (in the senses that its data objects are configured in metadata) then you can add more Data Objects, but do so with great care. Adding more data objects adds additional overhead and you might cause other unforeseen issues by adding data objects.
So, what options are left?
Probably the best option is to use Correspondence Template Child Form HTML. It is not as easy as simply adding a field to a template, but it avoids the issues with absent data objects, and you have a lot of control over what you want to place in the template. One downside with Correspondence Template Child Form HTML is, you can't easily splice a single field in the middle of a paragraph; this feature was intended for listing records in a grid. Therefore, you'll need to use some creativity and be aware of the benefits and limitations of Correspondence Template Child Form HTML.
System Options
These System Options contain a value of a Correspondence Template's primary key (you can get this from the URL querystring, it is the 36-character GUID value after "Key=" when you are navigated to the record for the template in iWeb). If you are using the area of netFORUM that relies on these options then you must set up a Template and then configure the system option's value to be that guid.
Each of these templates are used for different purposes in netFORUM, and the email that is sent by netFORUM is triggered to go during different events. See each page below for more information about why and when these emails are sent. Also, some of these options have related options that need to be configured. For example, some of these template options require another option to be set to true in order to "turn on" this feature. Also, some of these options have a related option in which you need to set the email address of the recipient who should get the email. For these options we recommend that you set up a special email address with a distribution group instead of entering a specific person's email address.
Finally, a number of these template options point to a particular template that ships with baseline NetForum; the page for each of these template options will point this out if one exists. If your system has this template, then you can use it. If your system does not have this template, then you can get the sample from a distribution database (check with Abila if you have questions on this). If you wish to change the default standard template, we recommend creating a new one based on the old one, modify the new one as needed, and then update the template system option to point to the guid of the newly created template.
- AccountingBatchProcessorTaskNotificationTemplateGuid
- ContactRequestDefaultCorrespondenceTemplateGuid
- DuesRenewalGetRecordsEmailTemplateGuid
- DuesRenewalRunUpdateEmailTemplateGuid
- FulfillmentBackOrderEmailTemplate
- FulfillmentConfirmationEmailTemplate
- FulfillmentLowInventoryEmailTemplate
- InventoryTransactionsEmailTemplateGuid - added in 2008.01
- NewMemberConfirmationTemplateGuid
- COEConfirmationTemplate
- OrderFulfillmentConfirmationEmailTemplate
- PaymentConfirmationTemplateGUID - added in 2007.01
- RecognizeRevenueEmailTemplateGuid - added in 2008.01
- RenewMemberConfirmationTemplateGuid
- SubscriptionFulfillmentNotificationTemplateGuid
- SubscriptionRenewalTaskNotificationTemplateGuid
- TimeExpenseDeclineGUID
- TimeSubmissionDeclineEmailGUID
- VerifyEmailAccountTemplateGuid
If new system options are added, please categorize them like this. Generally, the naming convention is to suffix the system option name with "TemplateGuid" or at least have the word "Template" in the name.
[[Category:Correspondence Template System Option]]
Best Practices
- Enter an HTML and Text version of the email. netFORUM will send both versions. More advanced mail servers will render the correct version appropriate to the email reader. If the email reader can display HTML, then the mail server will render it as HTML.
FAQ
Different Templates for Different Scenarios
Q. Member Confirmation Emails allow for only one Template for all membership packages. Is it possible to send different confirmation templates to different membership packages?
A. There are a number of ways that you could send different emails based on the membership package purchased. You could use this solution for other scenarios in which baseline netFORUM uses a single template, but you want to tailor the text in that template to different cases.
One option is to use a single template as described on this page, but splice in different text for each package (think of a paragraph in the middle of the email body) using Correspondence Template Child Form HTML. This is the most straightforward way but it could be awkward depending on how many packages you have and how different you want the text to be, and how much ability you can offer content writers who would maintain the text. To decouple the SQL programming in the Child Form HTML from the template text, you might want to consider managing the text in other Templates, and have your "main" template query those other templates according to some kind of naming convention that maps packages to related templates. This would allow non-technical membership staff to manage the template text for the different packages on their own.
Another option is create a Workflow rule that sends different templates for different packages when a membership is renewed or added.
CSS Classes
Q. Can I use CSS classes in templates?
A. If you want to style elements in templates, you must use inline style tags.