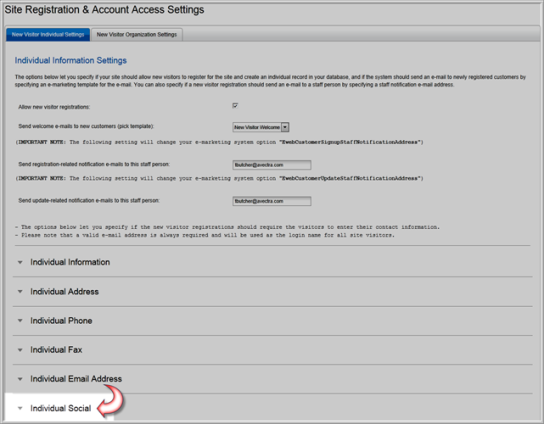
The New Visitor tab in the Web Site Editor allows you to set up the experience that new visitors will have when they sign in to eWeb for the first time.
There are two sub-tabs under the New Visitor tab. The New Visitor Individual Settings tab allows you to customize questions on the individual's personal information. The New Visitor Organization Settings tab allows you to indicate whether new registrants should see questions on their organization and have the opportunity to add new organization information during the setup process. You may specify notification e-mail addresses under both tabs.

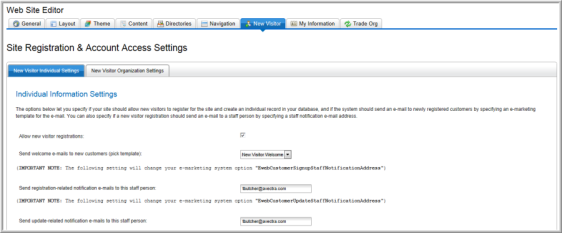
Individual Information Settings
- The Allow new visitor registrations check-box allows you to enable new visitors to register on the eWeb site. If this box is not checked, new visitors will be unable to register on eWeb.
- Using the E-mail settings, indicate the welcome e-mail, if any, to be sent to new registrants. You may also specify the staff person(s) to receive registration-related and update-related notification e-mails.
- The individual tabs allow you to customize the requests for information that new visitors receive during the sign-in process. Each tab contains different individual options such as address, phone, and fax options to name a few. Expanding a tab enables you to view and select those options and choose whether or not to make the option required. For example, a new registrant may be asked for title, work address, etc. upon creating an account. You may also opt to make those fields required entries for new visitors, forcing them to complete the fields before continuing with the new visitor registration process.
Organization Information Settings
- In the E-mail settings section, indicate the staff person to receive organization-related notification e-mails.
- The organization tabs allow you to customize the requests for information that new visitors receive during the sign-in process that is organization specific. Each tab contains different organization options such as organization address, phone, and fax options to name a few. Expanding a tab enables you to view and select those options and choose whether or not to make the option required. For example, a new registrant may be asked for their organization name/information. You can opt to require organization name/information using the Organization Information tab and make the organization name read-only, as well.
- Remaining organization tab options allow you to customize the requests for organization information that new visitors receive during the sign-in process. For example, requests for the organization work address, billing address, phone number, etc. You may also opt to make certain fields required entries for new visitors, forcing them to complete the fields that you mark as required in order to continue with the new visitor registration process.

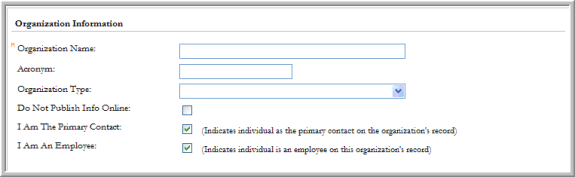
When a new visitor registers, an individual record is created in your database for the customer. To enable new visitor registration, first select the Allow new visitor registrations check-box on the New Visitor tab in the Web Site Editor. The My Information tab is then used to specify whether or not those fields may be edited later (or simply viewed only) from the My Information hyperlink on eWeb by customers. See Editing and Viewing My Information on eWeb for more information.
The New Visitor Individual Settings tab, under the New Visitor tab, is where you decide what individual information you want to collect about a new visitor registrant. The first four settings, however, deal with enabling new visitor registration entirely on your Web site and what is communicated to whom when you do.
Allow New Visitor Registrations: This check box enables new visitor registrations to occur on your Web site. All information collected creates a record in your database (individuals, organizations, etc.). The default for this check box is selected to yes which will allow new visitor registrations.
If this box is disabled, the link you see in the image below will be removed and you will not be able to register new visitors nor will they be able fill in their information during check-out. This greatly curtails new prospects and membership drives for organizations so decide carefully before disabling this checkbox.
Send Welcome E-mails to Customers: This drop-down enables you to specify if you want the system to send a welcome e-mail to newly registered visitors. The drop-down is populated with eMarketing templates that may be used here.
Send Registration-Related Notification E-mails to this Staff Person: If you want a staff member to receive notification every time you receive a new visitor registration, enter his/her e-mail in this field. This e-mail notification field is also managed in the eMarketing set-up form. Changing the staff recipient e-mail on the New Visitor form will replace the previously set eMarketing system option value.
Send Update-Related Notification E-mails to this Staff Person: If you want a staff member to receive notification every time a record is updated, enter his/her e-mail in this field. This e-mail notification field is also managed in the eMarketing set-up form. Changing the staff recipient e-mail on the New Visitor form will replace the previously set eMarketing system option value.
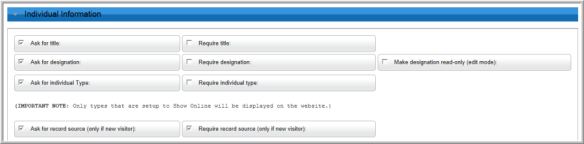
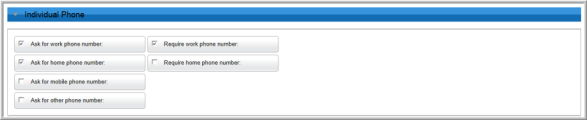
The remaining tabs under the New Visitor Individual Settings tab enable you to expand and specify which data fields you want to include versus require when your new visitor is registering on your Web site.
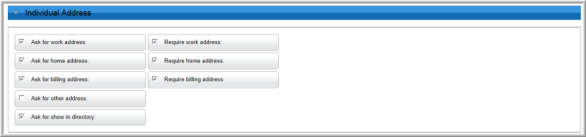
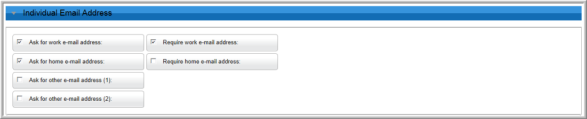
For example, in the image below, the Individual Address tab has been expanded to display the address fields that are available for inclusion on the New Visitor Registration form on eWeb by specifying what the form will ’ask for’ by way of individual addresses.
In other words, clicking the checkbox next to a field will enable that field on both the New Visitor Registration and My Information (on eWeb once registered) forms. Options that are unchecked will not be displayed on either form.
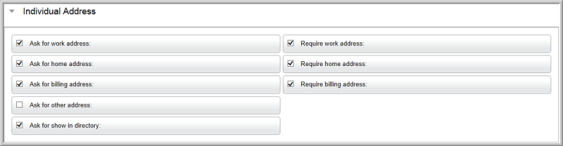
Further, clicking the checkbox next to a field will also enable the Require option to become visible in the right column (notice how the Ask for other address field is unchecked in the sample image above and there is no Require option.) Clicking the Require option next to a field will not only include that field on the New Visitor Registration and My Information forms, but will also make it a required field and the new visitor will be unable to save the form until the field is completed.
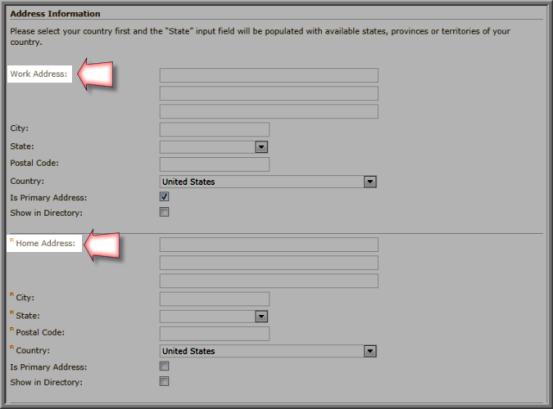
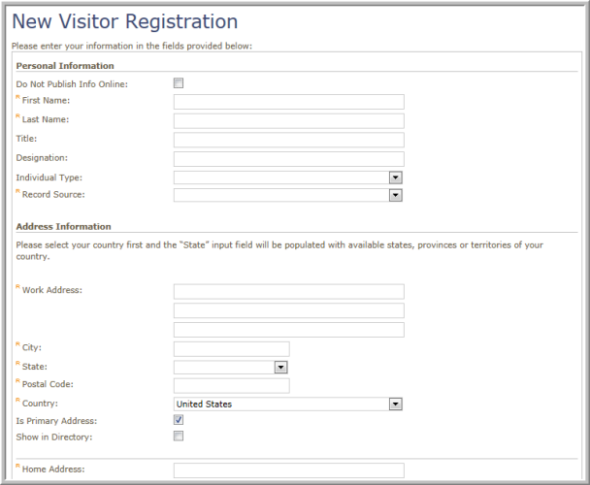
The sample image below demonstrates how manipulating the Ask for and Required checkboxes will display fields on the New Visitor registration form accordingly. Notice, for example, that work address is asked for but not required while home address is both asked for an required per the settings above.
Once an individual registers on your eWeb site, they will have the opportunity to view or edit these settings under the My Information section of the eWeb site. See Editing and Viewing My Information on eWeb for more information.
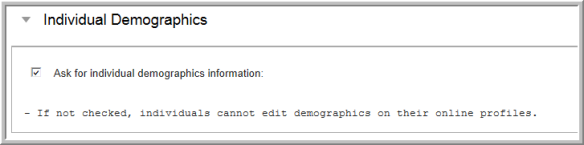
Individual Demographic Information: The Ask for individual demographics information (under the Individual Demographics tab) will allow clients to collect individual demographics during the addition of a new visitor if enabled. If individual demographic information is disabled, demographic information will not be collectable or editable for customers on the Web site. For more information, view Demographics and New Visitor Registrations.

The New Visitor Organization Settings tab, under the New Visitor tab, enables you to specify that, in addition to information about the individual, you also want to collect information about his/her organization as well. Just as with the New Visitor Individual Settings tab, the first field deals with enabling the collection of organization information on your Web site and what is communicated when you do.
Once an individual registers on your eWeb site, they will have the opportunity to view or edit the organization information they have entered under the My Information section of the eWeb site depending upon what settings you select described in this topic. See Editing and Viewing My Information on eWeb for more information.
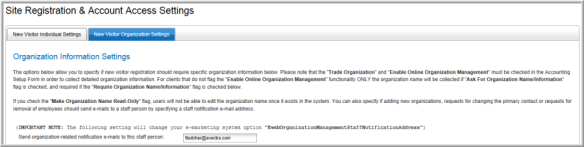
Send Organization-Related Notification E-mails to this Staff Person: If you want a staff member to receive notification every time organization related e-mails should be sent, specify the e-mail in this field. This field will overwrite your e-Marketing system option that was previously set for notifications: EwebOrganizationManagementStaffNotificationAddress.
The remaining tabs under the New Visitor Organization Settings tab enable you to expand and specify which data fields you want to include versus require when your new visitor is registering on your Web site.
For example, in the image below, the Organization Information tab has been expanded to specify whether or not a new visitor registrant should require visitors to enter their organization's contact information. Further, once it is selected, you may specify whether or not the information is then required. In other words, clicking the checkbox next to a demographic will enable that demographic on both the New Visitor Registration and My Information (on eWeb once registered) forms. Options that are unchecked will not be displayed on either form during New Visitor registration or on eWeb afterwards.
Ask for Organization Name/Information: This checkbox is used in conjunction with the Trade Organization and Enable Online Organization Management to dictate how much information is collected about the New Visitor’s organization. Particularly if you specify to Require Organization Name/Information instead of simply asking for it; the New Visitor may have the choice in creating just an individual account while entering his/her organization name or you may decide you want to require the New Visitor to enter complete individual and organization profiles, for example.
Ask for Organization Type: This checkbox will request that a type be entered if the types have been set up to Show Online.

Additional tabs on the New Visitor Organization Settings tab collect information such as address, phone number, fax, and so forth may be specified. However, the Organization Setting tab is a significant decision. Four Require Organization Setting scenarios are outlined below with supporting examples as to why you might want to choose that scenario for your association over another when completing this section of the New Visitor tab. Further, which options need to be enabled and disabled are also detailed for each scenario to work correctly.
Require Organization Settings During New Visitor Set-Up
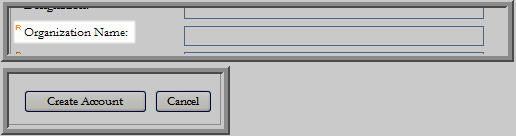
Require Org Setting 1. Scenario One – New Visitor May Choose To Create an Individual Account OR an Organization Account
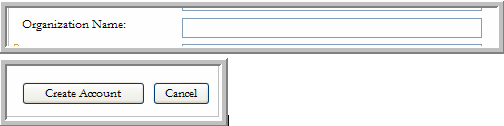
The first important item to note about scenario one is that the new visitor is not required to create an organizational account in this scenario. He/She may, for example, create only an individual account and bypass creating an organization account altogether. Note in the image below that two buttons are available for this New Visitor; Create Account and Create Account & Enter Your Organization Info. The Create Account button will create an Individual profile only while the Create Account & Enter Your Organization Info will create both Individual and Organization profiles. As noted, when this scenario is enabled, the New Visitor may choose either button on the New Visitor Registration form.
Choose this scenario if you think you may have individuals who are self-employed (and may not have true company data or employees, for example, to enter) or for individuals who will not be entering detailed company information that you want to provide a choice to.

To enable Require Organization Settings = 1: Trade Organization in Accounting Setup must be enabled, Ask for organization name/information must be enabled, and Require Organization Information on the New Visitor tab must be disabled (unchecked).
Require Org. Setting 2. Scenario Two – New Visitor Must Create Both Individual and Organization Account Profiles
In scenario two, the New Visitor is not given the choice as in scenario one. An account profile for both the individual and the organization must be created. Therefore, as noted in the image below, only the Create Account & Enter Your Organization Info button is available.

Choose this scenario if your individuals represent organizations and, therefore, organization information is an important piece of your association business.
To enable Require Organization Settings = 2: Trade Organization in Accounting Setup must be enabled, Ask for organization name/information must be enabled, and Require Organization Information on the New Visitor tab must be enabled (checked).
Require Org. Setting 3. Scenario Three – New Visitor Has Organization Name Field Available (Not Required)
In scenario three, only the Organization Name field in the Personal Information section of the New Visitor Registration form is available now (in the previous two scenarios it has not been because the ability to create an entire Organization profile is in place). The New Visitor is not required to complete the Organization Name field prior to completing registration however. Also note that only the Create Account button is available indicating that only an Individual profile is being created.
This scenario is similar to scenario one in that some associations may not want to require individuals to complete an Organization profile only this scenario takes a further step back in that only an Organization Name field is provided (and not required).
To enable Require Organization Settings = 3: Trade Organization in Accounting Setup must be disabled, Ask for organization name/information must be enabled, and Require Organization Information on the New Visitor tab must be disabled (unchecked). Further, no other Ask for organization checkboxes need be selected.
Require Org. Setting 4. Scenario Four – New Visitor Has Organization Name Field Available (Required)
Scenario four is exactly like scenario three with one exception; the Organization Name field is now required. Also note, just as in scenario three, that only the Create Account button is available indicating that only an Individual profile is being created.
To enable Require Organization Settings = 4: Trade Organization in Accounting Setup must be disabled, Ask for organization name/information must be enabled, and Require Organization Information on the New Visitor tab must be enabled (checked). Further, no other Ask for organization checkboxes need be selected.
Once you have decided which Require Organization setting you are going to use and how much organization information you are going to collect by enabling or disabling the Require Organization Information check box as appropriate, continue filling out the rest of the New Visitor tab, Organization Information Setting section.
Send Organization-Related Notification E-mails to this Staff Person: If you want a staff member to receive notification every time organization related e-mails should be sent, specify the e-mail in this field. This field will overwrite your e-Marketing system option that was previously set for notifications: EwebOrganizationManagementStaffNotificationAddress as noted in the Enabling Online Organization Management topic.
The remaining fields within the Organization Information Settings enable you to specify which fields for contact data you want to require your new visitor to complete when registering his/her organization. What information is important to your association is what should be considered when requiring fields, however, keep in mind, that registration cannot progress until all required fields are completed so having too many required fields is not necessarily a good thing either.
You are able to see the effects of your work on the New Visitor tab once you use the Save button and save your New Visitor tab settings. Below is a sample New Visitor registration form with an Individual Information section set-up. You will notice that some of the fields have been set to ask only while some have been set to required fields. Record source is required, for example, as is individual work address, work phone number, and work e-mail address.
When a new visitor registers on eWeb using this set-up, here is how the form appears to that user. (partial view)
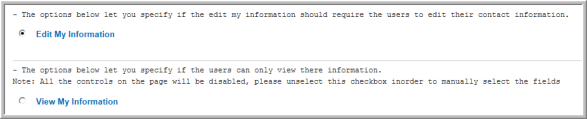
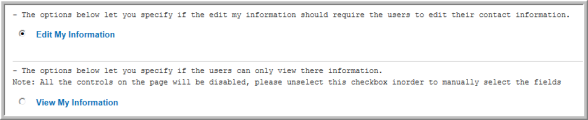
Once the new visitor creates his/her account and is able to log-in, he/she may access their information from the My Information page on eWeb. You may specify which of those fields that have been collected will appear on the My Information page on eWeb through use of the My Information tab in the Web Site Editor. Further, you may also decide whether or not the new registrant will be able to edit those fields or view them only depending upon which setting you choose as seen in the image below. For more information on setting up the My Information page on eWeb, view the online help topic, Editing and Viewing My Information on eWeb.
When you begin creating your Organization account (if enabled through the Require Organization Settings), the system is intuitive enough now to recognize the domain name you enter for your Organization account.
For example, in the image above, the new visitor logging in to create a customer account has a domain of Abila.com. As a result, after the Individual account is created and because the Require Organization settings force the New Visitor to add an Organization in this particular example; when the Individual account is created after clicking the Create Account & Enter Your Organization Info button on the add new visitor registration form, the system will display the form below:

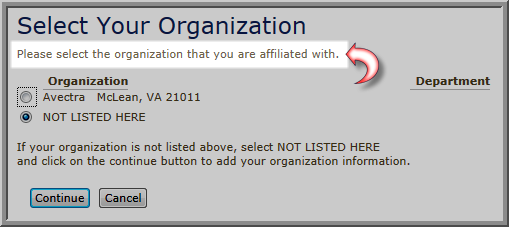
Because the domain was Abila.com and this domain was already part of the data in the system, it is further suggested that this person register under this Organization within netFORUM. This is only suggested if the domain/organization is recognized and already in the system. The New Visitor always has the option of choosing NOT LISTED HERE to enter an entirely new organization if he/she chooses. Also note that in the screenshot above that the text states: "Please select the organization that you are the primary contact of. This is the default text that is created with the system for this dialogue box. You may edit this text under the Content tab in the Web Site Editor under the My Information page, Primary Contact Request, as seen below.
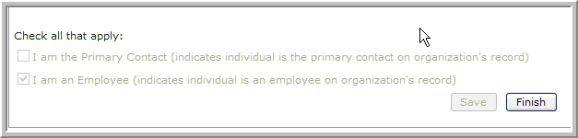
If the New Visitor selects an Organization currently in the system, he/she is given the choice with how they are to be associated with the Organization. The New Visitor may choose to be the Primary Contact for the organization or to simply register as one of the Organization’s employees. In the screenshots below you will see that the Save button to be clicked will change depending on whether the I am the Primary Contact or I am an Employee (or both) check boxes are selected on this form. What occurs afterward is also dependant upon if the Organization already has a Primary Contact.
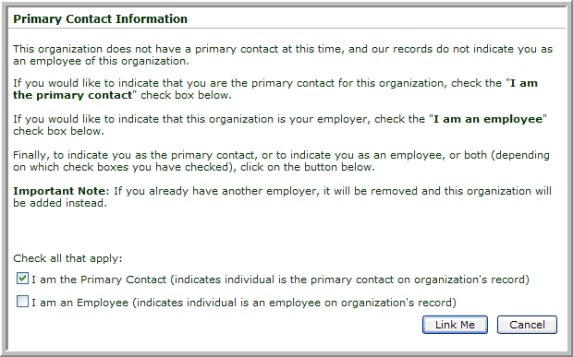
Organization Selected Has a Primary Contact – Primary Contact Check Box Selected
If the New Visitor selects an Organization currently in the system, he/she is given the choice with how they are to be associated with the Organization as illustrated in the form below. The New Visitor is informed that the organization already has a primary contact and also who the current Primary Contact is that he/she is asking to replace.
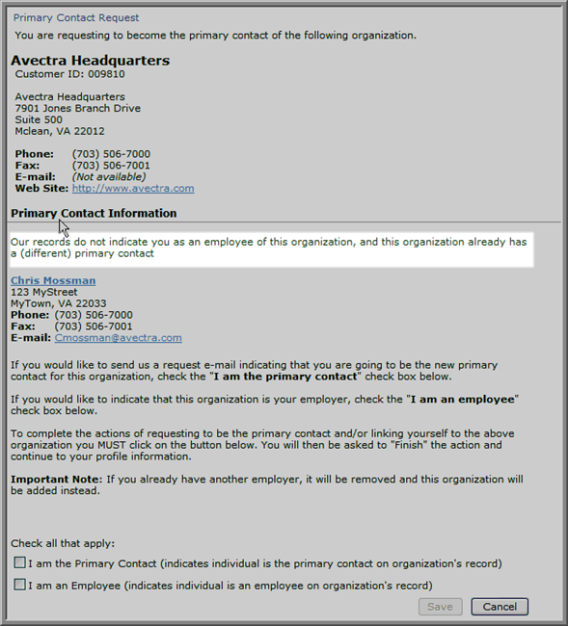
Notice in the screenshot above that the New Visitor decides that he/she wants to be the Primary Contact and selects the I am the Primary Contact check box. When this occurs, note that the Save button changes to Send E-Mail to Link Me. This will generate an e-mail to your Organization indicating that this New Visitor wants to be the new Primary Contact for this particular Organization.
(The New Visitor is also informed that this request is being made and also who the current Primary Contact is that he/she is asking to replace).
![]()
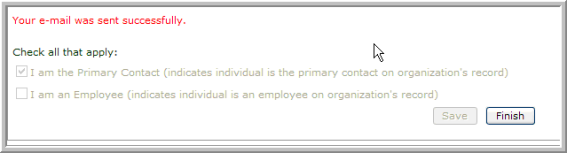
A success message is generated informing the New Visitor that the e-mail has been sent will be shown once complete.
Note: The e-mail that is sent to your staff is sent to the address designated in the eMarketing system option set in eMarketing Set Up: EwebOrganizationManagementStaffNotificationAddress. See Enabling Online Organization Management for more information.
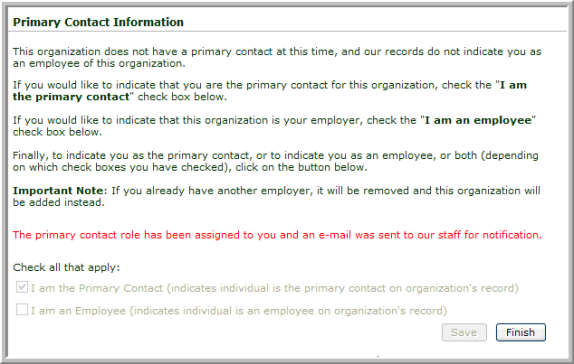
Organization Selected Does Not Have a Primary Contact – Primary Contact Check Box Selected
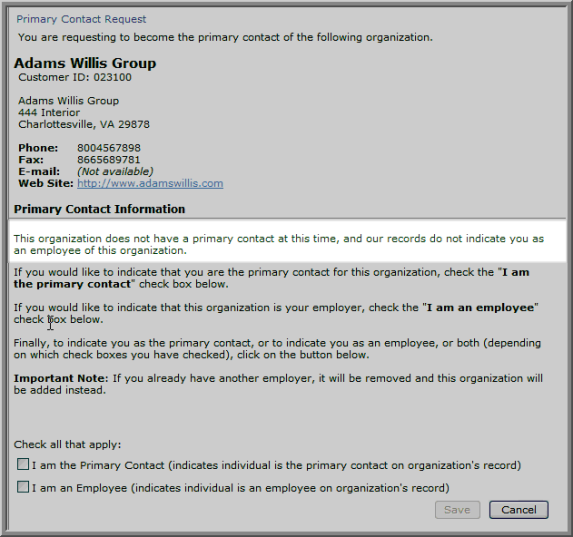
Notice in the screenshot above that the New Visitor decides that he/she wants to be the Primary Contact and the Organization, in this case, does not have a Primary Contact. If the New Visitor selects the I am the Primary Contact check box this time the Save button changes to, simply, Link Me.
This will generate an e-mail to your Staff indicating that this New Visitor has been made the new Primary Contact for this particular Organization. A success message is generated informing the New Visitor the he/she is now the new Primary Contact.
Organization Selected Has a Primary Contact - Primary Contact and Employee Selected
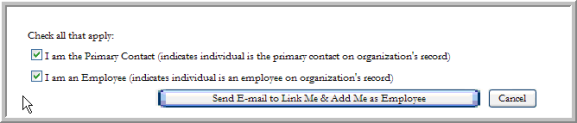
If the New Visitor selects both check boxes, and the Organization has a Primary Contact, the Save button changes to Send E-Mail to Link Me & Add Me as Employee. Just as when only the Primary Contact button was selected in this situation, an e-mail will be generated to your staff with this request stating the the New Visitor is requesting to become the new Primary Contact.
Note: The rule of thumb is that when the button has Send E-mail within its text, the Organization has a Primary Contact which means an e-mail needs to be generated to Staff with the request. When no Primary Contact exists, the New Visitor is simply linked or added as an Employee with the Staff only notified.
New Visitor is not the Primary Contact but an Employee
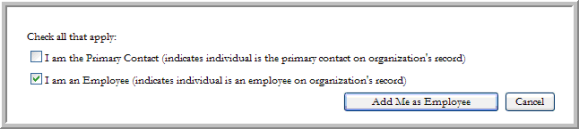
The New Visitor can always choose to add him/herself as an Employee of the selected Organization but choose not to be the Primary Contact.
Once the new visitor has clicked ’r;Add Me as Employee’ they will see the ’r;Finish’ button. Click on it to add the organization.
After the New Visitor has been added, they are visible on the Organization Profile under the Relations tab as part of the Linked Individuals child form, seen below by your staff members.

If the New Visitor chooses to add a new Organization they can select I Am The Primary Contact if they are the primary contact for the organization they are adding. The New Visitor can also select I Am An Employee if they are not the Primary Contact but should be linked as an employee of the Organization. If both roles are applicable the new visitor should select both. The selections that they make will then be updated in CRM on the Individual and Organization record.
Demographics and New Visitor Registrations
Note: Both the New Visitor Individual and New Visitor Organization Settings tabs have a demographics tab and check box that, if selected, will collect custom demographic information from each if desired. If disabled, demographics will not be collected on the New Visitor registration form.

If the demographics information check boxes are enabled visitors will be able to edit demographics only after saving their contact information and if the Edit My Information setting is enabled on the My Information tab.
Also under the My Information tab, under Individual Demographics, the Ask for individual demographics information check box must be selected. Otherwise, customers will not be able to edit their demographics even if Edit My Information is selected. This is also true for organization settings.
Certain demographics can be made read-only when specifying what should be collected on New Visitor registration forms. This means that in edit mode (after the record has been initially entered and exists in the database) that demographic cannot be changed by the user on eWeb under My Information.

For example, if the Make organization name read-only checkbox is not selected, the Organization Name field may be edited by the customer on eWeb under the My Information link as seen in the image below. This is assuming that the My Information page is in edit mode and not view only mode.
Note that both the Ask for Organization Name/Information and Require Organization Name/Information control two aspects of an organization and what appears on the New Visitor form; that is, the organization’s name textbox and whether or not an entire organization form to complete for its information appears and is required.
To differentiate between the two (the name textbox and whether or not an organization form appears - and if both are required), the Trade Org setting is used in conjunction with whether or not the person utilizing edit mode once a record is created is related to the organization (i.e., is the person a Primary Contact or does he/she have permissions to edit the record if it is set to read-only). Therefore, keep in mind that:
- If the Trade Org checkbox is turned OFF, the Organization Name textbox seen above will appear for everybody. This is true when both adding a New Visitor registration and when editing a record on the My Information page on eWeb. By using the mentioned read-only setting, the Organization Name can become read-only in EDIT mode.
- If the Trade Org checkbox is turned ON, instead of the Organization Name textbox appearing for everybody, a whole organization form will appear for everybody in ADD mode, and the same form is only accessible to eligible individuals (primary contacts, relationship types, etc) in EDIT form on the My Information page on eWeb. The mentioned read-only setting only applies to those individuals who are not related to the organization if selected. Related individuals will still be able to edit Organization name in this case.
Once an individual registers on your eWeb site, they will have the opportunity to view or edit this setting under the My Information section of the eWeb site. See Editing and Viewing My Information on eWeb for more information.
For more information on edit mode, view the Help topic on Enabling Online Organization Management.
New visitors to your eWeb site will now have the ability to choose whether the addresses they enter are visible in the online directory.
Note: The Show in Directory check box is also available on the Edit My Information page in eWeb that is available to users once they register for the site.
To enable this ability for new visitors to your eWeb site, complete the following steps:
- Hover over the Modules tab in the top navigation bar. In the fly out menu, click Web Site.
- On the Web Site / Overview page, expand the Web Site Editor group item and click Web Site Editor.
- Click the New Visitor tab to open the New Visitor | New Visitor & Account Access Settings page.
- Ensure that the New Visitor Individual Settings tab is selected. Expand the Individual Address tab.
- Click the Ask for show in directory checkbox.
![]()
Selecting this checkbox will add the Show in Directory checkbox for every address requested on the New Visitor Registration page. New visitors will have the option to select (or deselect) this checkbox to control which of their addresses are visible in the eWeb online directory.
- Click the Save button. This will update your eWeb site with the new settings.
When a new visitor registers on your eWeb site, they will see the Show in Directory checkbox listed below every address type that is requested on the New Visitor Registration form.

Users may only have one address at a time visible in the online directory. If the user attempts to select a second address to be visible, the first address will be deselected and no longer visible in the online directory.
Once an individual registers on your eWeb site, they will have the opportunity to view or edit this setting under the My Information section of the eWeb site. See Editing and Viewing My Information on eWeb for more information.
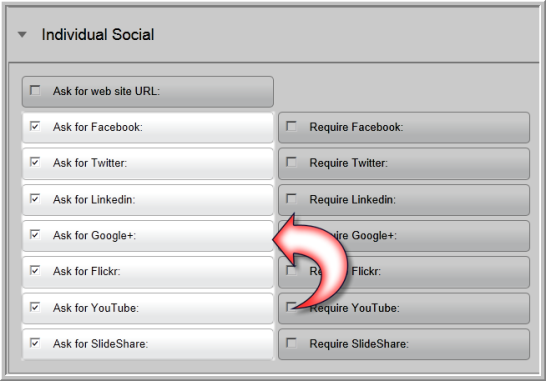
Prior to users being able to enter their social information on your eWeb site, these fields must be enabled.
To enable the social fields in eWeb for new visitors, complete the following steps:
- Hover over the Modules tab in the top navigation bar. In the fly out menu, click Web Site.
- On the Web Site / Overview page, expand the Web Site Editor group item and click Web Site Editor.
- Click the New Visitor tab. This will open the New Visitor | New Visitor and Account Access Settings page.
- Scroll down the New Visitor | New Visitor and Account Access Settings page and expand the Individual Social Demographics section.
- Click the check boxes for which social media sites you would like to be present on the new visitor registration form.