Open topic with navigation
Cancelling a Batch of Invoices
Use the Process Invoice Cancellation
batch process to cancel open invoices, closed invoices, or to cancel closed
invoices with payments. When you cancel an invoice, the membership
record is also cancelled.
Note: An open invoice
is created when the Bill Me
and Create Invoice options
are selected during the Shopping Cart check out process. A closed
invoice is created when the Bill
Me option is selected during the check out process and
there is no Balance Due.
A closed invoice with payment is created when a payment is entered
during check out, or the payment is added for an open or closed
invoice at a later time.
To cancel a batch of invoices, complete the
following steps:
- Expand the Module
Menu and click the Accounting hyperlink
to open the Accounting module. (This action can also be accessed
from the CRM module.)
- Click the Financials
Actions group item to see the list of available options.
- Click the Process
Invoice Cancellation hyperlink.
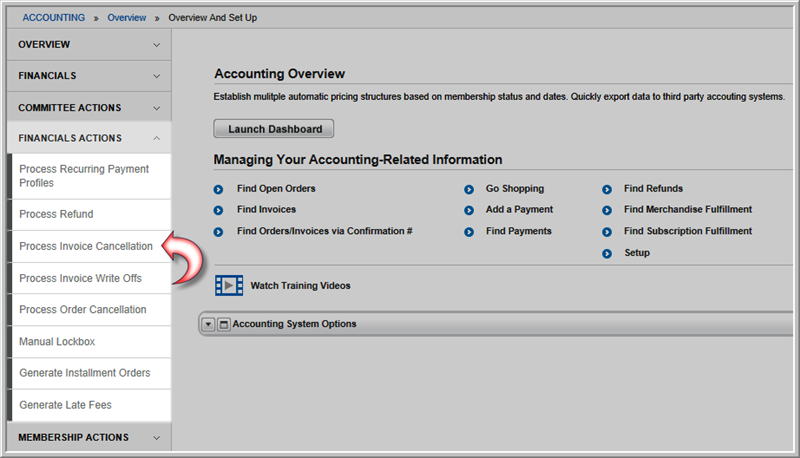
This will open the Invoice
Cancellation pop-up window.
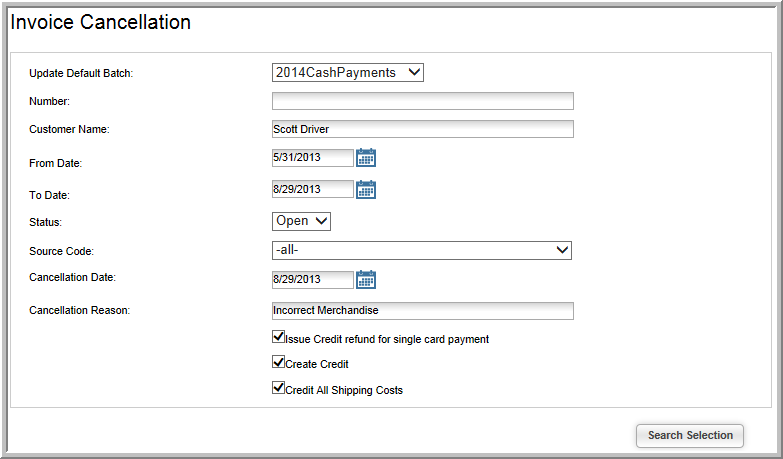
- Expand the Update
Default Batch drop-down menu if you would like to modify
your default batch.
- Enter search criteria to find the invoice that you
want to cancel, in the Invoice Cancellation
window. Search parameters include:
- Number search on the invoice number
- Customer Name (last name, first name)
- From Date - search on a date range
starting from this date. This is the invoice creation date.
- To Date- search on a date range ending
with this date.
- Status
(Open, Closed,
or all)
- SourceCode - search on invoices
associated to a particular source code.
- The current date populates the Cancellation
Date field. (The date can be edited.)
- Enter the Cancellation
Reason.
- If Credit Card
was selected as the Payment Method
during Shopping Cart or Online Shopping check out, select
the Issue Credit Refund for Single
Card Payment check box. (This option only works for closed
invoices paid with a credit card, processed through netFORUM.)
- The CreateCredit check box is automatically
selected and will create the appropriate credit for the customer.
- If a shipping charge was added to the order, you
can credit the shipping charge by selecting the Credit
all Shipping Costs check box.
- Click the Search
Selection button to search for the invoices that match the
criteria.
- Review the list of invoices that displays. All
invoices returned in search results are automatically selected. If
there is an invoice on the list that you do not want to cancel, clear
the check box next to the invoice.
To de-select all invoices in the search results
list and choose the ones you want, click the De-Select
All button. This clears all check boxes in the search results
list, allowing you to select only the invoices that you want to cancel. The De-Select All button acts as a toggle switch—to re-select all
invoices, simply click the De-Select All button again.
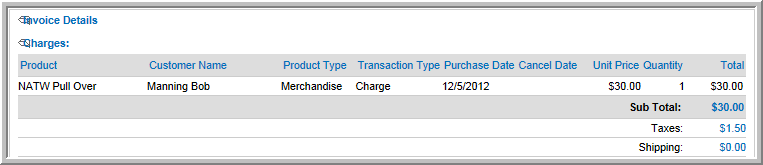
- You may click on the blue
 Information icon to obtain more details about an invoice and the invoice
itself (if needed) before you process a selection. For example,
after clicking the information icon, the invoice details are displayed.
You may click the line item again to go directly to the individual's
invoice and cancel the individual invoice or close the pop-up window
to return to the batch cancellation process.
Information icon to obtain more details about an invoice and the invoice
itself (if needed) before you process a selection. For example,
after clicking the information icon, the invoice details are displayed.
You may click the line item again to go directly to the individual's
invoice and cancel the individual invoice or close the pop-up window
to return to the batch cancellation process.
- After you verify that you want to cancel all of
the selected invoices, click Process
Selection.
- Click the Close
button in the top right corner of the Invoice
Cancellation window.