
|
|
Write-Off Group Item
|
Example: Write-Offs include: a deceased member with an account balance, transaction currency exchange rate differences, damaged goods, a deal that is negotiated with a customer for a specific payment that is below the amount of the invoice, etc.
A Write-Off is processed for the remaining amount of an invoice so the invoice can be closed and the batch it sits in can be processed.
When you decide to write-off the remaining balance of an invoice, you are creating a "payment" for that invoice balance with "write off" as the Payment Type. Subsequently, each write off generates a Payment Profile instead of a Write-Off Profile, which does not exist in netFORUM.
Since the write-off is in essence, payment data, only the Add functionality is available within the Write-Off group item. The standard add functionality is accompanied by the Batch Write-Off Process.
|
|
|
Write-Off Group Item
|
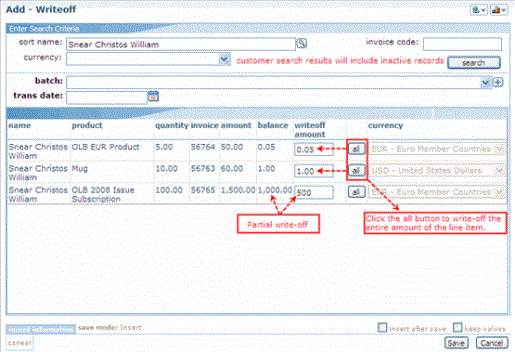
Using the Add Write Off page is recommended for writing off one or a few line items only. It does however, allow you to do partial write-off amounts.
To Add a Write-Off:
 )
)
 to add a new batch).
|
|
COMPLETED Add - Write-Off page
|
The information displays in the write offs child form on the Individual, Organization, and Invoice Profiles.

|
|
Write offs child form on the Individual Profile page
|
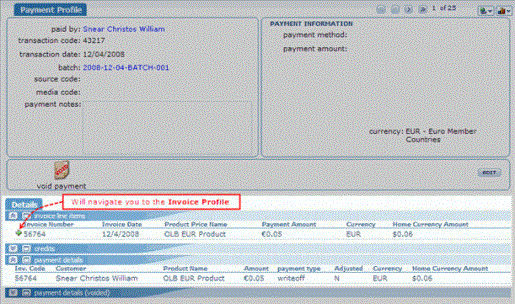
When you close and post a batch, the transactions are then posted to the General Ledger with the write-off amount debiting the Bad Debt account you entered for the price and crediting Accounts Receivable. Subsequently, the child forms on the Individual and Organization Profiles are separated into write offs (open batch) and write offs (closed batch) to distinguish that information (See above screen shot), and are the only location where you can access the Payment Profile ![]() for each write-off record.
for each write-off record.
Since the write-off allows you to close the invoice, you can return to the Invoice Profile by clicking the goto arrow ![]() on record in the invoice line items child form on the Payment Profile.
on record in the invoice line items child form on the Payment Profile.
|
|
invoice line items and payment details child forms on the Payment Profile page
|
Note: Partial payments are applied to the balance due. If a payment was made, the balance due will be less than the invoice amount.
This process gives you the ability to process multiple write-offs. For example, writing off all of the applicable transactions within a batch.
This process is much faster than the standard Add - Write Off form but can only process full, not partial, write-offs.
To use the Batch Write-Off Process:
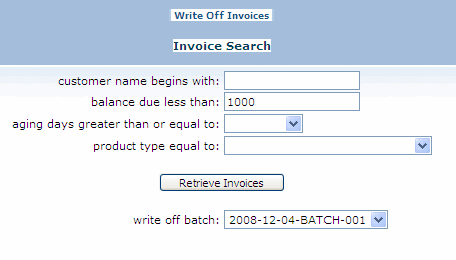 |
COMPLETED Search for write-off invoices |

|
|
Using the Select All process to write off transactions
|
|
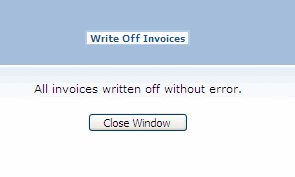
| Completion Window. |
Note: The process will generally not produce any errors if the transactions were processed correctly.
Before you create the write-off for a deferred product, make sure the invoice amount or balance amount has been recognized.
To Add a Write-Off for a Deferred Product: