Discount Program
Your organization may choose to create and offer a discount program on the products that work with credit hours in NetForum such as an event or publication. A discount program may be thought of as similar to a coupon book based on hours or number of uses. Once created and purchased by an organization, individuals may apply the discount program and then redeem the credits when purchasing products or events that use the program.
Discount programs are set up and managed through already existing functionality in NetForum; namely inventory, discount products and subscriptions. This topic will describe how to set up, add, and manage your discount programs.
Discount Program Set Up
There are several steps that must be followed to set up and use discount programs. They are described in detail in the following sections.
Adding a Discount Program Product Type
A single discount program product category must first be created during setup. This is accomplished in product setup as part of the inventory module.
To add a discount program product type, complete the following steps:
- Go to the Inventory module > Overviewgroup item > Product Setup group item link > Product Types child form.
- On the Product Types child form, click the Add button. This will display Add Product Type form.
- If necessary, add a new product type with Subscription as product type and enter other necessary details and then click Save. The newly added product type will be listed in the Product Types child form.
- On the Product Types child form, click the Expand icon on the Subscription product type line item. This will display Categories sub child form.
- On the Categories sub child form, click the Add button.
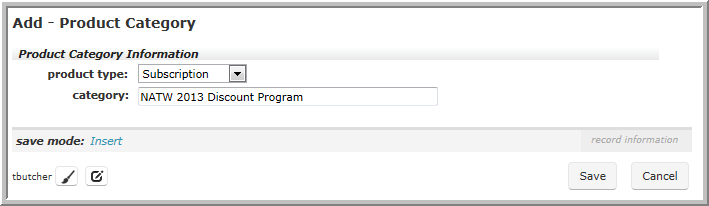
- On the Add - Product Category window, for Category field, give it a meaningful discount program name and then click Save to add the new discount program product type.
Obtaining the Discount Program Product Type Key
After the new discount program product category has been added, you must obtain its item key to update the new DiscountProgramProductCategoryGuid system option designed for this functionality. This is accomplished by copying the key from the product type's URL in the browser window.
To obtain the new product type's item key to update the DiscountProgramProductCategoryGuid system option, complete the following steps:
- Go to the Inventory module.
- Click the Product Category group item, then the List Category hyperlink.
- Click the Goto arrow next to the product category you just created.
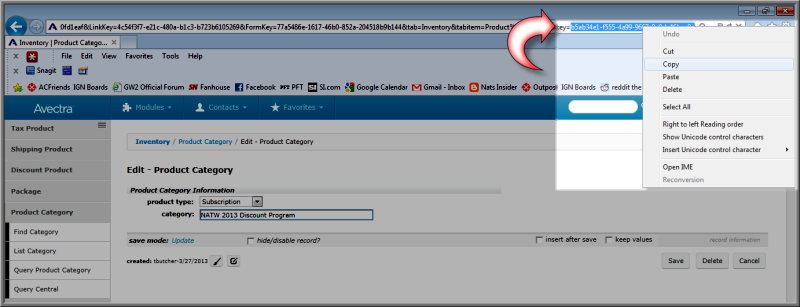
- After clicking the Goto arrow, you will be on the Edit-Product Category page for the product type you created.
- You may then use the browser's URL address bar to obtain the product type key which is found at the very end of the URL's address. Copy every character found after the key= statement.
Updating the Discount Program Product Category System Option
Once you have your new discount program's product category key copied, you must update the DiscountProgramProductCategoryGuid system option that has been created.
To update this system option, complete the following steps:
- Go to the Admin module.
- Click on the System Options group item and then Find System Option hyperlink.
- Enter DiscountProgramProductCategoryGuid in the System Option field. You may also enter simply Discount%.
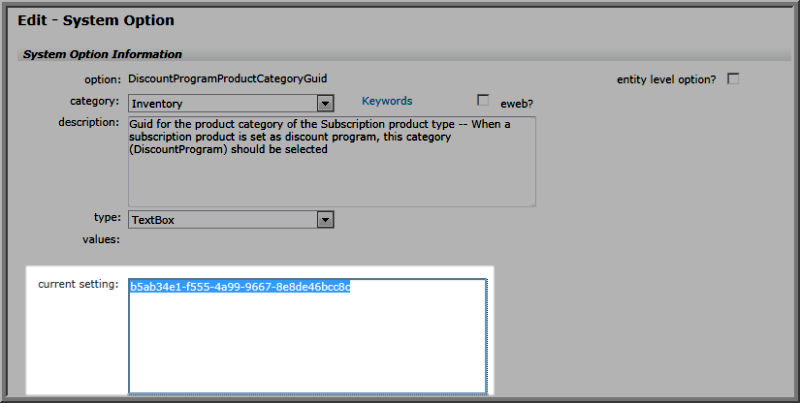
- On the Edit - System Option form, paste the key you copied from the browser URL of your new discount program product category into the current setting field. Click Save.
Note: Going forward, only discount programs based on this specific product category will now work. You may create multiple discount programs, but they must be based on this product category . You may now proceed to the next section and add a Discount Product for use with your Discount Program.
Adding a Discount Product for Use with a Discount Program
After you create your discount program product type, you must now create a discount product for use with your discount program.
Please note the following:
- Standard fields may be used and completed when adding a discount product. However, certain fields must contain specific values to work correctly with discount programs. Those are described in more detail below. You do not have to complete any child forms when filling out a discount product for use with a discount program.
To add a discount product for use with a discount program, complete the following steps:
- Go to the Inventory module and click the Discount Product group item, then click the Add Discount hyperlink.
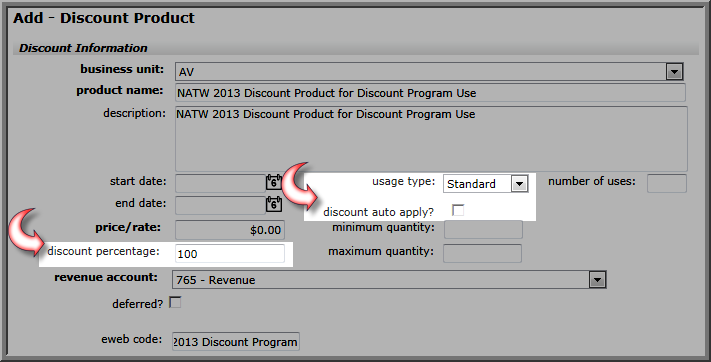
- Complete the fields as you normally would, paying attention to the product name field in that you should give it a Discount Program name to separate it from the normal discount products.
- The usage type field must be Standard.
- The discount auto apply check box must be disabled.
- The discount percentage must be 100%.
- Click Save to save your discount product. Only discount products with these attributes will be available for use with discount programs. You may now create your actual discount program.
Adding a Discount Program
Discount Programs are based on either hours or number of uses. The setup of each is described in this section. However, if you have not completed the initial set up steps described above with adding a new discount product type and creating a discount product for use with your discount program, you should not proceed.
Discount Programs are set up in the Subscriptions module. To add a new discount program, complete the following steps:
- Go to the Subscriptions module.
- Click the Discount Programs group item, then the Add Discount Program hyperlink.
- Add a discount program for use by hours or by number of uses.
Discount Programs Based on Hours
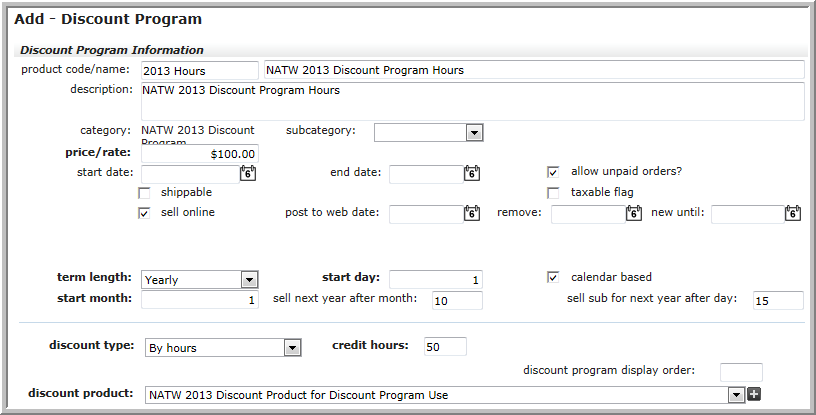
To add a discount program based on hours complete the Add - Discount Program, Discount Program Information section as follows:
- Complete the fields for the discount program as you normally would when adding a subscription.
- Notice that the category field is already read-only with the discount type you created and assigned to the DiscountProgramProductCategoryGuid system option.
- You must assign a price/rate for the discount program. This is what it will cost to purchase the discount program.
- You must choose a discount type of either hours or use. If you choose hours, as in this example, it means that the discount program will have a set number of hours that may be redeemed.
- credit hours equals the total number of hours that may be redeemed in a discount type of by hours.
- The discount product drop-down contains all the discount products you have created with the correct attributes specified in the section adding a discount product for use with a discount program above. You must assign a discount product to a discount program for it to function correctly.
- The discount program display order field functions like other order fields in that it will display discount programs in the order specified on eWeb.
Once you have created your discount program, click the Save button to complete and save your program. You are now ready to being using your discount program.
Discount Programs Based on Number of Uses
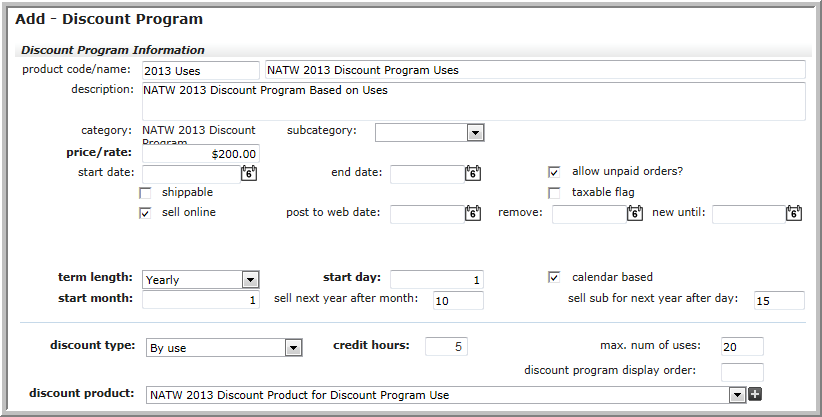
To add a discount program based on number of uses complete the Add - Discount Program, Discount Program Information section as follows:
- Complete the fields for the discount program as you normally would when adding a subscription.
- Notice that the category field is already read-only with the discount type you created and assigned to the DiscountProgramProductCategoryGuid system option.
- You must assign a price/rate for the discount program. This is what it will cost to purchase the discount program.
- You must choose a discount type of either by hours or by use. If you choose by use, as in this example, it means that the discount program will have a set number of uses that may be redeemed. Further, the max. numb of uses field will become available to specify that number.
- credit hours, in the case of a by use discount program, dictates what type of maximum credit items may be used in conjunction with the program. For example, you may have a 5 hour credit event and a 3 hour credit publication you want to use in conjunction with this discount program. To use both, specify 5 in the credit hours field to ensure that all items with 5 or less credit hours granted may be used with this discount program. However, if you then had an event that granted 6 credit hours that you tried to use the discount program with, an error message would be generated.
- max. num of uses: Specify how many uses the discount program will contain upon purchase. This example will generate 20 discount coupon codes, for example, that may be used before the discount program is completed.
- The discount product drop-down contains all the discount products you have created with the correct attributes specified in the section adding a discount product for use with a discount program above. You must assign a discount product to a discount program for it to function correctly.
- The discount program display order field functions like other order fields in that it will display discount programs in the order specified on eWeb.
Once you have created your discount program, click the Save button to complete and save your program. You are now ready to being using your discount program.
The Credit Hours Field and Discount Programs
Keep in mind that the Credit Hours field is treated differently in the function of the discount program depending upon if it is a by hours or by use discount program.
By Hours: The credit hours field determines the overall balance of the discount program and is decremented by the credit type of the item that is purchased and discounted. The overall balance is tracked and when the credit hours field has a zero balance, the discount program may no longer be used.
By Use: The credit hours field determines what type of item may be purchased and discounted. For example, if a 3 is placed in this field, only items that are three credit hours or lower may be discounted with the applied coupon.
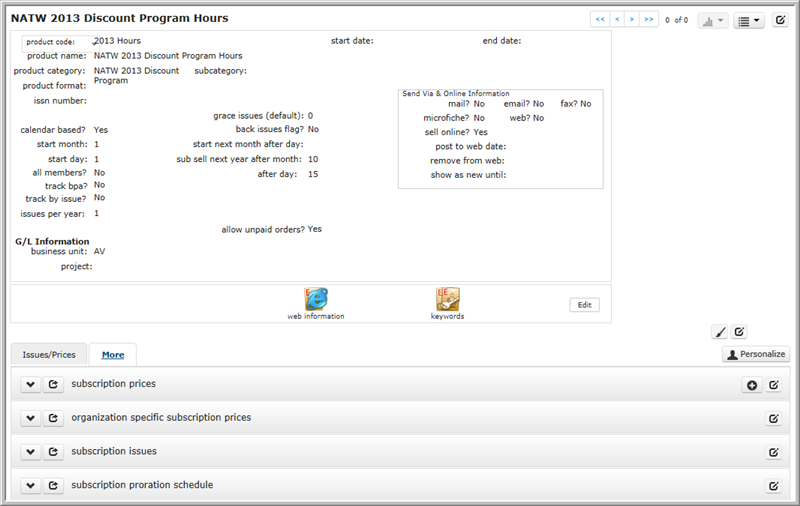
Discount Program Profile
The Discount Program Profile displays information about discount programs that have been set up in NetForum. The Discount Program Profile is very similar to the Subscription Profile.
Navigating to the Associated Discount Product
Each discount program has an associated discount product.
To navigate to the profile of the associated discount product, expand the Action Items menu and click the Go to Discount Product hyperlink.
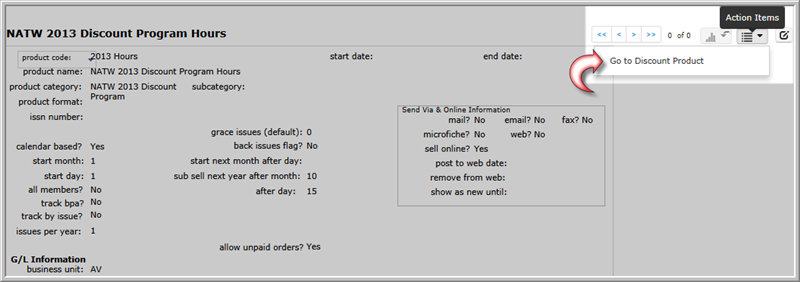
This will open the Discount Product Profile for the discount product associated to this discount program.
Finding a Discount Program
There are multiple ways to locate a record using the Find page (for detailed methods on how to locate records, see the Find page). The Find functionality is universal throughout NetForum . The results will display in a List page, which is also universal throughout NetForum .
The Discount Program information is stored in the database by the "columns" (fields) you selected during the Add Discount Program process.
Find vs. Query
The Find page is setup with a pre-defined set of columns (fields) versus a Query which allows you to select from ANY column in the search Table.
Navigating to the Discount Program Profile
To navigate to the Discount Program profile page, complete the following steps:
- Go to the Subscriptions Module.
- Expand the Discount Programs group item located on the left-navigation bar.
- Select the List Discount Programs group item link.
Managing a Discount Program
Discount programs are managed through already existing functionality in NetForum; namely those items where credits are applied such as events and publications.
Setting Up a Discount Program for Use with an Event or Publication
To use a Discount Program with an Event, the event must meet specific criteria which are described below (NOTE: To use a publication with a discount program, the exact set of steps are completed):
- The event must have credits set up on the Credits tab events credit child form.
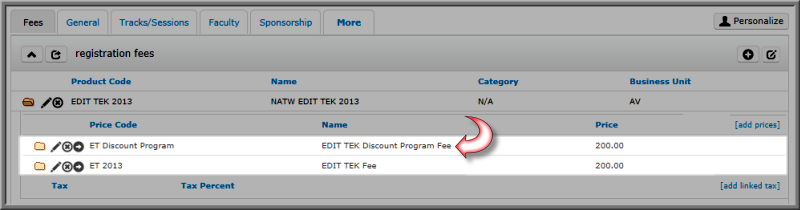
- When setting up a registration fee on the Fees tab under the registration fees child form, you must nest a discount program fee under the normal event registration fee.
- Give the price a meaningful name related to the discount program and, keep in mind, when the discount program is applied by an individual in the shopping cart, the discount program price will be used so you should consider using the same price as the normal event registration fee if you want to credit that same amount.
- In addition, when adding the discount program price attributes, you must tie it to the same credit type you set up on the Credit tab earlier in the requires CEU type drop-down. This will specify how many credit hours to subtract from the discount program when it is applied in the shopping cart by an individual.
Note: Setting up a publication for use with a discount program is exactly the same as setting up an event. That is, you must make sure that credits have been enabled, that a separate discount program price has been set up, and that the discount program price has been tied to the credit type you plan to use with the publication.
- Once the credit and pricing structure have been set up, an organization may purchase the discount program so that the credit hours or usage may be tracked.

Selling a Discount Program to an Organization
Tip: The steps below are for Organizations purchasing discount programs and individuals, most commonly employees, redeeming the coupons. However, an individual may also purchase a coupon book and the process of selling and redeeming the credits described below is essentially the same.
Before an individual may apply a discount program coupon for a credit, his/her organization must first purchase one.
To purchase a discount program, an organization must complete the following steps:
- On the Organization Profile, click the Invoice drop-down option on the Add profile tab to access COE normally on iWeb.
- Under Actions>Select Product, you may click Discount Programs.
- The price of the Discount Program is set up when the discount program is added, as described in the section above. It is purchased as a normal merchandise item.
- Once the discount program has been purchased by the Organization, you may view it under the Subscriptions tab, discount program usage child form if the discount program purchased is an hours discount program. The child form will note the credit hours contained on the discount program and the number of hours used by individuals who have applied it toward events and so forth. This is described in more detail in the next section.
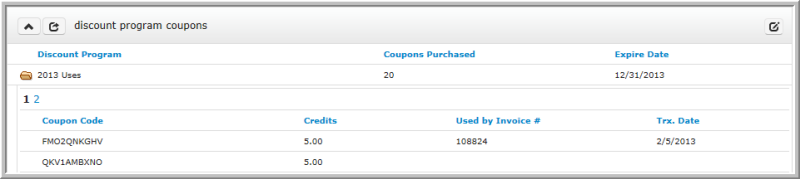
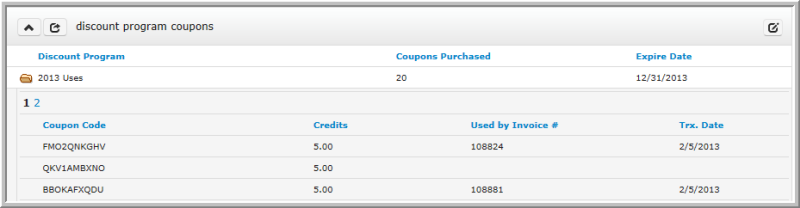
- If the discount program purchased is a number of uses discount program, it will display instead under the Subscriptions tab, discount program coupons child form. The child form will note coupon codes that may be used to redeem 1 individual use per coupon code of the discount program, the type of credit item that may be used with the program (in the example below, an item that is 5 credit hours or less), and which invoices have redeemed a coupon and the transaction date. Notice that the number of Coupons Purchased is noted as well which is the maximum number of uses that is specified when the original discount program by number of uses is originally set up.

Applying a Discount Program to an Event or Publication after Purchase
Once an organization has a discount program on file, individuals may register for an event, purchase a publication, etc. and then, during checkout, bill to the organization that has purchased the discount program and apply the discount coupon code (if a by use program and applicable) for credit for the event registration (in the case of the event). The steps are slightly different during check out depending upon if an hours or by use discount program is being applied and will be demonstrated below.
Applying a By Hours Discount Program at Time of Purchase
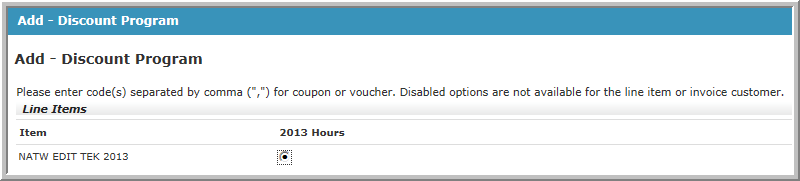
For example, in the image below, the individual has completed the registration process and is on the final step, Review/Payment. It is important to note that two steps must take place at this point. The Bill To: should be changed to the Organization that has purchased the discount program so that the appropriate number of credit hours for the event (and correct price may be credited) to the discount program the Organization purchased; and then, under Additional Items, apply discount program should be selected to complete the step.
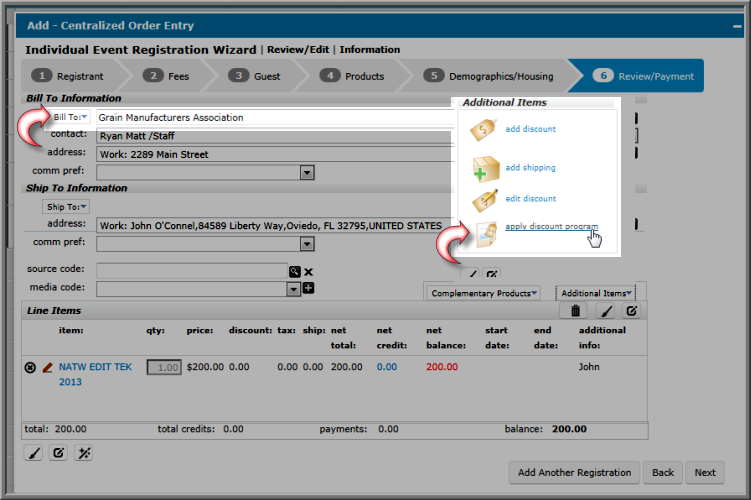
If the individual is applicable for the discount program price, he/she may select the radial button and price that appears. It will be grayed out if they are not applicable (in most cases this means he/she is not able to bill to the organization). The same bill-to logic applies to eWeb, meaning that this feature will work only if the eWeb customer is billing the order to his or her company (see the TradeOrganizationFlag system option).
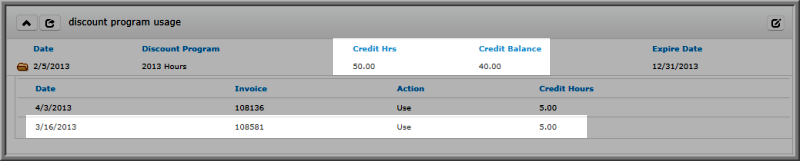
Because the discount program was billed to the Organization that purchased it by an appropriate individual, the discount program usage child form under the Subscriptions tab on the Organization profile, keeps track of its usage. Note that the Credit Balance column details how many credit hours are left in this particular program. This particular example is using an hours discount program. View the publication example for a by use discount program example. Further, each time it is billed, the invoice billing it may be viewed as well.
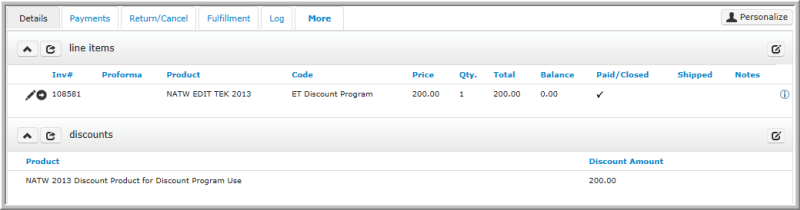
Finally, under the Details tab of the Invoice Profile, you will notice a zero balance and a discounted amount of the discount price you set up when creating your discount program.
Applying a By Use Discount Program at Time of Purchase
It is important to note that in a by use discount program, the purchaser only needs to have a correct coupon code (generated when the discount program itself is purchased) to apply and receive a discount that has been linked to a product; that is, he/she need not be linked to the organization that originally purchased the discount program nor does the Bill To: field need to be changed as in the case of the hours discount program in the previous example. In this way, an organization may use a discount program to give benefits or discounts to individuals not linked or tied directly to their organization but to important customers or vendors, for example.
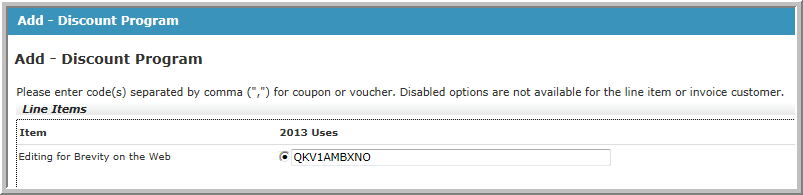
The discount program itself is still applied, however, after an item purchase is made. For example, a publication has been purchased. After the publication has been selected, the discount program may be applied by selecting the Additional Items box and then Apply Discount Program hyperlink.
Because the discount program has been set up and tied to this publication as a by use discount, anyone may now select the radial button (unlike the by hours discount program where he/she must be linked to the purchasing organization) and enter a coupon code. As noted, this coupon code is generated when the discount code is purchased and is found, for example, on the Organization Profile > Subscription tab > Discount Program Coupons child form.
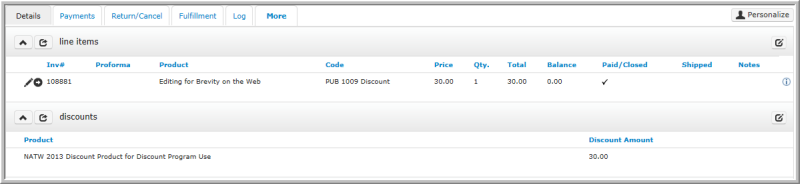
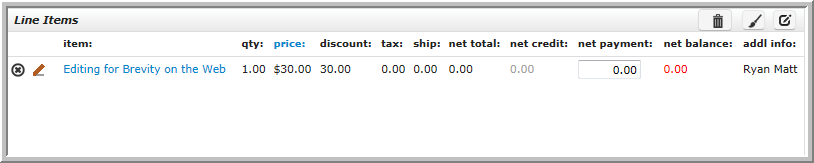
Notice that the line item during check out, seen below, now displays a net balance of zero and a discount of the original publication price after the discount program is applied. Further note, that the tax amount has been removed as well and now shows a zero balance.
As each coupon code for the discount program is used, the discount program coupons child form under the Subscriptions tab on the Organization profile keeps track of that usage. Note that the Used by Invoice column details which specific invoice used the coupon code.
Finally, under the Details tab of the Invoice Profile, you will notice a zero balance and a discounted amount of the discount price you set up when creating your discount program just as with the discount program.