Discount Product
Your organization may choose to offer discounts on the products it sells. For example, you may want to offer a discount as an incentive for new members to join or for current members to renew or, perhaps, for holiday merchandise purchases. Discount Products can be applied through NetForum at the time of sale in both iWeb and eWeb to allow for these special campaigns. Discounts are assessed as either flat rates or percentages and may also be set-up to be active for only a specific date range if you so choose.
You may use a discount product to create a Discount Program which acts similar to a coupon book for organizations and their linked individuals.
The five standard Group Item Links (Add, Find, List, Run Query, Query Central), are available in the Discount Product group item.
Adding a Discount Product
Your first step in using and allowing discounts for your products is to create your base Discount Product so that you can then add your discount amounts, dates they are applicable, and any specific products that are allowed to receive the discounts. You may also specify if the discount will auto apply to specific product types or if it has a certain amount of uses before it expires. For example, you might create a discount product relating to just memberships and membership drives, another discount product for conferences and events, and so forth. Further, you can specify that when a membership is purchased, the discount is automatically applied and, after 10 uses, it can no longer be used. Following this methodology, our example will create a Discount Product that will create discounts related to memberships. Note that fields in bold with asterisk mark in NetForum are required fields. You will not be able to save or apply your discounts until these fields are complete.
To add a new discount product to NetForum , follow these steps:
- Select the Inventory module.
- Click the Discount Product group item to expand.
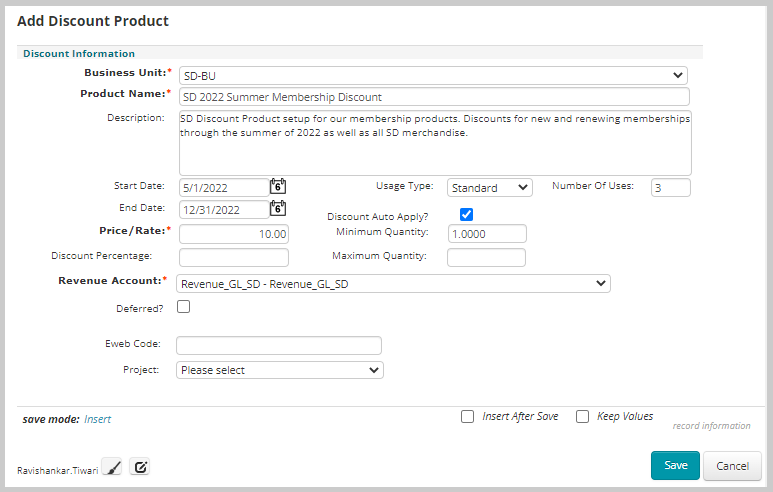
- Select the Add Discount from the drop-down menu. The Add Discount Product page displays.
- Business Unit: This drop-down will be pre-populated with your business unit (Default BU). Select a business unit from the drop-down list if you wish to change it.
- Product Name: You should choose a descriptive name for your discount product so you will know at a glance what kind of discounts it will hold. In the screenshot above, you know that it holds membership discounts for example.
- Description: This field should be used to describe with more detail the types of discounts used in this product. Note in the screenshot above that the types of discounts to be stored in this base product are described.
- Start / End Date: Start and end date refer to how long discounts will be available. You could enter that here to specify that all discounts relating to this product will have this start and end date. However, you can also enter this for each individual discount amount that you enter as well. This is discussed in more detail below. The discount product is active only till the end date mentioned in the End Date field. After the date is passed, it’s no more available in the search criteria.
- Number of Uses: Specify the number of uses per customer a discount has before it is automatically discontinued and unable to be used again. For example, in the image above, the Number Of Uses field specifies that this particular discount can be used a total of 3 times before it can no longer be applied. Be aware that the Number Of Uses field refers to the number of line items in the cart and not the quantity of items being purchased. Therefore, a single customer could have 1 line item with a total of 40 T-shirts purchased and this discount would be applicable. On the other hand, if the same customer attempted to purchase 5 different products, resulting in 5 separate line items, only the first 3 would be applicable for the discount.
Note: The number of uses is related to the sell-to customer and not the bill-to customer. Be aware that the Number Of Uses does not limit the number of times the discount product can be used by everyone, just the number of uses by a single customer.
- Discount Auto Apply: Specify if the discount automatically applies itself when the product it is connected to is selected and all price attributes are satisfied. Note that group discounts are always auto-applied. If you are creating a Discount Program, this should not be selected. Once you select the Discount Auto Apply check box the Minimum / Maximum Quantity fields will be populated.
- Usage Type: Usage type may be Standard or Group reg. Standard discounts as described here and are applied to products whereas a Group Reg discount is applied only to group registrations for events. For more information on how to set-up and use group registration discounts, view the Group Registration Discount topic. If you are creating a Discount Program, you must choose standard here.
-
Price/Rate: Enter the amount you would like to discount a product at the time of purchase.
-
Discount Percentage: Enter the discount percentage you would like to discount a product at the time of purchase.
-
Minimum / Maximum Quantity: Enter a minimum / maximum quantity if you intend to set up a bulk discount pricing structure.
-
Revenue Account: Select the account for revenue from the drop-down box. The amount from this account is debited when a product is sold (non-deferred price) OR when revenue is recognized (deferred price).
-
Deferred: Deferred discounts will be recognized over the same term as the product, they are discounting if that product price has been set as deferred. Click this check box if the revenue for this product must be deferred.
-
Deferred Expense Account: Select the deferred expense account from the drop-down box. When the discount is applied to a deferred product, deferred expense account will be debited instead of the revenue account on the discount product setup. When the revenue recognition process is run, a journal entry will be created for the discount which will debit the revenue account selected and credit the deferred expense account.
-
Eweb Code: Enter an eWeb code in the Eweb Code text box. The eWeb code will be used by your customers to enter at checkout on eWeb to apply the discount so it is important that it remain fairly simple and easy to apply.
-
Project: The project field is an accounting code reference, not a billable time entry project.
Once the Deferred check box is selected, the Deferred Expense Account field display.
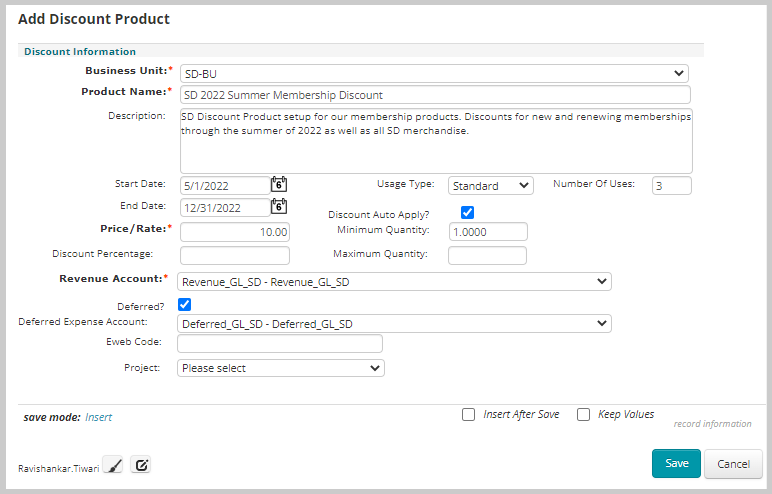
Note: If you want to discount a deferred price, then the discount also must be deferred.
When applying a discount, the system compares the deferred flag of the discount to the deferred flag of the product to which the discount would apply. If the flags have the same value, then the discount is applied. If the flags are different, then the discount cannot be applied to the product.
Once you have entered all information, click Save.
Finding a Discount Product
Finding Discount Products that have been entered into the NetForum database is easily accomplished. The Find function is universal throughout NetForum and detailed on the Find topic.
Finding discount products within the Inventory module follows the same format and function. You may search by the following:
- Discount Key (A drop-down of all current discount product names)
- Business Unit
- Usage Type
The Advanced View checkbox allows you to conduct Boolean searches to broaden and narrow your search as needed.
Managing Discount Product Records
Navigating to the Discount Product Profile
The Discount Product Profile is displayed once you have entered a discount product into the NetForum application. If you want to navigate to and view a specific profile page:
- Click on the Inventory module from the Module Menu drop-down.
- Click the Discount Product group item to expand. You can then use the List Discount or Find Discount group item link to find a discount product.
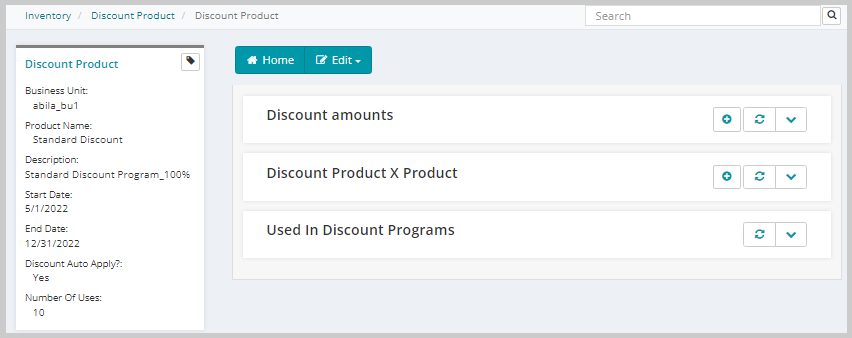
Depending upon which discount product you choose, its Discount Profile page will display.
Discount Product Profile
Your organization may choose to offer discounts on the merchandise it sells. For example, you may want to offer discounts on your merchandise as incentive for new members to join or for current members to renew or, perhaps, for holiday merchandise purchases. Discount Products can be applied through NetForum at the time of sale in both iWeb and eWeb to allow for these special campaigns. Discounts are assessed as either flat rates or percentages and may also be set-up to be active for only a specific date range if you so choose.
You may use a discount product to create a Discount Program which acts similar to a coupon book for organizations and their linked individuals.
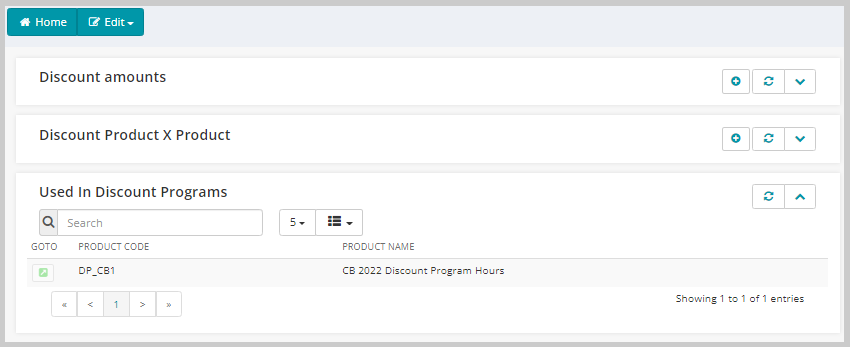
Viewing Discount Programs that are Associated to this Discount Product
The Used In Discount Programs child form displays a list of all discount programs that are associated to this discount product. Clicking the GOTO icon next to the desired discount program will take you to that Discount Program Profile.
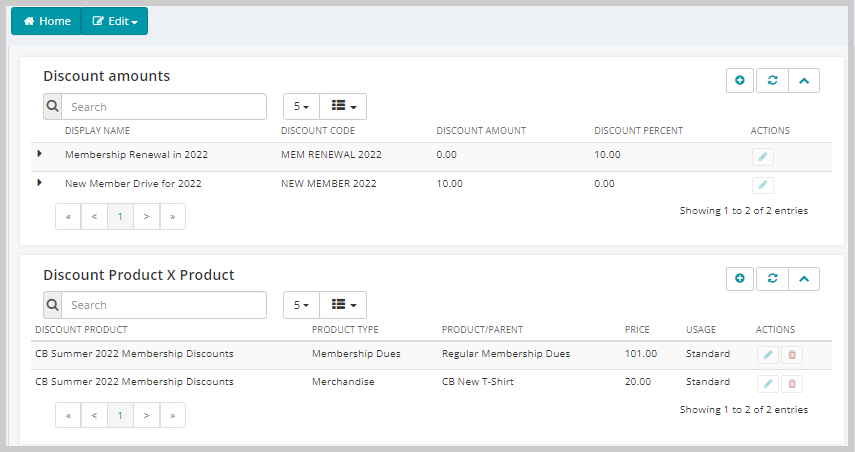
Discount Amounts Child Form
The Discount Amounts child formis used to specify the discount rates (and codes) you or your members will enter to obtain the discount. Note in the screenshot below two discount amounts have been specified; an amount for new members who join in 2022 set at a flat rate of $10.00 and an amount for members who renew in 2022 set at a 10%. It is possible to set both a flat rate and a percentage rate for one discount. If you do this, NetForum will deduct the flat rate first and then apply the percentage. For example, if you have a publication that you are selling for $100 and you apply a both flat rate discount of $10 as well as a percentage amount of 10%, NetForum will first apply $10 bringing the amount owed to $90 and then will apply the 10% discount to that total for a final discount of $19.00 to be applied to the final purchase of the $100 publication.
You can add as many additional discounts as necessary using the Add Record button.
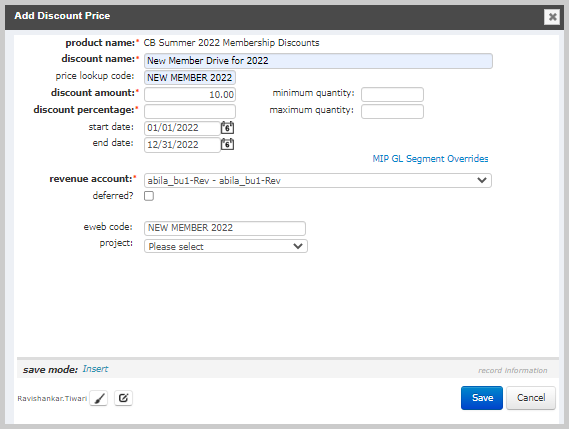
The screenshot above is the example used for the membership renewal discount when its discount amount was added. Take note that this discount will be in effect for calendar year 2022 (as opposed to just the summer dates that were specified on the overall discount when it was added) and has an eWeb code of NEW MEMBER 2022. The eWeb code is given to your customers to enter at checkout on eWeb to apply the discount so it is important that it remain fairly simple and easy to apply.
Adding a Discount Price Attribute
A price attribute can be added to discount products. This is completed once you add your discount amount on the Discount amounts child form by clicking the Add button on the Discount price attributes grandchild form under the associated discount to which you want to apply the attribute, as seen in the image below.
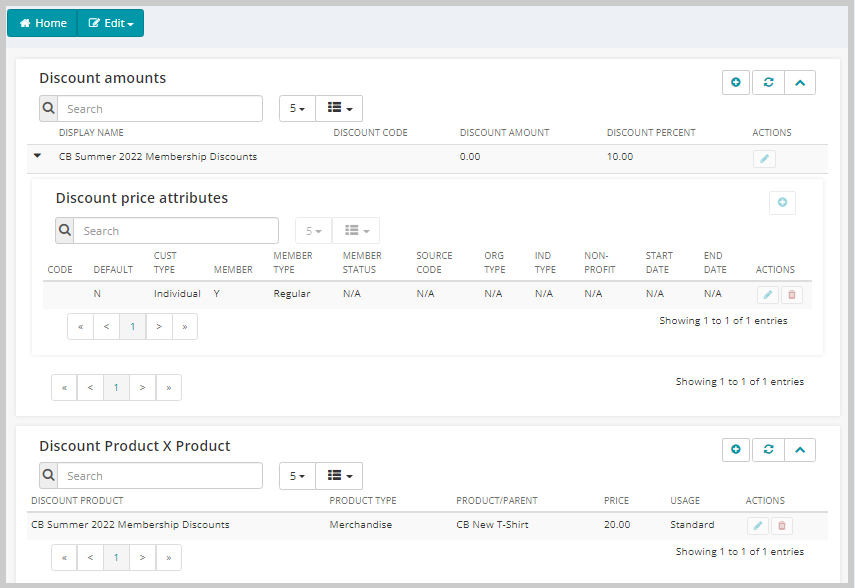
Price attributes for discount products are applied in the same manner they are applied throughout NetForum . That is, use them to restrict how your discounts are applied either by Member Type or a Customer type of individual or organization. Notice, for example, in the image above the discount has been set to apply for all merchandise but only to individuals with a Regular membership. For more information on price attributes in general, view the Price topic.
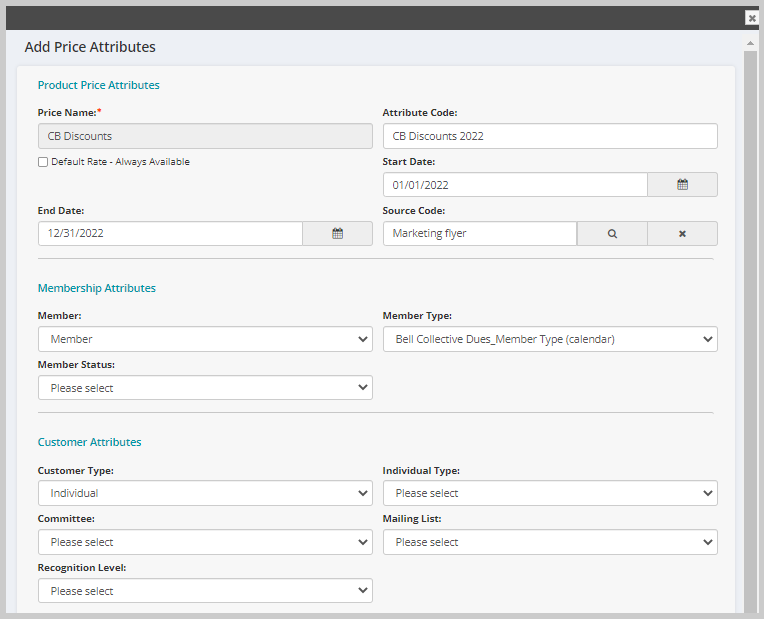
When you opt to add discount price attributes, note that you can specify a source code in the Add—Price Attributes form. When a source code is associated with the discount price in this way, the discount will be applied whenever the source code is selected in the Centralized Order Entry form.
Discount Product X Product Child Form
Once you have set your discount amounts and the dates they will be available, you may decide that you want to make them applicable for only certain products in your inventory, particularly if you selected the auto apply checkbox when you created your discount. For example, you could set-up a new member discount and make it available through January of the current year only and applicable to new memberships purchased that month as incentive for new members to join in the new year. Or you may want to provide your members who renew in 2010 to be able to apply a 10% discount to a product in your merchandise. This is accomplished through the Discount Product X Product child form, pictured below.
You can add as many product specific restrictions as you need using the Add Record button on the Discount Product X Product child form.
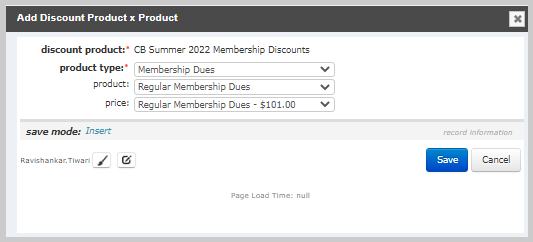
The screenshot above demonstrates how a specific membership is selected for a discount. If you wanted to allow the discount to apply to all items selected in your inventory, you could leave the product and price fields blank as an alternative.
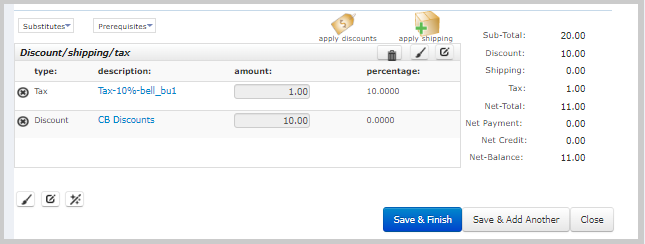
As noted, if the auto apply check-box is selected when adding your discount, when the product is purchased that you have added on the discount product x product child form, such as the Avectra t-shirt in the example above, the discount will be automatically applied without needing the code. This is demonstrated in the image below.
Note: Because of the way packages are priced and sold, it is not possible to add a non-dues package as a Discount Product X Product.
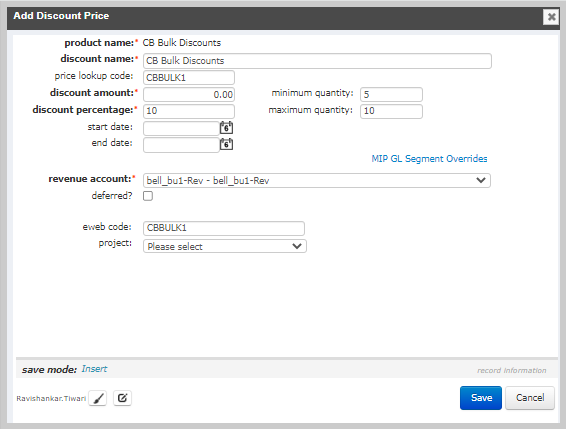
Adding Bulk Discounts
You have the ability to add bulk discounts based upon a specified number of products purchased. This is accomplished through the minimum and maximum quantity fields when adding discount prices on the discount amounts child form. Notice in the example below that a minimum purchase of 5 products is required before this discount will be (auto) applied.
You only need to specify a maximum field if you plan on setting-up tiered discounts. For example, you could set-up bulk discounts for tiered purchases of t-shirts in your inventory by specifying the following:
- minimum 5 - maximum 10 = 10% discount
- minimum 11 - maximum 20 = 15% discount
- minimum 21 - maximum 1200 = 20% discount (working on the assumption that no customer is likely to purchase 1200+ shirts)
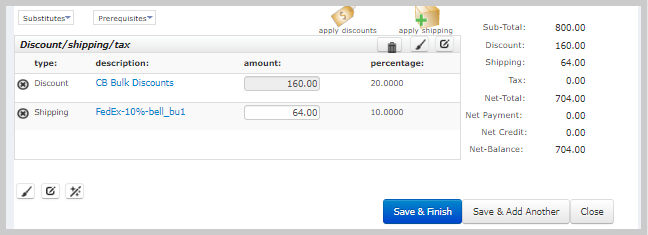
Your child forms would then look similar to the example below as a result.

Notice that when a bulk amount is then purchased, such as 40 t-shirts, using the example above, the tiered discount of 20% is automatically applied (if the auto-apply checkbox is selected).
Bulk discounts can only apply to a specific line item, not to a collection of two or more line items of the same product in one order. For example, suppose you have a specific item that has a bulk discount set to take effect once the quantity is 10. You create two line items in one invoice because you want to ship 4 to one address and 6 to a different address. Bulk pricing for the 10-item price will not trigger in this case.
Configuring Group Registration Discounts for an Event
You have the ability to set-up a Group Registration Discount for events. The motive in setting up a group registration discount is to provide your customers with incentive to register more customers by providing them with higher discounts with each successive registrant. There are three different group registration scenarios that may be set-up for group registration discounts. They are:
- Scenario One - Ranged Discount: You might specify that a group will be given a 10% discount if they register at least 3 or more customers.
- Scenario Two - Ranged & Incremented Discount: Some organizations prefer to offer discounts each time a certain number of full price registrations have been met. For example, for every one full price registration that is purchased, two discounted registrations are purchased.
- Scenario Three - Ranged & Tiered Discounts: Finally, you may also set-up tiered discounts for group registrations. In this scenario, an organization may decide that at least 5 registrations are required for a group before a 10% discount is granted and, after the 10th registration, a 20% discount will be granted for all remaining registrations in the group.
Each of the above 3 scenarios can be set-up using the group registration discount functionality and are discussed in more detail on the Group Registration Discount topic.
Excluding a Price from Being Discounted
To exclude a price from being discounted, click the Do Not Discount? checkbox located on the Add - Price or Edit - Price form.
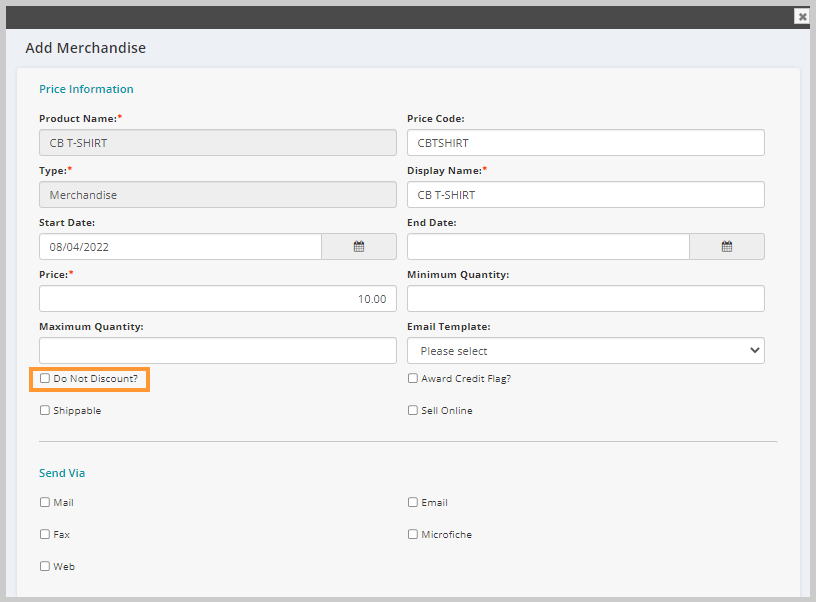
If you try to apply a discount to a price that has been excluded from discounts, a message will apply informing you that no discount can be applied to that price.