Form Extension
A Form Extension adds programming logic to a designed Toolkit Form. A form extension can fire on a singe form, on multiple forms, or with Object Extensions (see below), on all Forms of an Object.
The most common area to extend netFORUM functionality through .NET code is in Form Extensions. The netFORUM Toolkit allows a developer to add form extensions to dynamic forms. The form extension will reference the library and namespace of the public method to be called.
Form extensions can be used to output HTML controls on a form, manipulate controls, or perform behind-the-scenes actions that are invisible in the user interface.
Note: Form extensions should only be used for user interface elements. Form extensions fire only on the Form it is on -- they do not fire in xWeb, Workflow, or .NET code. Therefore, if you are seeking to implement core business logic, then don't use a form extension. Instead use Workflow or .NET.
Uses
Form Extension
The public method can be fired during any of these events:
- OnInit: when the page is initialized. The object is loaded but the page has not been painted.
- OnLoad: when the page is loaded. The web and html controls are loaded on the page and are available for manipulation.
- BeforeSave: directly before the Save method is run, after a user clicks the Save button. These form extensions are typically used to validate data or to manipulate data before a save.
- AfterSave: directly after the Save method is run. These form extensions are typically used to fire some event after a record has been successfully saved.
- BeforeDelete: directly before the Delete method is run, in response to a user clicking the Delete button.
- AfterDelete: directly after the Delete method is run.
- BeforeCancel: before a Cancel is executed, in response to a user clicking the Cancel button.
- AfterCancel: after the Cancel is executed.
To add a form extension, first make sure that the Form on which you want to add the extension has the has form extensions checkbox checked. Next, from the form extensions child form, add a new form extension.
Invoking a Form Extension
After adding the form extension definition, ensuring that the has form extensions checkbox is checked, and placing your assembly DLL into the bin folder of the web application, then you must design the form and add the control to your form. You can add your form extension by clicking on the new control to add dropdownlist and scrolling to the very bottom. Then simply drag the form extension anywhere on the form and then save the form.
Managing Form Extensions that Span Multiple Forms
netFORUM allows you to define a form extension on one form, and then add that form extension as a control on multiple forms. In other words, you might have a form extension (we’ll call it Extension X) defined on Form A, and then use that form extension on Form A. You might then use that same form extension on Form B, Form C, and other forms.
Object Extension
A Form Extension can serve as either a Form Extension or an Object Extension that will fire on all Forms of a single Object. An Object Extension is developed and configured in the same way as a Form Extension except for the following differences:
- The has extension controls checkbox on the Object must be checked.
Note: The initial release of 2006.02 neglected to place this control on the designed form. Therefore you must update this from within SQL:
UPDATE md_object SET obj_has_extensions = 1 WHERE obj_key='xxxxxx'
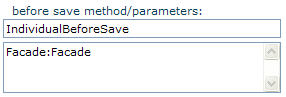
- Go to any Form of the Object and add a Form Extension. First save the form extension, then edit it and go to the advanced page, select the Object to which the form belongs, and set the Form to be blank:

- For the method definition in the Form Extension, set the parameters to be Facade:Facade as shown here:
- The .NET code for the Form Extension should not follow the typical pattern of passing in a PageClass and System.Web.UI.Control parameter. Instead, to match up with the Facade:Facade parameter as described in the step above, pass in a FacadeClass as in:
public void CommitteeParticipantBeforeSave(FacadeClass oFacade)
{
    DateTime dtFrom = System.Convert.ToDateTime(oFacade.GetValue("cmc_start_date"));
    DateTime dtThru = System.Convert.ToDateTime(oFacade.GetValue("cmc_end_date"));
    if (dtFrom > dtThru)
    {
        ErrorClass oEr = new ErrorClass();
        oEr.Number = (int)ErrorClass.ErrorNumber.GeneralError;
        oEr.Message = "From Date must be before Through Date";
        oEr.Level = ErrorClass.ErrorLevel.Error;
        Config.LastError = oEr;
        Config.LastError.Display();
    }
}
Limitations of Object Extensions
- Object Extensions work only on Forms. Does not fire when the object is run in code or from xWeb.
- Works only in netFORUM build 2006.02 and later.
- If you have an Object Extension on the Address Object, but a user edits an address on a Form based on the Individual object, your Object Extension will NOT fire. Workaround: add Object extension to Individual and see if you can call your original object extension on the Address. In reality, an Object Extension is really a "Form Extension that works on all Forms for that Object." The main benefit of the Object Extension is that you have to set up the metadata only once, and you do not have to worry about going to every form of that object and putting the form control on the object and checking the "has extensions" checkbox for every form. Just be aware of the limitations of an Object Extension and design your solution accordingly.
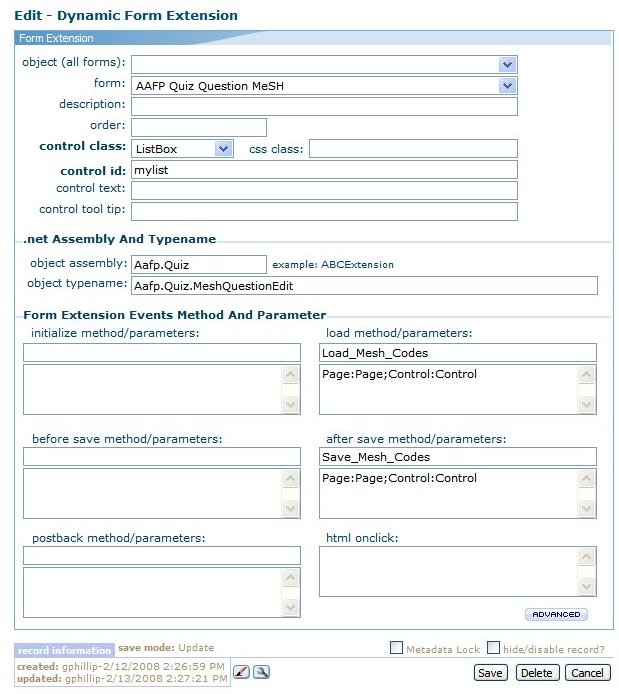
Controls
- Form: This is the form to which the form extension belongs. Note that a form extension on one form can actually be placed on other forms.
- Description: Enter a general description of this extension. For custom extensions, enter the client abbreviation at the beginning to distinguish from baseline form extensions (e.g. ABCDE Individual BeforeSave).
- Order: The order on which the extensions should fire. If you have multiple form extensions on the same page, and one is dependent on the other, then ensure that the order numbers are in the proper order.
- Control class: the most common choice is Div. All non-visual form extensions are a Div. Some scenarios call for a Button control class.
- Css class: used if the Control class is not a Div.
- Control ID: Enter an ID that is sure to be unique as this will be the ID painted onto the ASPX web page. For custom extensions, enter the client abbreviation at the beginning to distinguish from baseline form extensions (e.g. ABCDEIndividualBeforeSave).
- Control text: Enter a “friendly description”. For a Div, simply re-type the Control ID. For form extensions with control class of Button, the value entered here will be the caption on the button.
- Control tool tip: Will add a tool tip for certain visual form extensions.
- Object assembly: The assembly name of the class library.
- Object typename: The namespace of the class.
- Method/parameters pairs: Enter the name of the public method in the class that should fire in the designated method, and enter any parameter name/value combinations in this way:
ParameterName1:ParameterValue1;ParameterName2;ParameterValue2
Example: Page:Page;Control:Control
The advanced button takes you to less commonly used form extension properties.
Execute Stored Procedure AfterSave
This form (or object) extension uses Avectra.netForum.Data.DataUtils.ExecuteSql to fire a stored procedure in the AfterSave event. By using this method, you do not need to write any .NET code, you just need to add the Form Extension metadata, design the form, and put the extension on the Form as a Form Control.
The Assembly and typename are CaSE seNsItiVE because they refer to .NET libraries. Be sure to enter these exactly:
data
Avectra.netForum.Data.DataUtils

Here is the AfterSave method and parameter:

The parameter text is this. Note how we are using Parsed Values. Be sure to capitalize the first letter "S" in String and be sure to type exactly ExecuteSql in the correct mixed case.
String:exec dbo.client_XYZ_InsertAppForMem
  @email='{email}',
  @app_cst_key='{CustomerKey}',
  @end_cst_key='{mbr_ind_cst_key_referral}'
Execute Stored Procedure BeforeSave for Validation
Using the same approach as above, you can also execute a database SP in the BeforeSave form (or object) extension event to perform a validation. Please note that if you are trying to look at data in the database, the information on the form that the user just attemped to save is not yet in the database. If you want this SP to throw an error back to netFORUM, which will show the error message to the end user and prevent the record from saving, then you must issue a SQL RAISERROR as in:
RAISERROR ('You may have only 6 codes.', 16, 1)
See RAISERROR for more.
Important! Please note that there are some things you should NOT do in SQL. As a rule you should not bypass the netFORUM Object model by writing direct inline SQL. The only exception is for certain simple routines that are not heavily Object-dependent.
Redirect AfterSave
If you have an eWeb page, and you want it to redirect after you save a Form, then use this extension.
Assembly, Typename, Method, and Parameters:
extension
Avectra.netForum.Extension.Utility
RedirectAfterSave
Page:Page;Control:Control;String:ProfilePage.aspx?webcode=abs_profile&key={abs_key}
Send Email Confirmation
Used to send an email Correspondence Template. The third parameter is the Key of the template.
Assembly, Typename, Method, and Parameters:
extension
Avectra.netForum.Extension.Utility
SendTemplate
Page:Page;Control:Control;String:EE74F3B7-935B-474E-974D-05AF3041191B
Adding a listbox to a form

You can add a multi-choice scrolling list (that is, a ListBox) to a form. First create your Assembly and typename.
using System;
using System.Web.UI;
using System.Web.UI.HtmlControls;
using System.Web.UI.WebControls;
using Avectra.netForum.Common;
using Avectra.netForum.Controls;
using Avectra.netForum.Data;
using System.Collections;

namespace Aafp.Quiz
{
    public class MeshQuestionEdit
    {
        public void Load_Mesh_Codes(PageClass oPage, Control oControl)
        {
            if (! oPage.IsPostBack)
            {
   	// First find your custom control that you have place on your form
	// Then add your items to that listbox
                ListBox myList = (ListBox)oPage.FindControl("mylist");

                ListItem mesh1 = new ListItem();
                mesh1.Value = "1";
                mesh1.Text = "Lung Cancer";
                myList.Items.Add(mesh1);

                ListItem mesh2 = new ListItem();
                mesh2.Value = "2";
                mesh2.Text = "Skin Cancer";
                myList.Items.Add(mesh2);

                ListItem mesh3 = new ListItem();
                mesh3.Value = "3";
                mesh3.Text = "Foot Cancer";
                myList.Items.Add(mesh3);

                myList.ToolTip = "This is a scrolling list box.";
            }
        }

        public void Save_Mesh_Codes(PageClass oPage, Control oControl)
        {
	// Loop through your check box and process it.
            ListBox myList = (ListBox)oPage.FindControl("mylist");
            for (int i = 0; i < myList.Rows ; i++)
            {
                if (myList.Items[i].Selected)
                {
                   // DoStuff(  myList.Items[i].ToString() );
                }
            }
        }

    }
}
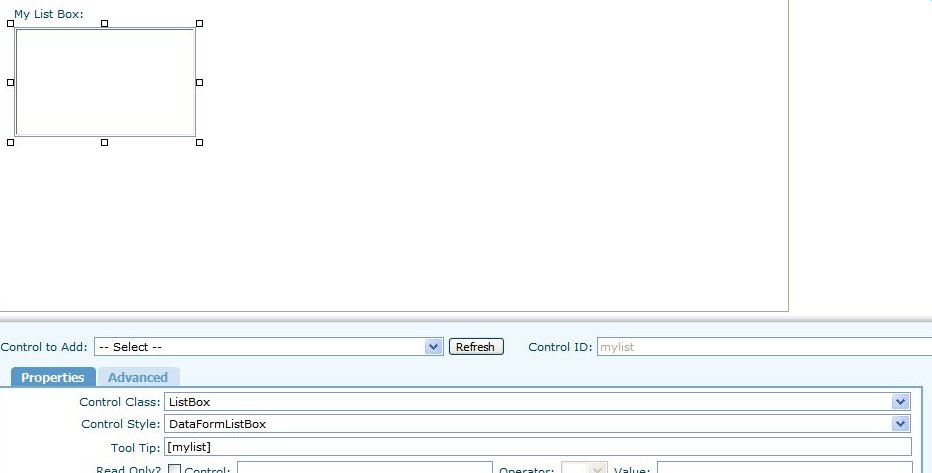
Then add your form extension in the form designer and size it accordingly. Note that the Control Class is set to ListBox and the Control Style is set to DataFormListBox.
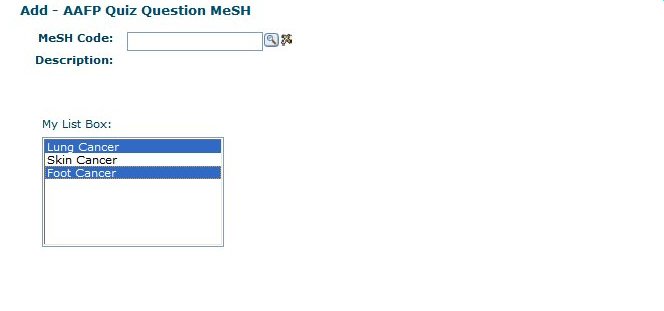
Here is the final form view.
Form Extension on Postback
This code sample shows how to execute code and manipulate Facade Object controls in an event triggered by a postback on a Form. The code will fire only when a specific control is the object of the postback, which we can determine by inspecting the __EVENTTARGET property in code.
See Also
Form extension references - SQL script to see where and if a particular .NET method is referenced as a form extension.