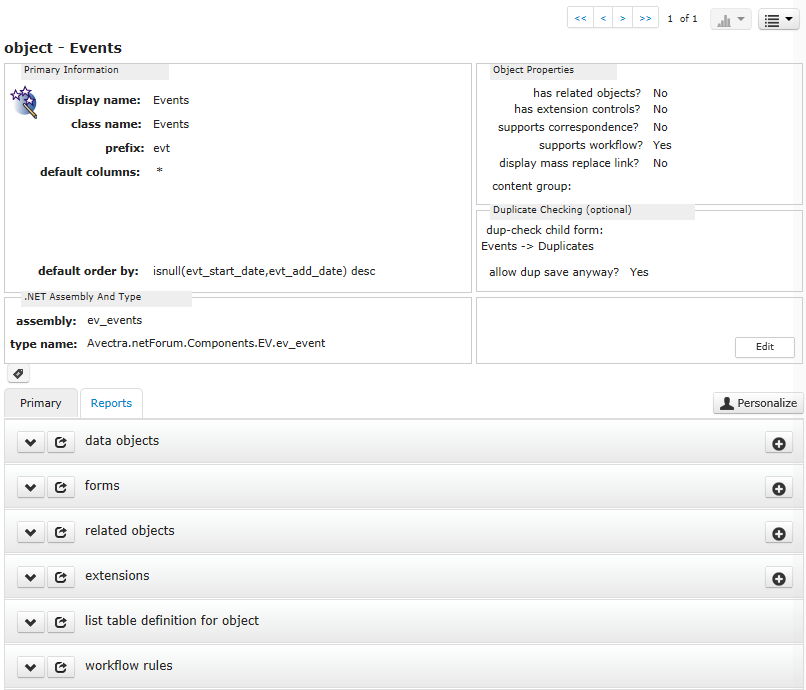
Object Profile Page
The Profile page for an Object can be opened from several different places.
-
Open the Find Object form by selecting from the left navigation menu.
Note: If you are on the Toolkit Overview page, you can click on the Object
 icon instead.
 - Enter search criteria.
- Click Go.
- If more than one Object meets the search criteria, the List Object page displays. Click on the desired Object.
Method 1:
Click the object link on the Form Profile page.
Method 2:
- On the Form Profile page, click the action items
 button in the upper right hand corner.
 - Click Form Object.
- On the Workflow Rule Profile page, click the action items
 button in the upper right hand corner.
 - Click Go to Object.
Fields
display name: The friendly name for the Object. This is the name that will display throughout the Toolkit. This field is required. To distinguish baseline Objects from custom client Objects, the client's acronym is typically added to the beginning of the display name.
class name: The Object name. Typically this is the same as the display name, but all spaces are removed. This field is required.
prefix: The 3-character column prefix for the core database table most closely associated with the Object. This field is used by the NetForum framework and it is required.
default columns: The data columns shown on the List page that displays the results of a Find or Query (based on the Object). This field is required.
Note: An asterisk in this field indicates that a List Table is configured for the Object, and the List Table is used to indicate what data columns will display on the List page.
default order by: The data columns that are used to sort the results of a Find or Query (based on the Object). If the List Table is configured for the Object, then these columns must be set up as list columns. This field is required.
assembly: The name of the .NET class library for the underlying object. This field is required and it is case-sensitive. NetForum instantiates this assembly object whenever this object is invoked in NetForum.
type name: The namespace for the class, used in conjunction with assembly. This field is required and it is case-sensitive.
has related objects: If selected, this indicates that the Object has Related Objects. The framework does not enforce related object relationships that are defined for this Object is this check box is not selected.
has extension controls: If selected, this check box indicates that the Object has Object Extensions.
supports correspondence: If selected, the Object supports the NetForum Communicate feature, and the Communication icon is added to the List Page for the Object.
supports workflow: If selected, Workflow rules and tasks can be created for the Object.
display mass replace link?: If selected, the Object supports Mass Replace, and the Mass Replace icon is added to the List Page for the Object.
Note: Mass Replace is not available on a List Page that opens when a List Group Item Link is clicked. Users must run a Find or a Query (based on the Object) that retrieves a specific list of results in order use Mass Replace.
dup-check child form: The name of the Child form that the Object will use to check for duplicate records during data entry. All of the forms that belong to the Object will check for duplicates by using this form. See Duplicate Check Child Form for more information.
allow dup save anyway?: If selected, a Save Anyway button is available on all of the forms that belong to the Object. Your users can a record even if it might be a duplicate. This field works in conjunction with dup-check child form.
Buttons
An Object Profile page has common Toolkit buttons. See Common Toolkit Profile Page Buttons for descriptions. The following buttons are also on an Object Profile page.

|
Edit: Click to open the Edit Object form for this Object. |

|
Keyword: Click to open the Edit Keywords or Tags form. Add one or more keywords to the Object. Keywords will help when searching for the Object. See About Keywords for more information. |
action items  shortcuts:
- Click to list the Data Objects for the Object.
- Click to go to the Edit form for the child form that the Object uses to check for duplicates. If no Duplicate Check Child Form is assigned to the Object, then the Add Dynamic Child Form form opens instead.
- Click to open the Object and Form Deploy tool. Use this tool to deploy the Object, a form belonging to the Object, or a child form belonging to the Object.
- Click
Object Profile Child Forms
The following child forms are available on the Object Profile Profiles tab:
The following child form is available on the Object Profile Reports tab:
Object Profile Grandchild Forms
The following grandchild form is available on the Object Profile Profiles tab:
