
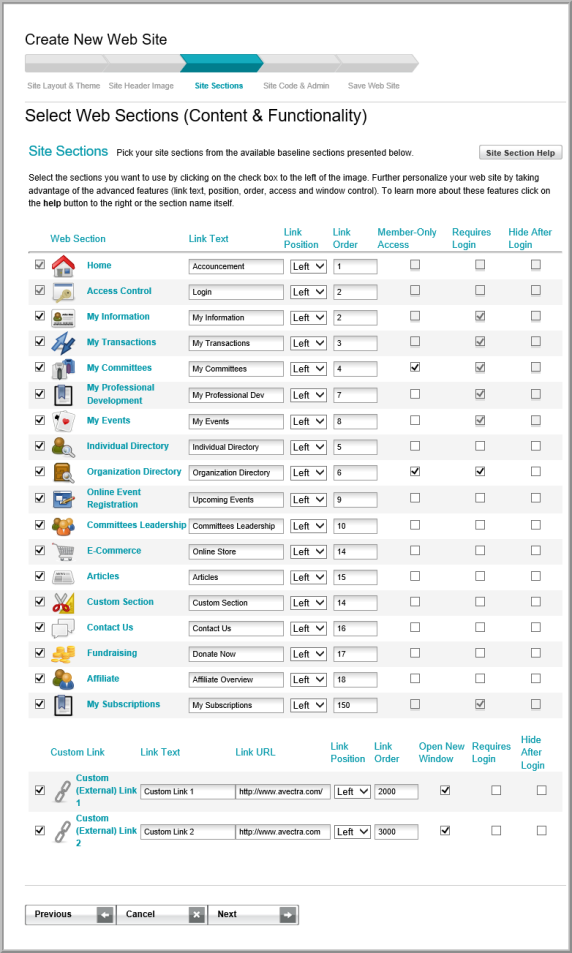
Selecting Web Site Sections (Content & Functionality)
The third step of the Web Site Wizard allows you to select which sections you want to include in your navigation bar, gives you the option of renaming the links, and gives you the ability to put the links in the order you want them to appear on the navigation bar of your Web site (e.g., Online Store, Upcoming Events, Contact Us, etc).
Tip: The steps outlined below are the same steps used when creating/modifying Web Site Navigation Links using the Add Baseline Section button on the Content tab of the Web Site Editor.
To create the links for the navigation bar:
- Open the Select Web Sections (Content & Functionality) page of the Web Site Wizard. This is the third page in the wizard.
- The Web Section column displays the available options you may enable on your Web site.
- To display a link on the navigation bar of your Web site, click the check box to the left of the Web Section column.
- To change the name of a link as it will display on the eWeb site, edit the text in the Link Text column/field.
- To display the link on the left side of the Web page, select Left from the Link Position drop-down list. Or, to display the link at the top of the Web page, select Top.
- To re-order the links in the navigation bar, select the order in which you want them to appear in the Link Order fields.
- To add security to a link so that only members can access the Web page, select the Member-Only Access check box. (The system recognizes individuals with an active membership.)
- To add a log-in requirement so that the user must log-in before accessing the Web page, select the Requires Login check box. (The My Information, My Transactions, My Committees, and My Professional Dev sections always require a log-in. This cannot be changed by the user.)
- To hide the link after the user logs-in, select the Hide After Login check box. Only users who are not logged-in will see this link. (This is useful if you want to create a Welcome page for "newcomers" the first time they access the site.)
- Click the Next button to continue through the rest of the steps in the wizard to update your Web site.
Note: To access the My Committees page, you must be a member of a committee.
Available Components
My Information
The My Information link takes the user to their Individual Profile where they can edit their contact information online. (This link requires the user to log in.)
My Transactions
The My Transactions link takes the user to a Web page where they can view the orders purchased and invoices processed within the past 30 days. (This link requires the user to log in.)
My Committees
My Committees - The My Committees link takes the user to a Web page that displays a list of committees (only if you are on a committee). (This link requires the user to log in.)
- If you select the Members-Only Access check box, the My Committees link will be available to members only.
My Professional Development
The My Professional Development link takes the user to a Web page where they can view their certification, designation, or education credit information online. (This link requires the user to log in.)
- If you select the Members-Only Access check box, the My Professional Development link will be available to members only.
My Events
The My Events link takes the user to a Web page where they can view all events that they or their guest are currently registered for or have registered for in the past. Event details are present such as Event date and time, name, and number of times a user has registered.
Individual Directory
The Individual Directory link takes the user to a Web page where they can search for individual members.
- If you select the Members-Only Access check box, the Individual Directory link will be available to members only.
- If you want to require the user to log in before accessing the Web page, select the Requires Login check box.
Organization Directory
The Organization Directory link takes the user to a Web page where they can search for organizations.
- If you select the Members-Only Access check box, the Organization Directory link will be available to members only.
- If you want to require the user to log in before accessing the Web page, select the Requires Login check box.
Online Event Registration
The Online Event Registration link takes the user to the Events section of the Shopping Cart.
- If you select the Members-Only Access check box, this feature will be available to members only.
- If you want to require the user to log in before accessing the Web page, select the Requires Login check box.
Committee Leadership
The Committee Leadership link takes the user to a Web page that displays a list of committees and the individuals associated with the committee who have leadership positions as indicated on the Committee Profile. (This link requires the user to log in.)
- If you select the Members-Only Access check box, the My Committees link will be available to members only.
E-commerce
The E-commerce link takes the user to the Online Store.
- If you select the Members-Only Access check box, the Online Store will be available to members only.
- If you want to require the user to log in before accessing the Web page, select the Requires Login check box.
Articles
The Articles link takes the user to a Web page where they can search for a posted "article." An article might be a press release, white paper, meeting summary, or other document.
- If you select the Members-Only Access check box, the Articles link will be available to members only.
- If you want to require the user to log in before accessing the Web page, select the Requires Login check box.
Custom Section
The Custom Section link takes the user to a custom Web page. (See Adding Content to a Custom page)
- If the Members-Only Access check box is selected, this feature will be available to members only.
- If you want to require the user to log in before accessing the Web page, select the Requires Login check box.
- If you want to hide the link after the user logs in, select the Hide After Login check box and this page will only be available to users who are not logged in.
Contact Us
The Contact Us link takes the user to a Web page that contains information on how visitors can contact your organization.
Fundraising
The Fundraising link takes the user to a Web page that will allow them to donate a fund specified by the organization.
Affiliate
The Affiliate link takes the user to the Affiliate List page for the organization.
My Subscriptions
The My Subscriptions link takes the user to a Web page where they can view the subscriptions purchased and invoices processed.
Custom Links
The Custom Links take the user to external Web pages, for example, your organization's main Web site.
- If you want the external Web page to open in a new window, select the Open New Window check box.
- If you want to require the user to log in before accessing the Web page, select the Requires Login check box.
- If you want to hide the link after the user logs in, select the Hide After Login check box and this page will only be available to users who are not logged in.
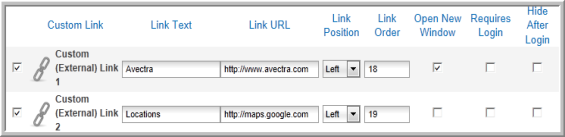
You can use a Custom Link to create a link to an external Web site such as to your organization's main Web site.
To create a link to an external Web site:
- Open the Select Web Sections (Content & Functionality) page of the Web Site Wizard. This is the third page in the wizard.
- In the Custom Link section of the page, select the check box next to Custom (External) Link.
- Enter the link name in the Link Text field. This will be the name that appears in the navigation bar.
- Enter the Web site address in the Link URL field.
- Select the Link Position (left or top). Left will cause the link to appear in a left navigation bar while top will cause a top navigation link.
- Select the Link Order (relative to the other links on your navigation bar.)
- To open the external Web site in a new window (so that they can easily come back to the original Web site), select the Open New Window check box. Otherwise, when clicked, the site will appear in the current window you have open.
- To require a log-in for accessing the external Web page, select the Requires Login check box.
- To hide the link after the user logs in, select the Hide After Login check box.
