Open topic with navigation
Setting Up an Anniversary-Based Membership
An Anniversary-Based Membership
starts immediately, the day the customer purchases the membership. (Or,
if you opt not to start the membership immediately, the membership will
activate the month following the purchase date (the first day of the following
month). This is different from a Calendar-Based
Membership because the calendar-based membership starts on the same
day and month every year (e.g., starts on January 1st no matter when the
customer purchases the membership). You may decide how the anniversary
membership functionality is enabled as well by how your system options
are set.
To set up
an Anniversary-Based Membership:
- Click the Administration
module tab.
- Click Add Member
Type from the Member Types
group item.

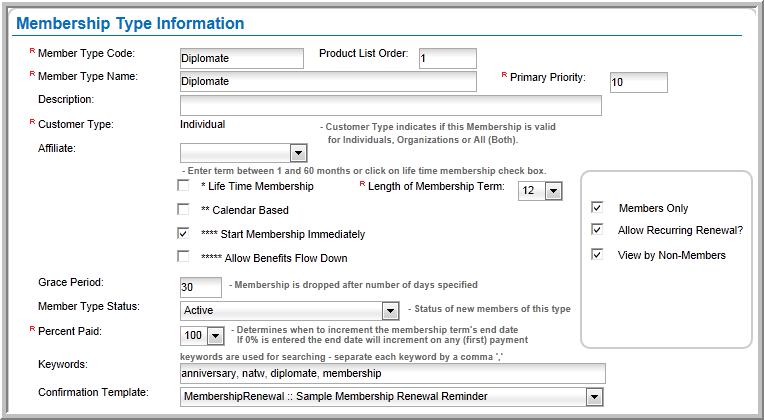
- In the Membership
Type Information section (seen below), enter the Member
Type Code and
Product List Order.
- Enter the Member
Type Name (name of the membership).
- Enter the Primary
Priority of the membership if your entity allows multiple memberships.
This is required. View Setting
Up Multiple Memberships for more information.
- Enter a Description
for the membership.
- From the Customer
Type drop-down list:
- Select Individual
to specify that the membership is only for individuals.
- Select Organization
to specify that the membership is only for organizations.
- Select All
to specify that the membership is for both individuals and organizations.
- Select an Affiliate
from the drop-down menu. The Affiliates
module may be used to define those chapters, special interest groups,
sections and so forth affiliated with a member type, committee, event,
etc. An affiliate group may be thought of as a more permanent
data grouping with its own Website and resources than just a member
type or event group. For more information, view What
is the Affiliates Module.
- Make sure the Calendar-Based
check box is clear. When the Calendar-Based
check box is clear, the membership is, by default, an Anniversary-Based
membership.
- If the Start Immediately
check box is selected during member type set-up, anniversary memberships
will begin immediately on the purchase date. Effective
and Expire dates, however,
depend upon the Percent Paid drop-down and whether or not the Anniversary
system option has been set by Client Services. For more information
view the Anniversary Membership
help topic.
- Select the number of months in the membership from
the Length of Membership Term
drop-down list.
- If you select the Allow
Benefits Flow Down check box, the membership benefits that
are set up for this membership type will also be available to linked
organizations or individuals.
- The Members Only
check box is selected if only members may purchase this calendar membership.
- The Allow Recurring
Renewal check box is selected if this member type may be renewed
by customers on a recurring payment basis. It is only present
if recurring renewal memberships have been set up for your entity
by Abila support. View Recurring
Renewal Membership Rules for more information.
- Select View By
Non-Members if you want the member type to be viewable by non-members.
This check box is only visible if the Members
Only check box is selected.
- In the Grace
Period field, enter the number of days the member has to
renew the membership after it expires. For example, if the membership
expires on 12/1/12 and the membership drop process is run on 12/15/13,
even though the membership has technically expired, the member won't
be dropped because they still have a grace period in which to pay.
If the member has not paid as of January 1, when the January
drop process is run, the member will be dropped, because the grace
period is over.
- Select the Member
Type Status that will be assigned when this member type is
purchased or renewed (e.g., Active, or Pending). (You might want to
use Pending for the status
if the customer needs to meet certain criteria before membership becomes
active.)
- If you want to base membership activation on payment
amount, you can set up a Percent
Paid requirement. For example, if Payment
in Full is a requirement for membership, select 100
as the Percent Paid requirement.
If only half the payment is required up front, select 50
for the Percent Paid amount.
If the customer is not required to make a payment in order to become
a member, select 0 for the
percent paid requirement. If 0 Percent
Paid is entered, the end date will increment on any (first)
payment.
- Enter Keywords
if you want to be able to search for this membership online based
on a keyword. (Separate the keywords with a comma.)
- Use the Confirmation
Template drop-down to specify which template that will be used
to send a confirmation of purchase to customers who purchase this
calendar membership from the online store.
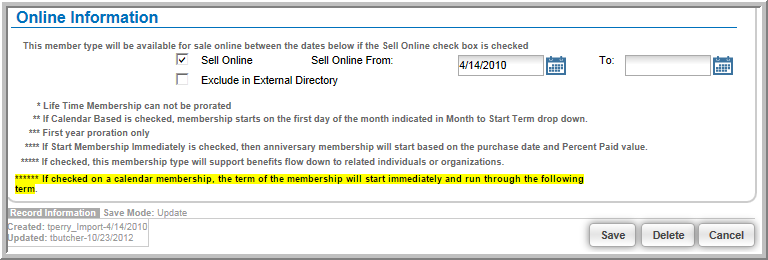
- In the Membership
Type Availability for Sale section (seen below), enter the
Availability for Sale dates.
This is the time period the membership will be available for sale
in the internal Shopping Cart.
- The Member Type
Available From and To dates specify when the Member Type is
available for sale both internally and in the online store.
- The Show as New
From and To dates specify the dates that the Member Type will be featured
as new in the online store.
- The Featured Product
From and To dates specify the dates that the Member Type will be available
in the featured product bar at the top of the online store.
Note: If you select
the Inactive check box,
the membership will not be available for sale internally or in
the online store. It is completely inactive. This
is useful if you need to amend or make changes to the member type
and need to ensure it is not available for purchase in the meantime.

- In the Online Information
section (seen below), select the Sell
Online check box to sell the membership on your Web site. To
set the specific time period for the membership to be available through
the Online Store, enter the
Sell Online start and end
dates.
- Select the Exclude
in External Directory to exclude the membership in the external
find directory.
- Click Save
to create the Member Type Profile.
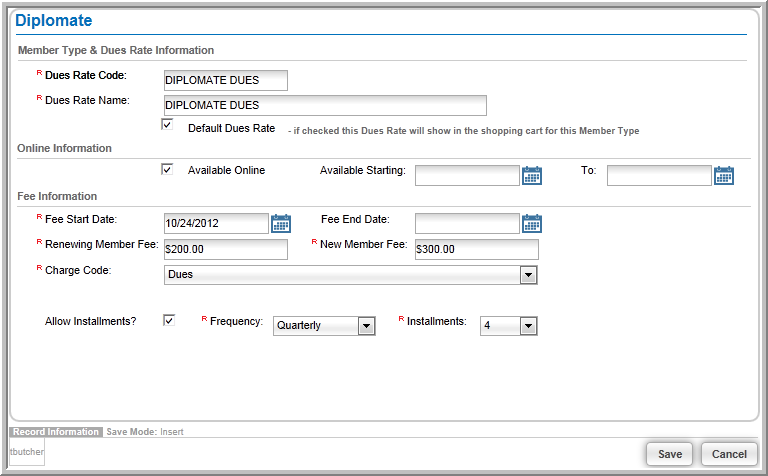
To
add the Dues Rate:
- .
- Click the Add Dues
Fees button (or, on the Membership Dues Rate child form, click
Add.)
- In the Member Type
& Dues Rate Information window, enter the Dues
Rate Code.
- Enter the Dues
Rate Name.
- Click the Default
Dues Rate check box if this is the default
dues rate.
- Click the Available
Online check box if the membership is to be sold in the Online
Store.
- Enter the Member
Fees. Renewing Member
Fee is what the member will be charged for a membership renewal.
New Member Fee is the
price of a new membership.
- Select the Charge
Code.
- The Allow Installments
check box is visible if installment
billing is available for your entity. It enables customers
to pay off the membership price in the installments you specify in
the Frequency and Installments drop-down such as by
quarters.
- Click Save.
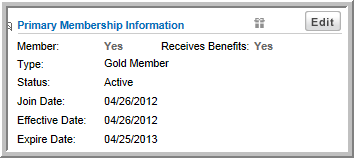
On the Individual or Organization Profile, in the Membership
Information section, the start date, or join date, is the date
the membership is purchased. The expire date is based on the join date,
plus the number of months in the membership, less one day. For example,
if the Join Date is 4/26/2012
and the Length of Membership Term
is 12, the expire date would be 4/25/2013.