Open topic with navigation
Managing Contact Requests from iWeb
When a new contact request is received, the first step is deciding which
department the request should be routed to and then entering the contact’s
information and request into netFORUM Pro. There are two ways the
contact request can be entered. The first is to navigate
to the appropriate department's profile and add the request. The
second,
is to navigate to the individual
(or organization)
profile of the party making the request and add the contact request.
Adding a Contact Request to a Department Profile
To add a new contact request to a department
profile, complete the following steps:
- Locate the Department Profile that the
contact request should be filtered to. For example, a request
for a list of members of a specific committee might be filtered to
the Committee Department.
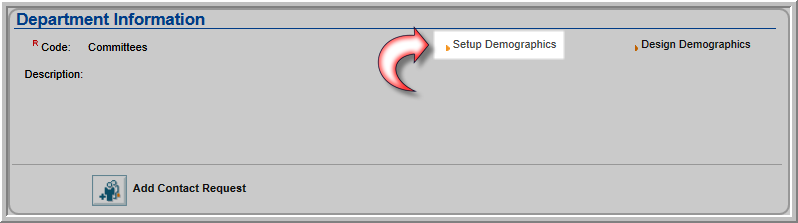
- Click the Add Contact
Request icon on the Action Bar of the Department
Profile to create a new contact request from a Customer for that
department. The Contact
Request pop-up window appears.
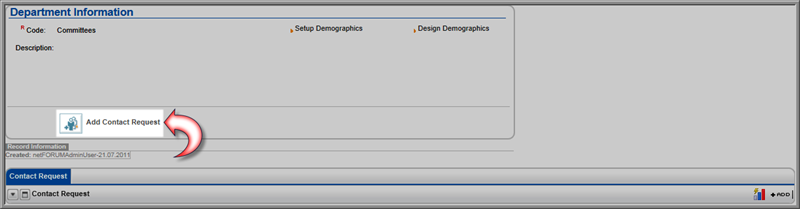
You will notice the Department/Subject
field is already complete and cannot be changed. This is because
you accessed this form from that department profile meaning this request
will automatically be assigned to this department.
- Enter a portion of the individual's (or organization's)
name that is making the contact request in the Sort Name field.
- Click the Search
 icon. A list of individuals (or organizations)
matching your search criteria will appear.
icon. A list of individuals (or organizations)
matching your search criteria will appear.
- Click the GoTo
 arrow next to the customer who is making the
contact request. The name of the customer will populate the
Sort Name
field.
arrow next to the customer who is making the
contact request. The name of the customer will populate the
Sort Name
field.
- Enter the date of the contact request in the Contact Date
field by clicking the calendar icon and using the calendar
control, or by manually entering the date.
- Expand the Topic
drop-down menu and select the topic of the contact request.
- If known, you may expand the Staff Assigned drop-down menu and
select the staff person who will handle this contact request.
- The Action Taken and Close Date fields will most likely
not be completed at the time the contact request is entered.
- If there is any special information that should
be included with this request, it may be entered in the Note
field.
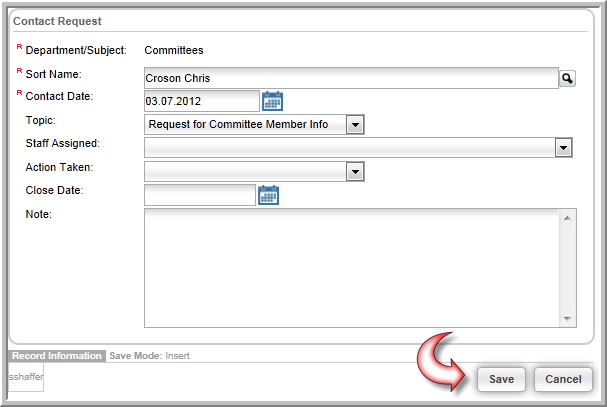
- Click the Save
button.
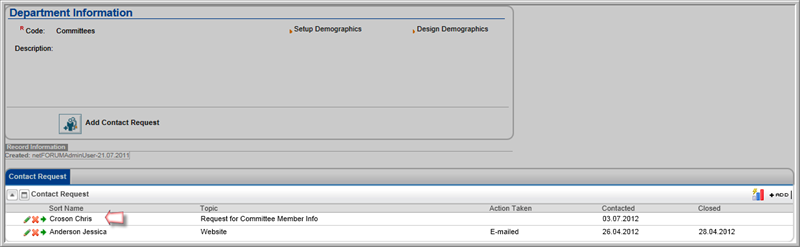
- Expand the Contact Request child form to see
the newly added contact request.
Adding a Contact Request from an Individual (or Organization) Profile
Contact Requests can also be added directly from the Individual or Organization
profile from the customer making the request.
To add a contact request from an individual
or organization profile, complete the following steps:
- Navigate to the individual
(or organization)
profile for the customer making the contact request.
- Click the Other
tab located in the child forms section of the profile page.
- Click the Add
 icon located on the Contact Request child form. This will open the Contact Request pop-up window.

- Expand the Department/Subject
drop-down menu and select the department the contact request is to
be routed to.
- The Sort Name
is populated with the individual (or organization) name and is not
editable. This is because you clicked the add icon from that
specific individual (or organization) profile.
- The Contact Date will default to today's
date, but can be modified.
- Expand the Topic
drop-down menu and choose the topic the contact request relates to.
- If known, you may expand the Staff Assigned drop-down menu and
select the staff person who will handle this contact request.
- The Action Taken and Close Date fields will most likely
not be completed at the time the contact request is entered.
- If there is any special information that should
be included with this request, it may be entered in the Note
field.
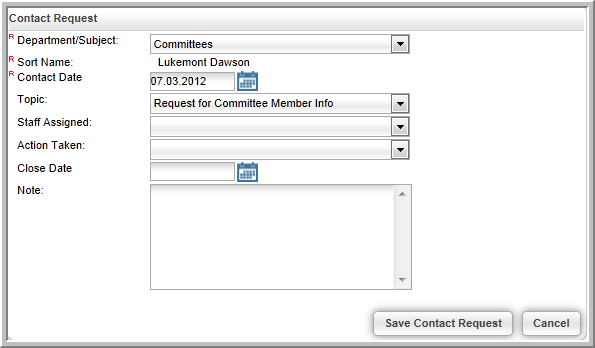
- Click the Save
Contact Request button.
- Expand the Contact Request child form to see
the newly added contact request.

Adding Demographics to a Contact Request
You may also provide additional information by way of custom demographics
at the bottom of the Contact Request form. These custom
demographics are set up on the various department profiles and will be
displayed whenever a contact request is made for that department (based
on the demographic settings.)
To add a custom demographic to a contact request, complete the following
steps:
- Open the department
profile for the department that will use the custom demographic
on its Contact Request
form.
- Click the Setup Demographics hyperlink located
near the top of the Department
Profile. This will open the Demographics
Setup pop-up window.
- Enter the name of the custom demographic in the
Caption field. This
is what will be displayed to the user.
- Select the order in which the custom demographics
should be displayed by entering a number in the Order
field. Lower numbers appear first.
- Click the Show
Internally check box if the new custom demographic is to be
displayed when a contact request is made in iWeb.
- Click the Show
Externally check box if the new custom demographics is to be
displayed when a contact request is made in eWeb.
- If the custom demographic requires more of an explanation,
click the Add icon to enter
a longer description for the new demographic.
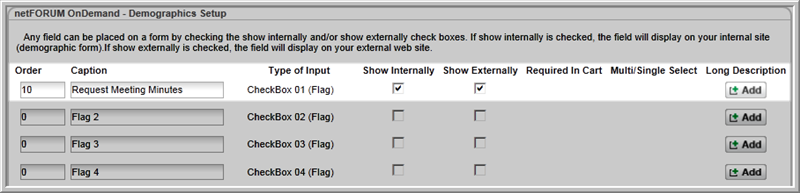
In the example above, a Request Meeting
Minutes check box has been set up to allow individuals (or organizations)
making a request of the Committees department to request meeting minutes.
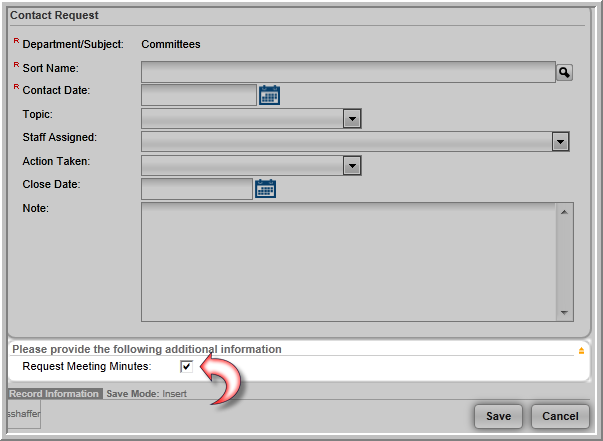
Whenever a Committees contact request is
made, the user will see the following check box on the Contact Request pop-up window.
Note: When adding
a Contact Request from an Individual (or Organization) Profile,
once the Department is selected on the Contact
Request pop-up window any demographics associated with
that Department will be displayed on the form.