Employee Profile
The Employee Profile section of an employee's record is split into six tabs: Employee Information, Job and Pay Rate, Taxes, Notes, Attachments, and User Defined Fields. Select a tab to get started.
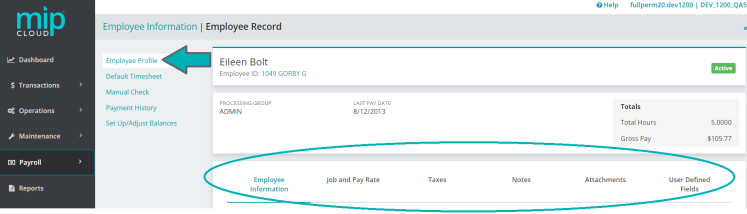
- Employee Information
- Job and Pay Rate
- Taxes
- Notes
- Attachments
- User Defined Fields
| Employee ID | The employee's ID. This ID cannot be changed. |
| Status |
The status of the employee.
|
| First Name, Middle Initial, Last Name | The employee's first name, middle initial, and last name. Middle initial is not required. |
| User ID |
Enter the employee's system user ID. User IDs are set up by the Administrator by going to Administration>Users>Manage Users. If the Fraud prevention options were selected by the Administrator in the system (Administration>Organization>Organization Settings>Module Setup>Payroll) and a system User ID is associated to an employee ID, one of the following could occur:
|
| Social Security Number |
The employee's social security number.
|
| I-9 On File | Checked if the employee has an I-9 on file. |
| Citizenship | Indicates the country of citizenship for the employee. |
| Marital Status |
Indicates the employee's marital status, such as single, married, divorced, or widowed. |
|
Gender |
Indicates the employee's gender, such as male or female. This editable field is limited to 20 characters. |
|
Ethnicity |
The employee's ethnicity. |
|
Work Phone Number |
The employee's work phone number. |
Important Dates
| Hired Date |
The date the employee was hired.
|
| Action Date |
The Action Date is an optional date field used for internal purposes. This field is not required.
|
| Birth Date |
The employee's birth date. |
| Termination Date |
The employee's termination date. |
|
Last Day Worked |
The last day the employee worked. |
Employee Residence
| Address |
The employee's address. |
| City, State, Postal Code |
The employee's city, state, and postal code for their address. |
| Country |
The employee's country location. |
| Phone, Fax |
The employee's phone number and fax number. |
|
|
The employee's email address. For information on setting up SMTP and email functions for MIP Cloud, see Setting Up SMTP and Email Functions . |
Emergency Contact
| Name |
The employee emergency contact's name. |
| Phone |
The employee emergency contact's phone number. |
| Relationship |
The relationship the emergency contact has with the employee. |
|
|
The email address for the employee's emergency contact. |
| Processing Group |
The employee's processing group code.
|
| Class |
The job class for the designated employee.
|
| Position |
The employee's job title.
|
| Employee Type |
The employee's type, such as part-time or full-time. |
|
Military Status |
The employee's military status, such as active, retired, or none. |
|
Occupation Code |
The employee's occupational code. This entry will be passed to the state tax filing forms. |
Driver's License
The employee's driver's license information.
Pay Rate
Note: If a salary is entered for an employee, the system calculates an Equivalent Hourly Rate for use in calculations that require an Hourly Rate, such as wages, benefits, or deductions.
| Salaried or Hourly |
Designates if the employee is salaried or hourly.
|
| Salary per Pay Cycle |
This field only appears if the employee is salaried. This field displays the salary per pay cycle for the employee.
|
| Equivalent Hourly Rate for Calculations |
If a salary is entered for an employee, the system calculates an Equivalent Hourly Rate for use in calculations that require an Hourly Rate, such as wages, benefits, or deductions. |
|
Hourly |
This field only appears if you selected "Hourly". This is the hourly rate for the employee.
|
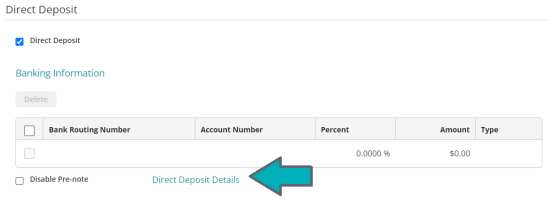
Direct Deposit
Note: You must have the Direct Deposit module installed to enter information in these fields.
If the "Direct Deposit" checkbox is selected, a table will display for you to enter banking information for the employee. Additionally, you can establish whether or not to send a pre-note to the employee's bank.
| Bank Routing Number |
Enter the employee's bank routing number. This is the nine-digit routing number that prints on the bottom of the check or deposit slip. |
| Account Number |
Enter the employee's checking or savings account number. |
| Percent |
Enter the percentage of the Net Pay to be deposited into the employee's bank account.
|
| Amount |
Enter the license class for the employee (such as C class, D class, etc). |
|
Type |
Select the type of account for the funds to be deposited - either Checking or Savings. |
|
Disable Pre-note |
Select this check box so that a pre-note for this employee is not created and sent to the financial institution.
|
Clicking the "Direct Deposit Details" link will open a new table with the following details:
| Disable Pre-note Last Updated |
The date of the last time the Pre-note field was modified. |
| Banking Information Last Updated |
Date that the payment information fields, Routing Number, Bank Account and Type, were changed. |
| Pre-note Sent |
Date that the pre-note was sent to the specified bank account. |
| Voucher Available |
This is the date when the Payroll voucher was available. |
Payroll Voucher
If the "Direct Deposit" checkbox is selected, you can choose what kinds of vouchers to generate for the employee. SeePrint and Email Checks and Vouchers for more information on Payroll vouchers.
Note: Payroll vouchers are printed/emailed during the Process Payroll and Print Checks process.
Select Print Paper Voucher to enable physical voucher printing for this employee.
Select Email Voucher to enable emailing vouchers for this employee. Select a voucher template and enter the employee's email address.
Note: When calculating Payroll with employees who have both Print and Email vouchers selected; if you print and then cancel out of the Email Preview form, the system will update the payroll history files, delete the calculated payroll and regular/supplemental timesheets, and create an ACH file; however, the email vouchers will not be available to send as attachments to the employees.
Federal Tax
| Filing Status |
Select a marital status of single, married, or head of household for this employee. This information is for Federal Income Tax purposes only. |
| Nonresident Alien |
Select if the employee is a Nonresident alien. |
| Exempt from Withholding |
Select if the employee is exempt from federal tax withholding. |
|
Employee completed W-4 Prior to 2020 |
Select if the W-4 for the employee was filled out prior to 2020.
|
Note: Some states utilize the federal W-4 to calculate state withholding. If the employee has completed their W-4 in 2020 and forward and the box on the Federal Taxes tab is unchecked, the state tax calculation may change to accommodate the new rules.
State Taxes
Note: If the employee must file taxes in more than one state (because the employee worked in more than one state during the year), do not change the State Tax setup for the existing employee, for whom a paycheck has been entered. Instead, create another Employee ID, using the employee's current information and the new State Tax setup. At year-end a single W-2 form for each Employee ID is created based on the employee's payroll information. The system reports information for only one state, per Employee ID; any additional State Tax information is not calculated or reported. Because you cannot create multiple W-2 forms per Employee ID, nor report more than one state on a single W-2, a separate Employee ID must be created for each W-2 you want to file. For more information, see Payroll State Taxes.
State Unemployment Tax
Select the appropriate state code for State Unemployment Tax.
Note: The only states available for selection are the ones that were previously set up by going to Payroll>System Setup>Taxes>State Taxes.
State Withholding Tax
Note: Some states utilize the federal W-4 to calculate state withholding. If the employee has completed their W-4 in 2020 and forward and the box on the Federal Taxes tab is unchecked, the state tax calculation may change to accommodate the new rules. Additionally, the Withholding Allowances value may be ignored as allowances have been discontinued for W-4 2020 and forward.
Select the appropriate state code for State Withholding Tax.
Enter a number of exemptions, deductions, allowances, or credits for State Withholding Tax. The boxes shown here vary according to the tax laws in the state for which information is being entered.
Note: There are several states with special rules for their state taxes. If the employee resides in Illinois, Mississippi, Marianas Protectorate, Massachusetts, Republic of Marshall Islands, or Republic of Palau, see Miscellaneous State Taxes.
See the following notes on the Spouse SSN Fields:
To view the entire Spouse social security number, you must have Display Sensitive Data for the active organization (Administration>Users>Manage Users or Manage User Groups). Otherwise, only the last four digits of the Spouse Social Security Number displays.
If the withholding tax state is Puerto Rico, enter the social security number of the employee's spouse if the employee is married. The system no longer writes the social security number to the MMREF file; however, Civil Status continues to be set to "M" for married. If you have entered a number in this field and "S" for single, this field is empty.
Other Tax
Note: Multiple localities for each employee can be entered. All other tax information is optional.
| Tax Code |
Select a tax code for the employee. These codes were set up using Payroll>System Setup>Taxes>Other Taxes. |
| Additional Withholdings |
Enter any additional tax to withhold from each paycheck. |
| Action |
The action of the selected tax code. |
If Exemptions/Deductions were set up for the selected Tax Code, a hyperlink will be available.
Select an exemption/deduction code, it's description, and the number of exemptions/deductions. The number entered is multiplied by the annual amount entered for the exemptions/deductions code. These exemptions/deductions were set up on the Payroll>System Setup>Taxes>Other Taxes>Other Tax Employee tab and are not always applicable.
Note: The employee pays withholding as Employee Paid Tax (LWT), and the employer pays withholding as Employer Paid Tax (LER).
Employee's W-2
Use this tab to enter information about this employee's W-2 and to indicate if this is a Medicare Qualified Government Employee (MQGE).
When a W-2 Box 13 item is selected, the system prints the information on the employee's W-2.
| Medicare Qualified Government Employee |
Select this check box if you are a government employer and the employee is a Medicare Qualified Government Employee. |
| Statutory Employee |
Select if this applies to the employee. |
| Retirement Plan |
Select if this applies to the employee. |
|
Third-Party Sick Pay |
Select if this applies to the employee. |
|
Issue Employee W-2 electronically using Aatrix® |
Select to issue the employee's W-2 and/or 1095 electronically using Aatrix® |
|
Issue Electronic 1095 |
Select the check box if the employee wants Aatrix® to issue their Form 1095 electronically. Aatrix® will notify the employee by email and the employee Form 1095 for employee electronic download. |
|
|
Aatrix will send electronic copies of W-2 and or 1095 forms to this email address when the Issue Employee W2 Electronically Using Aatrix® or the Issue Electronic 1095 check box is selected. The Employee Residence Email will display by default but may be changed if desired. |
Note about Medicare Qualified Government Employees
If you are a government employer—not a private sector employer—you may have Medicare Qualified Government Employees. Note that a Medicare Qualified Government Employee's wages and tips are subject to withholding only for Medicare, not Social Security, for part or all of the year.
Checking the "Medicare Qualified Government Employee" box on the Employee Information form tells the system to classify the employee as MQGE. This affects certain reports, as well as internal edits that the system makes to the employee's data.
Checking the "Medicare Qualified Government Employee" box does not affect tax calculations. Special Earning, Benefit, and Deduction Codes need to be set up for Medicare Qualified Government Employees (see Setting Up the Payroll Module). That way, employees who use a standard tax setup (FIT, FUTA, Social Security, and Medicare) will have one set of payroll codes, and employees with an MQGE tax setup (FIT, FUTA, and Medicare) will have another set of payroll codes.
If an employee is an MQGE for only part of the year, two Employee IDs must be created for the employee: one for MQGE W-2 filing, and one for standard W-2 filing. This is because, at year-end, the system creates a single W-2 form for each Employee ID, based on the employee's payroll information. The system only supports split filing for Medicare Qualified Government Employees, for which you must file two W-2 forms. Therefore, because the system cannot create multiple W-2 forms for one Employee ID, a separate Employee ID must be created for each W-2 you want to file.
Enter any notes about the employee here.
Add any relative attachments here.
This tab displays any user defined fields created by your organization. See User Defined Fields to learn more.