Form Designer
Form Designer
The NetForum Form Designer is the user interface to design and manipulate NetForum Forms.
The NetForum Form Designer gives the developer a virtually WYSIWYG canvas to design a form. Every input, label, DIV, form extension, image, hyperlink or other item on a Dynamic Form is called a Form Control.
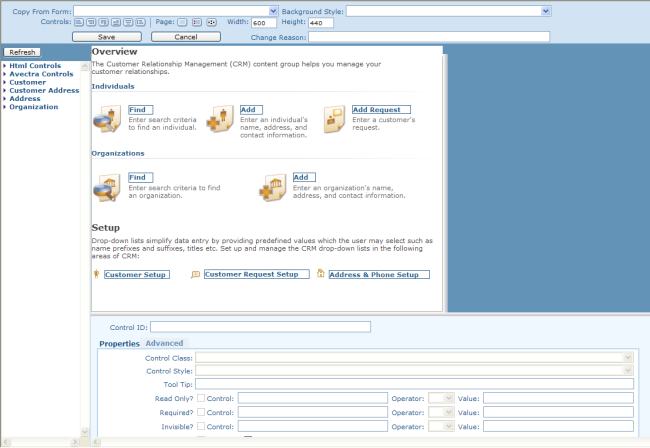
The top portion of the Form Designer is the Design Area. The Design Area is the visual presentation of the form.
The bottom portion of the Form Designer allows the developer to configure each control on the Design Area, and to perform other operations.
From the Form Designer, a developer may manipulate the layout or tab order of form controls, add new controls and extensions, and configure the behavior and attributes of form controls.
The key attributes of any form control are made editable once the control is selected by clicking on the control or tabbing to the control.
Tip: Be sure not to lose focus of the control by clicking on the control, and then clicking on the blank area of the form designer; you will think you are modifying that control, but your edits may not be saved.
The Form Designer can be accessed from the design form link on the Dynamic Form itself, or by clicking the design form icon  that appears on any dynamic form in the NetForum system (provided the logged-on user is a member of the netForumAdmin or AvectraAdmin roles). If you use MVC Forms, the Form Designer is accessed by using the System Tools icon in the menu bar
  , and selecting Edit in Form Designer.
Note: If you plan to do a major redesign on a Form, and you might want to revert back to the original version of the Form, make a backup form before you start. To do this, create a new Form within the same Object and name it the same name as your original form but add something like (Bob's backup 8/13/2011) to the end so you'll know what it's used for. For example, if the Form is called ABC Business Code then you might want to name the backup zABC Business Code (Bob's backup 9/21/11) (add the letter z in front so these sort toward the bottom). Design the new backup Form and use the copy from form feature and select the Form you're about to redesign. This will make your backup Form a clone of the original Form. Save the backup Form. Then go Design the "real" Form. If you run into trouble and need to back out your changes, then from the original form, design it and use the copy from form feature and select your backup Form. This will revert your original form back to its pre-modification state. Just make sure you delete these backup forms from time to time to avoid cluttering things up.
The Form Designer has built in timeout prevention to help developers who have a very complex forms to design. A "locked" checkbox has been added to the control properties area to indicate if the control has been metadata locked. Also, users can lock/unlock the control directly from the form designer. Finally, the form designer now saves "smarter" and only updates and locks the controls which have modified in the designer and no longer locks the form itself.
Form Designer Features
The Form Design toolbar provides alignment and layout options.

Alignment and Size Buttons
When two or more controls on the Design Area are in focus (by clicking on one control and holding down the Shift key and clicking on additional controls), then those controls can be aligned on the left, right, top or bottom edges by clicking on the alignment buttons. Controls of unequal sizes can be made equal width or height by clicking the size buttons.
Background Style
This dropdownlist selects a background CSS class for the form.
Other Buttons
Save: Saves changes to the designed form and closes the form designer.
Cancel: Cancels edits of the designed form, and closes the form designer.
Width and Height: the dimensions in pixels of the form. For most NetForum forms, the developer should avoid creating forms larger than 800 by 600 pixels (width by height). Profile pages should be exactly 800 pixels wide. Forms larger than this may not fit on some monitors. You can also use your mouse to resize the design area.
Edit Tab Order: allows the developer to set the tab order of the form controls. Note that if you have added one new control to the end of an existing form, you do not need to set tab order from the beginning. Instead, enter the tab order number you want to last element to be in the current tab order field and then click the control to set the order. See Sub_Form#Tab_order for information on how tab order works within subforms.
Fix Caption Widths: Depending on the version of Internet Explorer, Graphic Card and some other factors, it is possible that each time a form is saved, one pixel is added to the width of each label/caption control. Over time, this can make aligning captions problematic. Clicking this button will reduce all caption widths to their minimum without wrapping the caption.
Refresh: Click this button to refresh the list of available controls to add in the New Control to Add dropdown. If you delete a control on a form and want to add it back, you must click the Refresh button to repopulate the New Control to Add dropdown.
Copy From Form: This will copy over any controls from the form in this dropdown to the form you are designing. This can be helpful for synching one form with the controls on another form. Note that in version 2013.01, this feature was relocated from the designer to a form link called Copy From Another Form.
New Control To Add
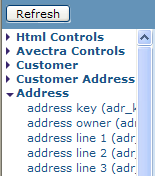
The form designer now provides a multiselect area for adding controls to a form. As shown to the right, the list of fields are grouped by the table they are part of and the developer is able to use standard control/shift-click for selecting multiple controls. Once selected, the controls can be dragged onto the form and they will be added in the area where the developer drops them. Additionally, the design area can now be resized using the mouse by dragging either the bottom or right border to meet the size needs.
In builds prior to NetForum 2010, the form designer had a dropdown for adding controls: The New Control To Add dropdown contains any controls that can be added to NetForum. The first series of controls in the top of the dropdown are generic HTML controls. The next series of controls in the dropdown are data controls that relate to actual properties of the Data Objects of the Object that is associated with the Dynamic Form being designed. The last series of controls in the dropdown are Form Extension (if any).
Each time you select a control from the New Control To Add dropdown, the control and its associated label (if any) will be placed on the upper left of the design area in the "landing area". You may then drag the control to its proper place on the form.
Note: If you've just added a new column and you don't see it as a choice in the Form Designer, Query or in other Toolkit features, ensure that you have run md_privilege_populate_by_table_quick in SQL and then clear cache in NetForum. After those two steps, you should see your new column(s).
HTML Controls
html :: CheckBox: An html::CheckBox is by definition not bound to a specific data column. Therefore, these controls typically are added to a form to allow a user to choose a certain attribute about the record which will be handled by custom code in a NetForum object or form extension. For example, the "Is Primary?" checkboxes on some forms in NetForum (e.g., Phone, Fax, Address) do not correspond directly to a certain column, but are used by the application to process certain business rules.
html :: Free Text: Use this control to add text labels to a form. The control styles that begin with DataFormLabel* may be used to change the appearance of the label. To add a bar with a label to accentuate an area of a form, choose one of the control styles that begin with DataFormChildHeader*. Below is an example of a Label (primary contact information) with a control style DataFormChildHeaderIndent.
html :: Hyperlink: Use this control to add clickable hyperlinks to the form. Enter the URL in the URL/Image Path/Data text area using the following built-in NetForum markup tags instead of raw HTML. The supported NetForum tags are url[], target[] and img[]. Here are several examples:
This URL will open a new modal window (to NetForum’s default edit modal window called DynamicEditModal.aspx) with a specified record in edit mode, directed to the Form specified with the FormKey, and editing the record linked to the parsed value {org_cst_key. The URL will have an image called img_profile_edit.gif.
url[javascript:void(0)] onclick[OpenNewWindow('dynamiceditmodal.aspx?FormKey=247a0871-03fe-4e95-8421-e0f610e8193f
&Key={org_cst_key}');] img[~/images/img_profile_edit.gif]
Here is a URL that opens up a new window to add a new record:
url[javascript:void(0)] onclick[OpenNewWindow('dynamiceditmodal.aspx?
Action=Add&FormKey=e53a8841-1d85-4c4a-b68b-80568fa7191d');] img[~/images/img_add1.gif]
Here is a more elaborate URL that uses a javascript alert popup:
img[~/images/img_cancel.gif] url[javascript:void(0)] onclick[if ('{exh_cancel_date}'!='')
alert('{cst_sort_name_dn} is cancelled.');
else OpenNewWindow('DynamicEditModal.aspx?Modal=Yes&FormKey=a5c7b221-8d5d-4864-a6dc-412a8f95882c={exh_key}');]
Here is a URL that can open a popup on a page that is being used to add new records. Note the parameter DoNotSave; this is to ensure that the SAVE button on the popup does not do a full save on the database, but only saves the values of the Façade Object:
url[javascript:void(0)] onclick[OpenNewWindow('DynamicEditModal.aspx?
Modal=Yes&DoNotSave=Yes&FormKey=6c8ae741-9d5e-47e8-bc9d-950d741f4b63');] img[~/images/notes.gif]
Here is a URL that will open an edit modal window with child forms by setting the querystring parameter ShowChildForms to Yes (note this is case sensitive):
url[javascript:void(0)] onclick[OpenNewWindow('dynamiceditmodal.aspx
?FormKey=16be6e57-0d49-45b7-9b29-a149f5d77a01&Key={org_cst_key}&ShowChildForms=Yes');]
Here is a URL that will go to either the Individual form (b77...)or the Organization form (f326...) or Chapter form (fall back form 1E1C...), depending on how the parsed value {cst_type} is evaluated. You will see that we are using conditional logic with ?:::
url[javascript:document.location='dynamicprofile.aspx?
FormKey='+ (('{cst_type}'.toLowerCase()=='individual')?
'b772881d-d704-40f3-92b6-09b13a50fcc9':
(('{cst_type}'.toLowerCase()=='organization')?
'f326228c-3c49-4531-b80d-d59600485557':
'1E1C9B24-6DCD-4C1C-B690-ADEE6AA48FB7'))+'&key={inv_cst_key}']
Here is a simple mailto based on the parsed value of the email address of the record being displayed:
mailto:{eml_address}
Here is a simple url that will open up a new window to the URL of the parsed value contained in {cst_url_code_dn}.
target[_blank] url[{cst_url_code_dn}]
Hyperlinks on a designed form may also be secured based on the security permissions that exist for any Group Item Link in NetForum. Here is an example of security placed on the Register for Event icon on the Individual Profile window:
url[javascript:void(0)] onclick[OpenNewWindow('DynamicEditModal.aspx?Modal=Yes&Action=Add&
ObjectKeyFrom=F41B6E06-299B-4022-BE6F-0641BA87DE59&
FormKey=3c6c86e5-5781-44e5-83cd-8976beadff6c');]
img[~/images/img_event_invt.gif] LinkKey[40fd0bc8-0d72-470d-9d9c-55a1878428d8]
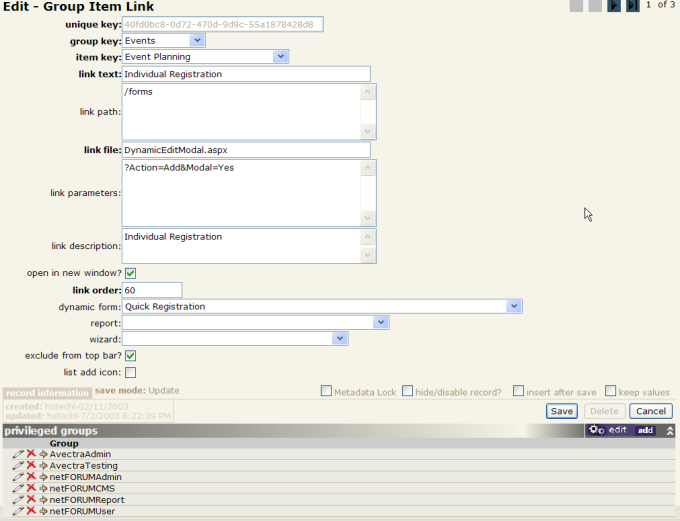
Group Item Link Permissions
Note the last clause denoting the LinkKey[<< guid >>]. The GUID value within the LinkKey point to a specific Group Item Link in NetForum. NetForum’s rendering engine will subsequently check group security privileges when rendering the HyperLink and disable it if the current user is not a member of any groups that can access the link.
In the example above, the GUID value points to this Group Item Link.
Note the privileged groups that have permissions to view this link. Also notice that the unique key value {40fd…} of this Group Item Link is the value in the LinkKey tag in the hyperlink value above. If the user in NetForum is not a member of one of these groups, then they will not have permission to view the link and the link will not appear for them.
For more information on LinkKey security, please see Security.
html :: Image: This will add an image to a form. Enter the path to the image in the URL/Image Path/Data textarea, for example ~/images/img_person_small.gif. Parsed values may be used, for example:
/netforum/eweb{ImageUploadDirectory}{cst_recno}.jpg.
html :: Sizable Box (Div): A Div control may be added to place a box in a form. This is helpful for grouping together common elements. In this instance, use DataFormDivDefault as the Control Style. For a box within a box, choose LeftUITable as the Control Style to create a contrasting style.
A Div is also used to place a Form Extension on a form. In this case, use DataFormDivNoBorder as the Control Style. Available Form Extensions may be added to a form by choosing the extension from the bottom of the New Control To Add dropdown. The Control ID will be the name of the Form Extension.
html :: Hidden Input:
Controls
UpdateGridControl
UpdateGridControl: This specialized NetForum control places a data grid on a form.
The UpdateGridControl is a control that allows you to add a new record and multiple child records simultaneously.
Data Controls
Data Controls: after the HTML and Abila controls in the New Control To Add dropdown are all available data controls that relate to a specific data column in NetForum. To place a data control on the form, simply select it from the dropdown and the control and its label will appear on the upper left corner of the form. You may then drag them to the proper place on the form. This list is populated based on the Data Objects of the Form's Object.
The label will default to the value in that control's underlying Column, but it may be changed by double-clicking on the label and editing the text. [Note that the column description originally derives from the extended property column definition in the database table.]
The Data Controls are added to the New Control To Add dropdown based on the Data Objects that belong to the Form's Object.
Form Control Properties
When you focus the mouse on a single form control, then you can set its properties in the Form Control Property section on the bottom half of the Form Designer.
Control Identity
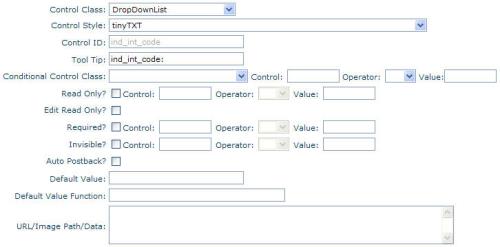
The Control Class, Style and ID are the main properties of any Form Control. The ID is set automatically by the Designer. The Class and Style are defaulted but may be overridden in certain exceptions.
Control Class: The Control Class is the base element of the control. The control class drives the visual depiction of the control and, in conjunction with the Control Style, determines how the control is rendered in HTML at run-time.
When controls associated with data column are added to a Form, NetForum will default the Control Class based on the Control Class of the underlying Column.
Control Style: The cascading style sheet class for the control. See Control Style for more.
Control ID: the name of the Control. This value is set by NetForum and is read-only.
Tool Tip: you may enter a Tool Tip that will appear on browsers that support the pop up help text that appears when a user hovers the mouse icon over a control.
Control Conditions
The next section of the Form Designer allows the developer to specify certain attributes or behaviors of form controls when a certain scenario occurs.
Those behaviors are:
Conditional Control Class: override the default Control Class of a control to a different Control Class for a specific scenario.
Read Only: make a control be read-only and therefore not editable.
Edit Read Only: make a control be read-only upon edit mode (but not add mode).
Required: require a user to enter a value in a control. There can be many nuances to required fields. See Required Field for more.
Invisible: make the control (and its associated label) invisible on the form.
Troubleshooting tip: Keep in mind that when the control is invisible, then it's not on the form, its value never gets set, and the object cannot get its value. By contrast, if the control is hidden, then the user will not see it, but the value of the control is available programatically and its value can be retrieved by the object. Also, "hiding" a control technically sets a different CSS class. If you view source, you will see it.
For any control where these attributes are desired, the developer may simply check the checkbox and the attribute will be applicable at all times. In some instances, however, the attribute may only be desired in certain scenarios.
In these cases, the developer may enter values in the fields for control, operator and value. When NetForum renders the form, if the settings of control/operator/value for that attribute evaluate to True, then the control will take on that attribute. Otherwise, the control will not be affected by that attribute.
At this time, it is not possible to specify a condition for the Edit Read Only attribute. The Conditional Control Class must always specify a control/operator/value condition.
Here are some examples for Required, Read-Only, and Invisible. Note that all three operate in essentially the same way.
Required
Suppose you wish to have a control that is required if the value of another control is equal to a certain code. For example, if a payment type (apm_type) is credit card then the credit card number field (pin_cc_number) must be entered. If the payment type is check, however, the credit card number field is not required. In this case, you would enter the following for the control pin_cc_number:
Another common scenario is to make one field be required only if another field has been filled in. For example, if a user enters a phone number (phn_number) then a phone type must be chosen from the phone type dropdown. To make the phone type dropdown be required only when a phone number is entered, create this required condition for the phone type control:
When the phone number is NOT empty, then the dropdown for phone type will be required.
Read Only
Sometimes you may want to display certain fields on a form, but make them editable only in certain scenarios. For example, suppose you are viewing a mailing address. If the address is a linked address, then the address should only be editable when you are editing the address of the owner of that address (as defined by the column adr_cst_key_owner).Observe the following form, and note how Address Line 1 is read-only unless the address is owned by the customer as determined by the parsed value of {cst_key}. The address fields will only be editable when accessed from the address owner.
Invisible
On some forms, you may want to have certain controls be invisible except in some circumstances.
Observe this portion of a form:
When the user clicks the on hold? checkbox, the form posts back and the following once-invisible controls are now visible, and two of them are required:
The on hold type dropdown gets these attributes from the following values in the required and invisible conditions:
When the on hold? (cxa_on_hold_flag) checkbox is unchecked (value=0) then the DropDown control is invisible. When the checkbox is checked (value=1) then the DropDown control becomes required.
The invisible conditional control is helpful if you have a limited amount of space on a form, and you want to display some fields in one instance and other fields in another instance. You may even place the controls directly on top of one another in the Form Designer, knowing that only one will appear at a time.
Evaluating Multiple Values
A Read Only, Required or Invisible operator may also evaluate multiple values if the values are separated by semicolons. Here are two examples:
![]()

Here is an example of evaluating more than one control, followed by a Visibility SQL command evaluating these controls:


Evaluating Values that are Too Long to Fit
If you want to evaluate multiple values, or a single long value, but you cannot fit all of them into the value textbox, then you can add additional values into the URL/Image Path/Data textarea for the following three conditions and their associated tags:
- Invisible Value - InvisibleValue
- Required Value - RequiredValue
- Read Only Value - ReadOnlyValue
The value you enter into the URL/Image Path/Data will be appended to what is in already in the Invisible, Required, or Read Only value textbox. Add the tag above and within brackets enter the value(s), separated by semicolons.
For example:
InvisibleValue[; {DefaultProductTypeForSubscriptionIssue}]
or
InvisibleValue[; {DefaultProductTypeForSubscriptionIssue};{AdvertisingChargeProductTypeGuid} ]
Below is an illustration of this feature, as shown from within the Form Designer:
In the example above, the control prc_deferred_flag will be rendered invisible if the value of prd_ptp_key is equal the value of {MiscellaneousProductTypeKey} OR the value of {AdvertisingChargeProductTypeGuid} OR 1CD13308-B1B6-4BF8-999E-A7981583084E, etc. {MiscellaneousProductTypeKey}, by the way, is the MiscellaneousProductTypeKey system option.
Evaluating a Value that is not Empty
If you evaluate a control based on a parsed value, you can evaluate whether the value is (or is not) equal to a parsed value AND whether the value is empty by placing an additional semicolon after the parsed value.
In the example above, if the value of {cst_key} is not equal to fax_cst_key_owner and {cst_key} is not empty, then the control being evaluated will be read only. If you had left out the semicolon, then the control being evaluated would NOT be read-only if {cst_key} were empty or null.
Conditional Control Class: Used to override the default Control Class of a control to a different Control Class for a specific scenario.
The Conditional Control Class will be used instead of the default when the Control, Operator and Value condition evaluates to true, similar to how Required, Read Only and Invisible operate.
Conditional Control Class – Control: see above.
Conditional Control Class – Value: see above.
Conditional Control Class – Control: see above.
Evaluating a Control Against Multiple Values
In the simpler examples above, we are evaluating a control against a single value. In some cases, you may want to evaluate a control against multiple values, for example:
In the case above, we are saying to make a control invisible if the Prefix Code [ind_prf_code] is Mr. OR Dr. OR Mrs. The operators (=) and (!=) effectively act as in "IN" operator when the values are separated by semicolons.
Evaluating a Control with SQL
Caution! Use great care with this powerful yet potentially harmful feature. This feature can be server-intensive because the SQL statement will fire every time the control is rendered. You should ensure that you return at most one row, and only one column, and that the SQL command that is being run is simple and fast.
Many times you may want to render a control read only, invisible or required based on a complicated condition that cannot be done using the features above. For example, you may need to evaluate more than one control, or you may have more complicated logic. In these cases, you can write a more advanced SQL statement that can handle this requirement.
A control may be evaluated for the ReadOnly, Invisible or Required condition based on a SQL statement in the URL/Image Path/Data section. To do this, check the appropriate checkboxand in the URL/Image Path/Data enter InvisibleSQL[select statement] or ReadOnlySQL[select statement] or RequiredSQL[select statement] where select statement is a SQL select statement that will return zero rows or 1 row. If zero rows are returned, then the control being evaluated will NOT be ReadOnly, Invisible or Required (depending on which you chose). If one or more rows is returned, then the control will be rendered ReadOnly, Invisible or Required.
You may use parsed values in your SQL statement, so you can key off other controls on the form.
The control to be evaluated is pin_eft_routing_number. This is a payment field for a check payment routing number. It should be visible only if the payment type, which is a different control on the same form, is equal to ’telecheck’ and only if the payment method, also a different control on the same form, is equal to ’pre-paid’. This business rule is implemented as shown above. Note that although this is a perfectly correct SQL statement, it does not actually select any data from any table.
In this example, we actually run a stored procedure to determine if the control should be read-only. Here is the text of the SP:
CREATE PROCEDURE dbo.co_phone_readonly_sql

@cst_key uniqueidentifier,
@phn_cst_key_owner uniqueidentifier=NULL,
@phn_key uniqueidentifier=NULL,
@entity_key uniqueidentifier=NULL

AS

SET nocount ON

IF (@phn_key IS NOT NULL AND @phn_cst_key_owner IS NOT NULL AND @phn_cst_key_owner<>@cst_key) begin
	SELECT 'readonly'
end
GO
Here is a third example, with this SQL statement querying from a database table:
Additional Form Control Properties
Auto Postback: check this checkbox if you want the form to postback to the server when the user enters or changes a value on this control. Generally you will do this only when this control influences other controls on the form. The on hold? checkbox in the example above is one instance.
Another example is if you have a Country and a State dropdown on the form. If the user changes the Country then you must post the form so that the State dropdown can be repopulated based on the Country chosen.
Default Value: Set a default value for a control. You may enter a specific value, a parsed value, a system option expressed as a parsed value, or certain NetForum variables such as {CurrentUser} or {CurrentDate}. Here are some examples of default values:
sales
{prc_start_date}
{BusinessUnitDefaultKey}
931161EF-4834-4511-9D93-EFB6565C9146
{CurrentUser}
0
Please note that the value for a GUID can be case sensitive. In other words, these two values are NOT equal in .NET (which is NetForum) although they are equal in SQL:
if('931161EF-4834-4511-9D93-EFB6565C9146' == '931161ef-4834-4511-9d93-efb6565c9146')
{
  print "equal";
}
else
{
  print "not equal";
}

/// output:

"not equal"
If you are finding that a value is not defaulting when it should, then try putting the GUID in lowercase and see if that works.
Default values get set at the object level. It will set a control whether the control is "hidden" or "invisible".
Default Value Function: In development.
URL/Image Path Data
This TextArea field is used for many purposes. See other sections on this page for more information.
This field can be used to embed client-side JavaScript into certain controls. For example, on a TextBox control you may add JavaScript that will fire on certain events. In the example below, we add an onchange event that fires on the First Name [ind_first_name] field and automatically updates another field on the form, in this case the Badge Name [ind_badge_name]:
Here is an example of changing the value of a TextBox to be today’s date, based on an onchange event firing on another control. On the control, you will set this value to set the value of another field (in this case, c86_request_date):
onchange[d=new Date();e=document.getElementById('c86_request_date');if(this.value!=''&&e!=null&&e.value=='')e.value=(d.getMonth()+1)+'/'+d.getDate()+'/'+d.getYear();]
Here is an example of using javascript to set one control's value based on the value of another. In this case, when you type a value into the radius control, it will set the value of the area control:
onchange[document.all.x02_area_cp_ext.innerText=parseFloat(this.value)*parseFloat(this.value)*3.14]
Here is an example of a javascript onblur function that runs after a user exits a control:
onblur[if(this.value != '')  if (document.getElementById('dyx_object_initialize_parameters').value=='')
 document.getElementById('dyx_object_initialize_parameters').value=
'Page:Page;Control:Control']
accesskey
In the URL/Image Path/Data, you may configure an accesskey or hotkey. An accesskey will associate a keyboard shortcut on the control that will activate when a user presses the Alt key and the letter you designate. For example, the Centralized Order Entry hyperlink on the Individual profile page has the following URL/Image Path/Data:
url[javascript:void(0)] onclick[OpenNewWindow('DynamicEditModal.aspx?Action=Add
&ObjectKeyFrom=F41B6E06-299B-4022-BE6F-0641BA87DE59
&inv_bat_key={DefaultBatch}
&FormKey=822c7524-5df6-499c-a4a3-517a886da94c');]
img[~/images/order_32.gif] LinkKey[d4049aee-b518-44c7-908b-3c79b75d4dc1]
accesskey[c]
The key property is: accesskey[c] where c is the letter you want to enable.
For a hyperlink, pressing Alt-C to give the hyperlink focus; next the user can press Enter to launch the COE form.
Sometimes you don’t seem to get a visual cue that hyperlink has gotten focus.
This might not work on all browsers (maybe IE only?).
Here’s more info from MSDN: http://msdn.microsoft.com/library/default.asp?url=/workshop/author/dhtml/reference/properties/accesskey.asp:
Note: By default, the accessKey property sets focus to the object. The object receives focus when the user simultaneously presses the ALT key and the accelerator key assigned to an object. Some controls perform an action after receiving focus. For example, using accessKey on a input type=button causes the onclick event to fire. By comparison, applying the accessKey on a radio button causes the onclick event to fire and toggles the checked property, visibly selecting or deselecting the control.
DynamicLink.aspx
DynamicLink.aspx enables you to have a hyperlink on a designed form that will take you to a List Result page. In the url/image path/data enter something like this:
url[DynamicLink.aspx?FormKey=d290eea3-1db3-44cc-9cb3-66ff0384688a
&DFormKey=16f5283a-a6d1-4690-aede-67aa626e403d
&ListWhere=reg_evt_key='{evt_key}' and reg_delete_flag=0]  img[~/images/evt_reg_list_32.gif]
DFormKey - destination FormFormKey. When you click on the record from the List Result, this is the form the user will go to.
FormKey - the FormKey that will determine which List Table definition to run.
ListWhere - optional user-defined filter, may pass any number of filters. Will append this to the end of the WHERE clause that executes to get the List Results.
DropDownList Definition Override
Value From, Column, Where, Order
The next six fields are used to populate the values in a DropDownList. If the control’s underlying column is already configured as a DropDownList, then you do not need to enter anything in these values. You should enter values in these fields only if the column is not configured as a dropdown, or if you wish to override the default dropdown definition for the column on this form only. The underlying column definition of a control can be accessed by going to Admin Column.
Value From: Database table(s).
Value Column: Column in table for the value.
Value Text Column: Column in table to display to user.
Value Where: Where clause (if any). You may also enter hard-coded values separated by semicolons, for example: North;South;East;West or N:North;S:South;E:East;W:West.
Value Where for Add: Where clause for add only (if applicable).
Value Order By: Sort Order. Typically this will be the same value as you enter in Value Text column.
Troubleshooting
Q: Any forms that I design look good on my computer but on other people's computers, the text labels are all messed up, for example:
A: Most likely you have made the font size or browser zoom on your computer larger than normal. You must set it back to normal or 100% or every form you designed will get messed up. This is done by adjusting your DPI settings for your display. For most computers, do this by going to desktop, right-mouse-click, Properties, Settings, Advanced. Find the Display DPI settings, and set them to Normal instead of larger than normal. After doing this, you may need to restart computer. Then, to fix the forms, every form you designed on the comptuer with the larger fonts must be redesigned.
You can disable the zoom setting in I.E. by following these instructions: See http://www.mickgenie.com/blog/how-to-disable-zoom-level-from-ie/.
Q. Sometimes I get a JavaScript error on the Form Designer. How can I avoid this?
A. If you have a slow internet connection, we have observed that if you try to start designing the form immediately after the popup page appears, you may start moving controls around before the webpage's javascript include file can be downloaded. When you move a control around, it tries to run certain javascript functions before the JS file has been loaded, and therefore you get a javascript error.
To avoid this, just pause for a second before you start clicking around and wait for the page to load.
Q. When I try to change the tab order, the whole form gets messed up.
A. We have occasionally noticed that when you design a form the very very first time that you cannnot also set the tab order during this first go-round. Simply save the form, then design it again and set the tab order, and you should not have any problems.
Also, it happens only rarely, most experienced form designers will save their designed form every so often; you would hate to design a form for half an hour, only to lose it if your connection gets dropped or some other glitch happens.
Q. I am using NetForum 2013 and once I make a change to a form, I am unable to access the Form Properties in order to modify the Change Reason field. How can I get the Form Properties section of the page back in order to access this field?
A. After making a change to a form, the Properties section of the page will close. In order to re-open the Properties section simply click anywhere in the header of the Form Designer.
This will open the Properties section where you can make any modifications you need (including to the Change Reason field.)