Add Timesheets
To access this form, go to Payroll>Processing>Employee Timesheets and click 
Use this form to enter the Earning, Benefit, Deduction, Workers' Compensation, and Leave Codes to use to calculate an employee's paycheck.
Note: Before you can enter timesheets, you must first set up at least one processing group. To learn how to set up a Payroll processing group, see Payroll Processing Groups.
The "Add Timesheets" form is split into two sections - "Timesheet Details" and "Employees".

The landing page for adding timesheets.
Timesheet Details
Use this section to enter the Processing Group, Timesheet Type, Pay Date, Pay Period Begin Date, Pay Period End Date, Employee ID, SUTA Weeks, and Timesheet Reference (if appropriate), for which to enter timesheets.
| Processing Group | Select the processing group for which to enter timesheets. You must have created at least one processing group to enter timesheets. See Payroll Processing Groups for more information. |
| Timesheet Type | Select a payroll type of Regular (R) or Supplemental (S). |
| Pay Date |
Enter the pay date for this timesheet.
|
| Pay Period Begin |
If entering a supplemental timesheet, enter the pay period begin date.
|
| Pay Period End |
If entering a supplemental timesheet, enter the pay period end date.
|
| SUTA Weeks |
Enter the number of SUTA (State Unemployment Tax) Weeks for this pay period, if applicable.
|
| Timesheet Reference | Enter a timesheet reference number for tracking purposes, if desired. |
Employees
The Employees table provides a comprehensive view of each employee's timesheet. The grid displays the Employee ID, Employee Name, Hours This Cycle, Hours Last Cycle, Gross Pay This Cycle, and Gross Pay Last Cycle.
Gross Pay is the total for the "Amount" column entered on the "Earnings" tab, excluding any Earnings Code that is "Contribute to Net Pay Only" (see Payroll Earning Codes).
You can choose to view a general summary for each employee, or go into more detail by selecting the Summary, Earnings, Benefits, Deductions, Workers' Comp, Leave, or other Details tabs from the toolbar above the grid.
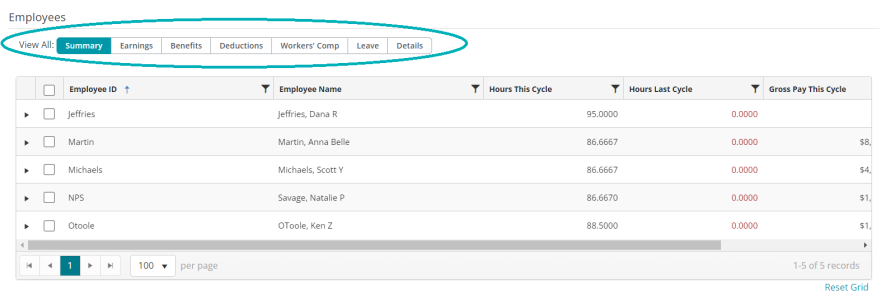
Select an option from the toolbar above the Employees grid to see more information on the employees' timesheets.
Note: If a Default Timesheet has been set up for this employee in their employee profile (see Employee Profile), the default information appropriate for this pay period will automatically populate. You can complete, change, or delete any of the default information displayed. If there is no Default Timesheet for the employee, you must manually enter all applicable timesheet information.
For more information on each tab, click the tab's name below.
Selecting the "Summary" option from the toolbar will show a summary of the codes used to calculate an employee's paycheck.
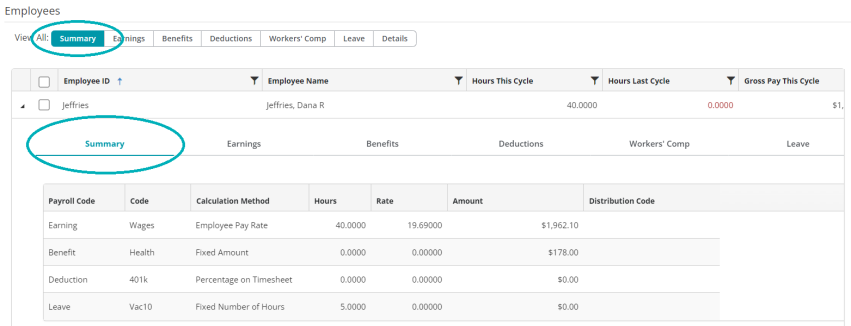
If you need to make edits to the timesheet, select which codes to edit from Earnings, Benefits, Deductions, Workers' Comp, or Leave.
Select the "Earnings" option from the toolbar to view or make edits to the earning code entries for an employee's timesheet.
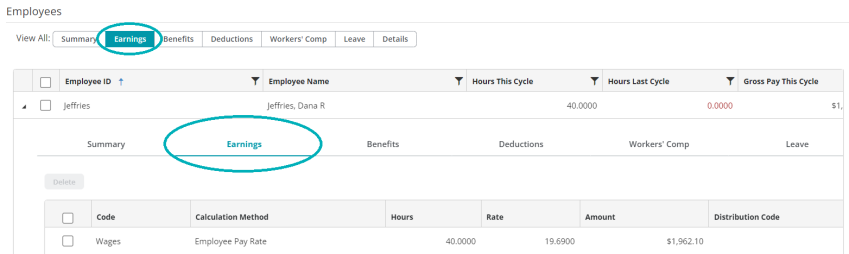
If you previously created a default timesheet for an employee (see Employee Default Timesheet), that information will automatically populate in the employee's timesheet. If not, you can manually enter the information here.
Note: A distribution code is required for every earning code entry.
Entering Earning Codes
If you enter an earning code that uses the "Amount on Timesheet" calculation method, you must enter a fixed amount.
If you enter an earning code that uses the "Rate on Timesheet" calculation method, you must enter a rate.
If you enter an earning code that uses the "Rate Multiplier", "Fixed Hourly Amount", "Employee Pay Rate", or "Rate on Timesheet" calculation methods, you must enter a number of hours.
See Payroll Earning Codes for more information on earning codes.
Select the "Benefits" option from the toolbar to view or make edits to the benefit code entries for an employee's timesheet.
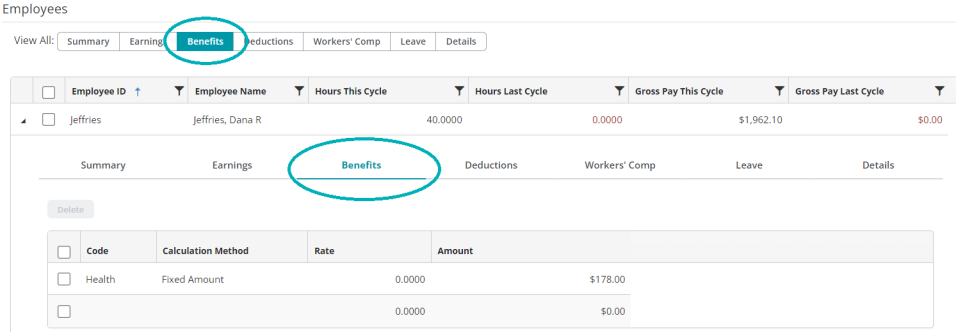
If you previously created a default timesheet for an employee (see Employee Default Timesheet), that information will automatically populate in the employee's timesheet. If not, you can manually enter the information here.
Entering Benefit Codes
If you enter a benefit code that uses the "Fixed Percentage of Earnings" or "Percentage on Timesheet" calculation methods, you must enter a percentage.
If you enter a benefit code that uses the "Fixed Hourly Amount" or "Fixed Amount" calculation methods, the system displays the amount that was entered for that benefit when you created the code.
If you enter a benefit code that uses the "Amount on Timesheet" calculation method, enter that amount.
See Payroll Benefit Codes for more information on benefit codes.
Select the "Deductions" option from the toolbar to view or make edits to the deduction code entries for an employee's timesheet.
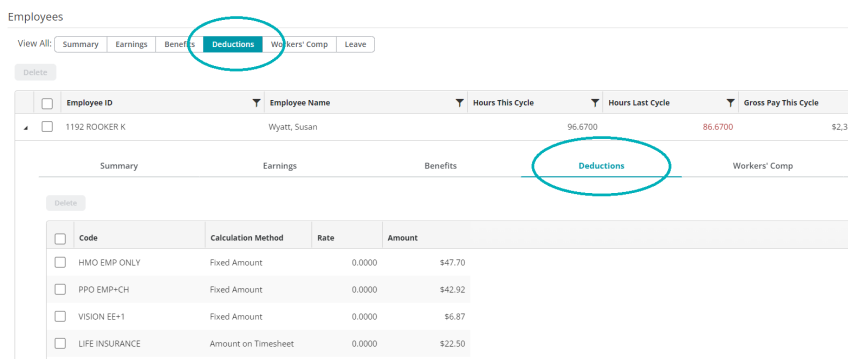
If you previously created a default timesheet for an employee (see Employee Default Timesheet), that information will automatically populate in the employee's timesheet. If not, you can manually enter the information here.
Entering Deduction Codes
If you enter a deduction code that uses the "Fixed Percentage of Earnings" or "Percentage on Timesheet" calculation methods, you must enter a percentage.
If you enter a deduction code that uses the "Fixed Hourly Amount" or "Fixed Amount" calculation methods, the system displays the amount that was entered for that benefit when you created the code.
If you enter a deduction code that uses the "Amount on Timesheet" calculation method, enter that amount.
See Payroll Deduction Codes for more information on deduction codes.
Select the "Workers' Comp" option from the toolbar to view or make edits to the workers' compensation code entries for an employee's timesheet.
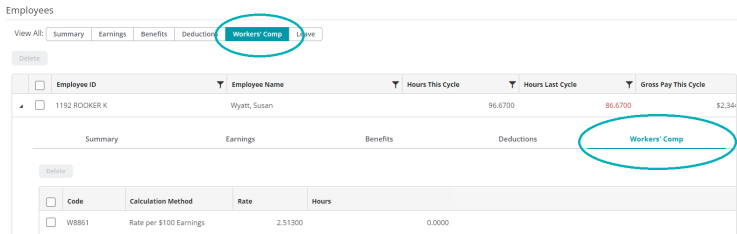
If you previously created a default timesheet for an employee (see Employee Default Timesheet), that information will automatically populate in the employee's timesheet. If not, you can manually enter the information here.
Entering Workers' Comp Codes
If you enter a workers' compensation code that uses the "Rate per Workers' Compensation Hours calculation method, you must enter the amount of hours to use for the calculation.
If you enter a workers' compensation code that uses the "Rate per Hours Worked" or "Rate per $100 Earnings" calculation methods, the system automatically calculates the amount based on the rate entered when the code was created.
See Payroll Workers' Compensation Codes for more information on workers' compensation codes.
Select the "Leave" option from the toolbar to view or make edits to the leave code entries for an employee's timesheet.
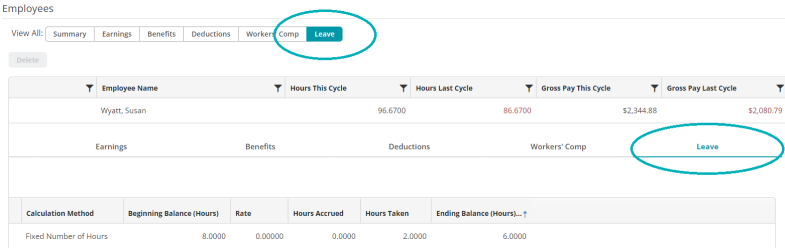
If you previously created a default timesheet for an employee (see Employee Default Timesheet), that information will automatically populate in the employee's timesheet. If not, you can manually enter the information here.
Entering Leave Codes
If you enter a leave code that uses the "Percentage on Timesheet" calculation method, you must enter a percentage.
If you enter a leave code that uses the "Amount on Timesheet" calculation method, enter that amount.
See for Payroll Leave Codes for more information on leave codes.
Note: "Beginning Balance" is calculated using the system date.
Generate Timesheets
To generate timesheets, select the employees to generate timesheets for, then click "Generate Timesheets".
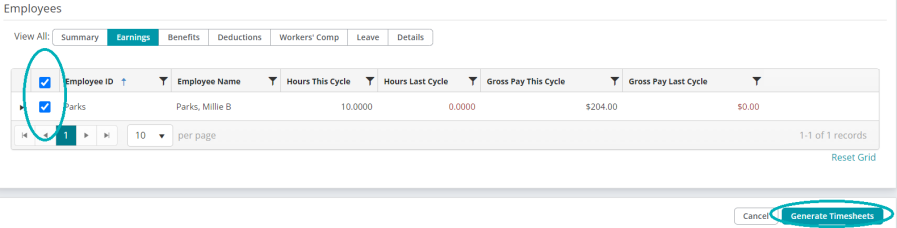
Select the checkbox next to an employee's name, then click "Generate Timesheets" on the bottom right of the screen.
After generating your timesheets, proceed to Process Payroll and Print Checks.
Common questions about adding timesheets in MIP Cloud
Enter Regular Timesheets for employees who do not have Default Timesheets (perhaps because their payroll information varies from payroll to payroll), or to change an employee's Default Timesheet information for one particular payroll.
Enter Supplemental Timesheets to give employees off-schedule or other non-standard payments; for example, you would use a Supplemental Timesheet to create a replacement check for a voided Regular Payroll check. Note that timesheets entered using this form are for a particular processing group, pay date, pay period begin date, and pay period end date.
If Default Timesheets (see Employee Default Timesheet) have already been set up for all employees, that information automatically displays on this form, for both Regular and Supplemental Timesheets.
To view Earning code rates and amounts, clear the "Hide Earning Code Rates and Amounts During Timesheet Processing" checkbox in Payroll module setup (see Setting Up the Payroll Module).
To reimburse an employee for a separate expense, create an Earning code with the "Contribute to Net Pay Only" checkbox selected (see Payroll Earning Codes). This will allow you to reimburse the employee the net pay amount without the amount being subject to taxes and fringe benefits.