
Planning a Custom Query
Although custom queries can be created from the ground up, each custom query planned and built from within the Query Tool should be initially created from a baseline query that is already included within netFORUM Pro if that baseline query is already close to what is needed. This will mean much less effort when constructing a query. Plan carefully and consider what it is the query must do and display before beginning so that the query will function efficiently. This helps to minimize the effort needed when creating the query.
Query Central filters baseline queries by Type.
Example: To view queries that return information on Customers, select Customer in the Type drop-down menu to display only queries related to Customer.
To begin creating custom queries, choose a baseline query in the Type drop-down that has the same parameters and functions needed in the custom query. The designated Query Tool Administrator for the organization has access to the Query Tool through the Open Query Tool for Selected Type link located under the Type drop-down menu, as described in Accessing the Custom Query Tool.
Opening the Query Tool for a Selected Type provides access to that type’s filters and variables, and begins the query creation process with that type’s baseline queries.
Example: If the Query Tool is opened in the example above, only the Customer baseline queries are available to begin with, and certain Customer filters and parameters would only be available to create the custom query such as Customer Type, Primary Phone, Customer’s Contact Info, and so forth.
Before Beginning a Custom Query
Before beginning a custom query, review how queries work within netFORUM Pro for quick and efficient creation:
- Everything query element in netFORUM Pro is considered an object. A Customer is an object. There may also be different types of objects for Customer such as an Individual Customer or an Organization Customer.
- Database tables exist for each object and, within those tables, are fields that describe those objects. The Individual Customer object and table has fields that support it such as Name, Address, and so forth.
It is important to understand these concepts because baseline queries in netFORUM Pro are created from these object and tables and custom queries are created the baseline query selected. The fields that are available for the baseline query (and object) will therefore be available for the custom query since it is created from the baseline. Start with the baseline query that makes the most sense to make sure that the maximum numbers of fields needed are available when creating the query.
Example: If a query based upon a specific Event had an object type associated with a Customer selected, what would happen? Most of the fields available for use would be Customer related and not Event related. A better choice would be a baseline query beginning with an object type of Event to create the query.
When planning the type of query to customize, consider the following questions before choosing the baseline query type on which to base the query:
- What is the query purpose?
- Is a list required from one specific area, such as Customers, or a list of open orders from one type of Membership?
- Or are all the Event Registrants from one specific Event by Member Type needed?
After the functions for the query to perform are set, set the fields needed to display the results.
To see Event Registrants by Member Type select Event Name and the Member Type.
To be more specific, additional fields are:
- Event Name
- Member Type
- Registrant Name
- Event Date(s)
- Contact Information
- Badge Name
Creating a simple Function and Field Table for planning purposes may help keep the needed functions and fields in the custom query. The query above would look similar to the table below.
|
FUNCTIONS: |
Should be able to pick the Event at run-time |
|
To execute |
Should list all Event Registrants |
|
|
Should be able to pick Event Registration Begin Date at run-time |
|
|
Should be able to pick Event Registration End Date at run-time |
|
|
Should be able to pick Member Type at run-time |
|
|
|
|
FIELDS: |
Event Name |
|
To display |
Registrant Name |
|
|
Registration Dates |
|
|
Member Type |
|
|
Member E-mail (Primary) |
|
|
Member Phone (Primary) |
Remember that functions are what queries do and fields are what queries display. After both the functions and the fields are set for the custom query, choose the relevant baseline query.
Creating a Basic Custom Query for a Mailing List by Member Type and Join Date
This section provides a step-by-step example for creating a basic custom query functionality and output.
The National Association for Technical Writers (NATW) has decided that a custom query is needed for Mailing Lists they have created in their system that will pull Individual members from a list with a specific Member Type and Join Dates so that marketing e-mails can be sent for upcoming events.
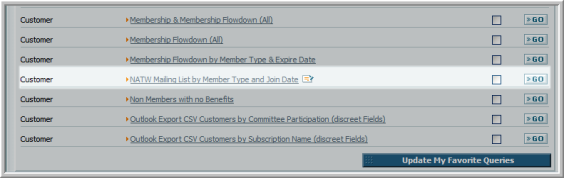
Query Central currently contains baseline queries for Customers on a Mailing List and Memberships and Join Dates. To obtain a list that contains both for marketing purposes, however, a custom query will need to be created by combining them within the Query Tool.
There are 5 basic steps in the work flow when creating a query:
- Planning the query
- Design the query functionality (Step 1 in the Query Tool)
- Formatting the query output (Step 2 and Step 3 in the Query Tool)
- Saving the query
- Running the query
Planning the Query
The first step in creating a custom query is to plan the functions and fields to execute to return the needed results. This helps select which baseline query to begin with when creating a custom query. For this case study, the following functions and fields are included in the Mailing List custom query:
|
FUNCTIONS: |
Should be able to pick any Mailing List in the system to market from |
|
To execute |
Customer Type should = Individual automatically |
|
|
Should be able to choose any Member Type in the system |
|
|
Should be able to choose the Member Type Join Date |
|
|
Member flag should be set to Member (for now only marketing to members) |
|
|
|
|
FIELDS: |
Mailing List name |
|
To display |
Member Type |
|
|
Customer Type |
|
|
Member Sort Name |
|
|
Join Date / Expire Date / Termination Date (Member Dates) |
|
|
Member E-mail (Primary) |
|
|
Member Phone (Primary) |
Note: Each function the query executes has an associated set of fields that will produce an output for that function. After the functions and fields are determined, pick the baseline query to start designing the custom query. Begin with the baseline query that most closely matches the custom query needed. For this case study, NATW decides to choose Customers on a Mailing List as the baseline query to begin the custom query design.
Tip: Functions are what a query DOES so that a field can DISPLAY output on the screen. Such as choosing any Mailing List in the database (Function) so that select Individuals display on it (Field) for marketing purposes. Functions DO, Fields DISPLAY.
Designing the Query Functionality
After the functions and fields needed to begin designing the custom query are set, decide upon a baseline query that will begin with most of these to minimize the work needed to do during the design and format stages. This is an important decision because the baseline query that selected should have most of the functions and fields already in place which means few additional functions and fields are needed to create the custom query.
In this case study, NATW decided to use the baseline query Customers on a Mailing List to start the custom query design. This means that when opening the Query Tool, the Administrator would select Customer in the Type drop-down and then click the Open Query Tool for Selected Type link.
The Customer Type is used to open the Query Tool in this case because that is where the baseline query is contained (Customers on a Mailing List) that NATW wants to use to create the custom query.
Step one in designing the custom query is to Load an Existing Query in the drop-down provided. In this example, NATW selected Customers on a Mailing List to use as the baseline query.
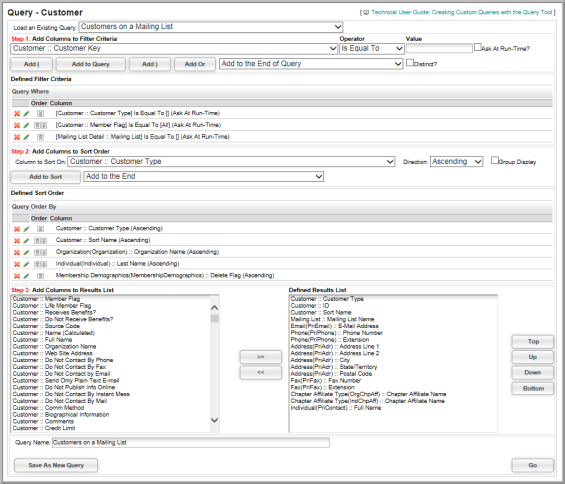
The Customers on a Mailing List baseline query loads three query filters that provide the following functionality:
- Customer Type is determined at run-time
- Member Flag is determined at run-time
- Mailing List is determined at run-time
Tip: Remember, Functions DO, fields DISPLAY. If a function is set to ‘ask’ at run-time, it means that the user will be asked a question when the query is run versus the query itself determining the outcome for the field to display. For example, in the query above, the user will be asked what kind of Customer Type they want the function to pull from the Mailing List (Individual or Organization) for the field to then display. Had this not been set to ask at run-time, the function would have retrieved whatever type it was directed to automatically pull when the query was run without asking the user.
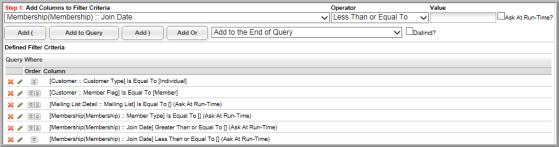
Now determine what functionality needs to be added, deleted, or modified in the baseline query filters that are loaded in Defined Filter Criteria based on the functionality determined from the planning stage. For this case study custom query, NATW decides the following modifications are in order based on the planning stage and the baseline functionality loaded in the Defined Filter Criteria box:
The following function needs no modification:
- Mailing List Detail :: Mailing List Is Equal To Ask At Run-Time
Forms a statement that the Mailing List be equal to a value supplied at run time.
The following functions need to be edited as follows:
- Customer :: Customer Type Is Equal To Individual
Forms a statement that the Customer Type be equal to Individual as an embedded filter.
- Customer :: Member Flag Is Equal To Member
Forms a statement that the Member Flag be equal to Member as an embedded filter.
The following functions need to be added as follows:
- Membership Membership :: Member Type Is Equal To Ask AT Run-Time
- Membership Membership :: Join Date Greater Than or Equal To Ask At Run-Time
- Membership Membership :: Join Date Less Than or Equal To Ask At Run-Time
Forms a statement that the Member Type be equal to a value supplied at run time.
Forms a statement that the Member Join Date be greater than or equal to a value supplied at run time.
Forms a statement that the Member Join Date be less than or equal to a value supplied at run time.
Tip: Date Range Operators are frequently added with a Greater Than\Less Than or Equal to Operator to specify a range.
Once these functions have been modified and added in the Defined Filter Criteria area, then the functionality criteria of the Customers on a Mailing List baseline query will match the functionality NATW has specified for the custom query.
Tip: Do not wait until all function statements are in place before using the Go button test and run the query. Run the query often to make sure that the functionality put in place is what is expected. Save the query often to avoid system time-outs and losing work while modifying the query until the work is complete.
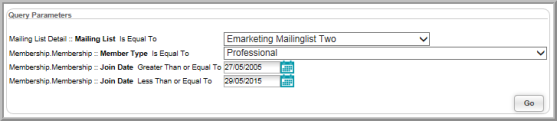
When run, the query behaves exactly as planned, allowing for:
- choosing any Mailing List in the system
- both Customer Type and Member Flag remaining automatically set
- choosing Member Type and Join Date ranges as needed (at run-time).
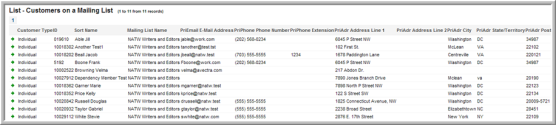
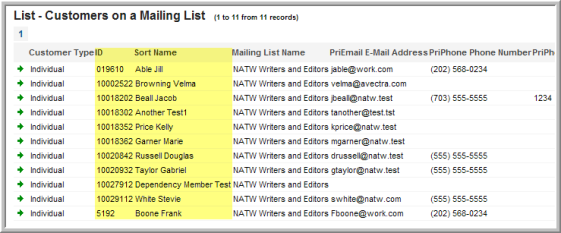
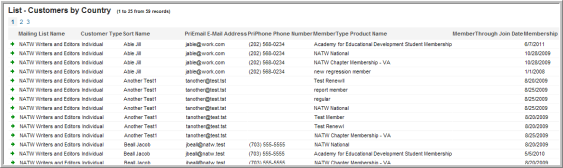
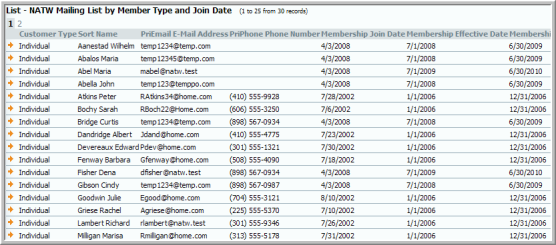
This query currently produces output as seen below. Notice that some fields not planned for are present, some columns are out of order, and some fields planned for are not present. This means that the next step is organizing the query into a more presentable format.
Formatting the Query Output
Once the query function is determined, format the output obtained into a readable format.
Sorting Query Output
Sorting refers to the order in which columns appear, such as alphabetically, from top to bottom, or ascending by Customer ID.
The Query Tool sorts columns that are placed in the Defined Sort Order box from top to bottom. This means that the output that is sorted first will always be at the top of the Defined Sort Order box.
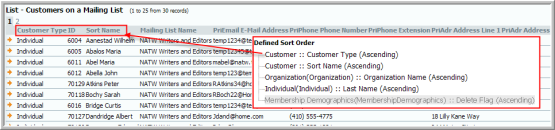
Example: The first column defined in the Defined Sort Order box is Customer Type followed by Customer Sort Name. As a result, Customer Type is followed by Sort Name when the query is first run. The Customer ID appears in the image but it is not a defined sort and so is not sorted. Some sort options that are present in the Defined Sort Order box are not appearing, such as Organization Name and Individual Last Name. This is because the columns have not been added in the Defined Results List in step three of the Query Tool or because they are appearing off-screen in this image. Remember, for columns to be sorted, they must appear in the Defined Results List as well as in the Defined Sort Order. Finally, the Defined Sort Order box is read top to bottom and that the output will sort in that order as well. The Customer ID column is now added to the sort by selecting this field in the Column to Sort On drop-down and then clicking the Add to Sort button.
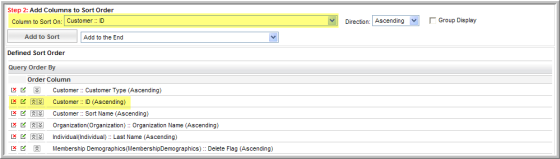
Because Customer ID now appears before the Customer Sort Name, the sort output now changes.
Customer Type is still sorted first, but then instead of Sort Name being arranged alphabetically, Customer ID is now sorted first, ascending, as specified in the Defined Sort Order box. This means that the Sort Name will no longer be in alphabetical order as a result.
Arranging Query Columns
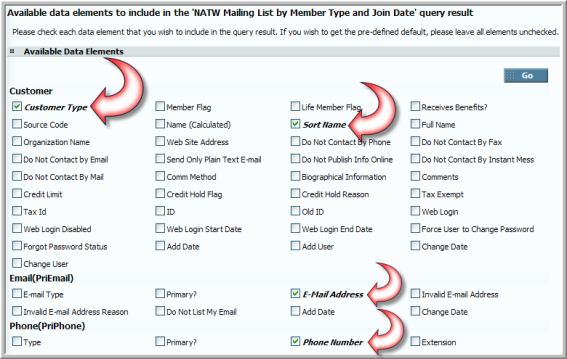
In this case study, NATW decided the following fields should display when the custom query finished running all functions:
|
FIELDS: |
Mailing List name |
|
|
Member Type |
|
|
Customer Type |
|
|
Member Sort Name |
|
|
Join Date / Expire Date / Termination Date (Member Dates) |
|
|
Member E-mail (Primary) |
|
|
Member Phone (Primary) |
Having a planned list of fields for a query makes the third and final step of the Query Tool easy to complete.
Every field specified in the Defined Results List appears in the output list. The Defined Results List is read from top to bottom just like Sort Order, and then appears from left to right on the query List results.
The last step in formatting the query output is to use the >> and << buttons to add and remove result fields. Shift-Left Click will select a range of values while Control-Left click will select specific columns. Use the Up and Down buttons to move columns backward and forward on the list.
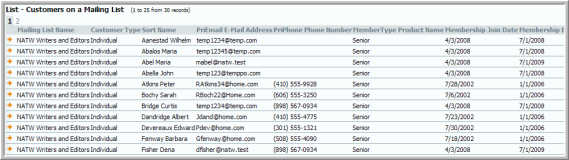
For this Case Study, NATW’s Defined Results List is pictured below so that it matches the fields decided upon in the planning stage.
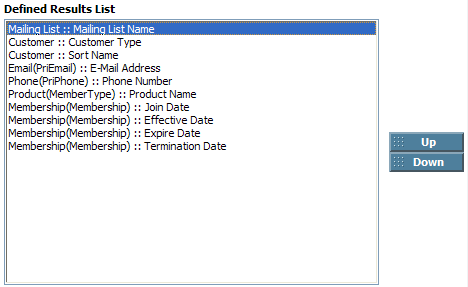
When the NATW query is run, the Defined Results List, from top to bottom, matches the exact left to right output on the resulting List.
Saving the Query Output
At the bottom of the Query Tool interface, enter a descriptive name in the Query Name box and click the Save As New Query button.

The query will be saved under the same Type originally opened in the Query Tool.
Example: If the query was created using a baseline query of Type Customer, the newly saved query will also be placed under Type Customer.
The query is placed alphabetically with baseline queries currently in place with a small icon next to it designating that it is a custom query. Enter a description for the query so that other users in the organization who run the query will understand what it will do by clicking on the query name. This will prompt a description box to appear.
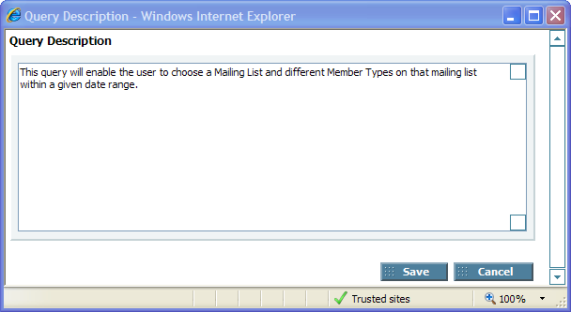
Enter a query description and click the Save button to save the descriptions for other users within the organization.
Options for Running the Query
There are two different options for running a custom query once created; from within the Query Tool or from Query Central after it has been saved.
Only a Query Tool Administrator for the Organization can run the query from within the Query Tool. Other users from within the organization can run the custom query just like a baseline query from within Query Central after the custom query is saved. However, there is a difference in query formatting and, specifically, how the Defined Results List (columns) appear in Query Central vs. running the query from the Query Tool.
The Defined Results List in the Query Tool, defines how columns appear in your query output. The Defined Results List above will produce the output columns below for example. Mailing List Name is at the top and is therefore the leftmost column, then Customer Type, then Sort Name, and so forth.
However, when other users in the organization run the query by using Query Central an intermediate step occurs for them in that they are presented with the ability to modify the fields or parameters of the query. In other words, they can choose to display more information should they choose.
Note: The items in bold are the columns selected in the Defined Results List to display and planned for in the original fields list. However, since users have the ability to potentially add more columns now using this parameters list, Query Central must now take this into account and modify the display columns from the parameters list selections rather than the Defined Results List to account for the possibility that users have added new fields.
When the query is run from Query Central, the columns will be read and displayed from the parameters list, all that have been selected (checked) top to bottom, and displayed left to right in the output list. Using the same Case Study output, this means the modified output would place Customer Type, Sort Name, Email Address, and Phone Number column output first. This can be seen in the new output from the same query that has been run in Query Central as opposed to the Query Tool.
Advanced Custom Query Functions
So far, when designing the custom query, only default AND statements have been used so all conditions must be met – or equal TRUE - before results will be returned.
Example: The top three functionality statements that are contained in the Defined Filter Criteria of the simple custom query designed in the simple case study.

In plain language, these three statements when combined into a query mean the following: If the customer type of customer X is equal to individual (TRUE) and the member flag is also set (TRUE) and he/she is on the Mailing List selected at run-time (TRUE) then he/she will be returned as a result. In other words, all of those statements must be returned true before that customer record would be returned as a result in the query. If any of those conditions return a false condition, such as the record type not being a member, for example, then that particular record would not be returned.
Keep in mind that all statements inserted are AND statements by default in the Query Tool. This means that they all must be true before a result is returned.
Create more complicated statements and conditions within query functions, such as inserting a condition that enables creating decision structures with queries by using condition A OR condition B.
Using Logic with a Query
A custom query can be set to make decisions by inserting OR statements instead of needing all statements to be true with AND statements to return a result.
Example: Using the NATW case study, update the custom query as follows:
In addition to needing a query that uses the Mailing Lists that pulls members by Member Type and Join Date, use the same query to pull members by region as well in case events are held by specific region. The same query will check the DC Metro region and only return results with Member Types in DC or VA or MD.
These statements should be OR statements instead of adding them to the Defined Filter Criteria box. Adding them without inserting an OR statement returns no results. This is because no Customer record would have had DC, VA, and MD listed as a State on their record. All statements that inserted are AND statements by default in the Query Tool which means they all must be true before a result is returned.
To create this logic, enter the first filter statement to check the Customer’s State/Territory. This is added to the end of the query and the Operator uses Contains to check DC (as in Washington, DC). It is not a run-time statement bu an embedded parameter for this query.
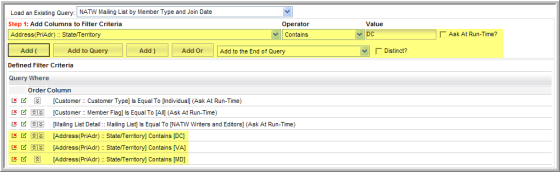
Statements added to the Defined Filter Criteria area are AND statements by default. Customer records who live in DC and VA and MD would be returned; in other words, likely zero. Insert an OR between the State/Territory statements so that Customer records with different State fields can be differentiated by the query tool and generate a return. This means that Customers who live in DC or VA or MD will be returned; a much more likely scenario.
To insert an OR statement between two statements, select the correct statement that it will appear before in the Action button drop down men and click the Add Or button.
To complete the updated case study with the appropriate OR statements, all of the Metro DC states should be updated using the Add Or button in combination with the drop-down menu. The query statements then read more like this: Return all customer types that live in DC OR VA OR MD. The drop-down contains OR operators in the correct positions as well.
![]()
Considering how AND statements work within the Query Tool, the first DC statement is joined with the first group of statements from the original query which makes it an AND statement. The query is stating: Return customer records on a Mailing List of type Individual, that have the Member flag set, and live in DC, or VA, or MD.
In reality, the State/Territory statements should be read as one statement and be separated from the main query statements so that the query, in plain language, reads more like this: Return customer records on a Mailing List of type individual, that have the Member Flag set, that also live in either DC, District of Columbia, VA, MD, and so forth.
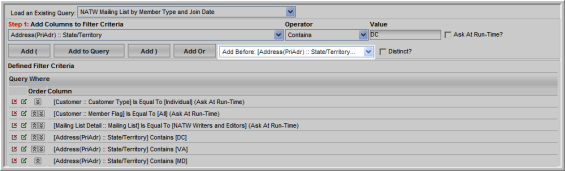
Do this in Query Tool using parentheses. To make sure that a group of statements are read (and evaluated) entirely separate from another group of statements use the Add ( and Add ) buttons.
The Add ( and Add ) buttons are used to make this distinction around statements. Select a statement in the Action button drop-down and then select Add ( to add a beginning parenthesis. The same is true to add the ending parenthesis. Or, add it to the end of the query if the statement is at the very end.
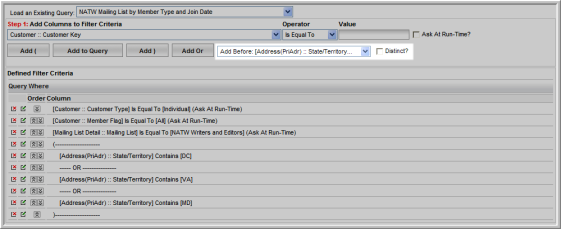
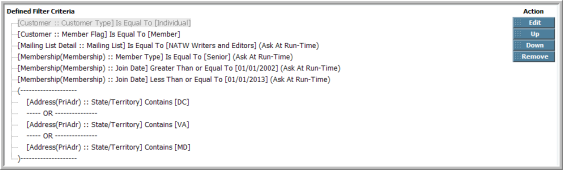
The final Defined Filter Criteria area for the updated Case Study appears below.
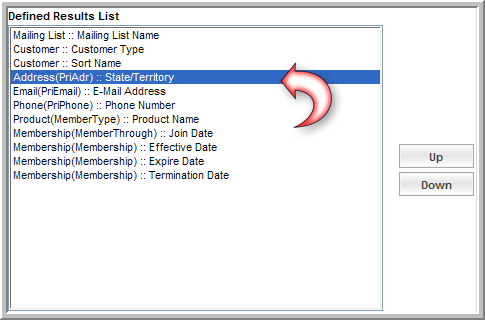
After adding new functionality, to display any associated fields or columns update the Defined Results List. A new column has been added to the Case Study Defined Results List to display the State/Territory and, using the Up button, has been moved closer to the left of the screen.
Save the new query using the Save as New Query button or use the Update Query button to update the existing query.
![]()