
Using Constant Contact for eMarketing
netFORUM Pro now integrates with Constant Contact e-mail marketing. This integration enables you to easily transfer your list of contacts from netFORUM Pro into Constant Contact using the E-Marketing Setup Wizard rather than manually exporting those contacts and then re-importing them into Constant Contact.
Further, with Constant Contact e-mail marketing, it is easy for you to connect with your customers, and for customers to share your message with their networks. Some of the e-mail features include:
- Easy to use, one-click editing; no technical skills required.
- Affordability.
- Facebook and Twitter linking.
- Social stats.
- Free HTML e-mail templates.
- Free personal coaching and support.
For more information and to sign-up for a Constant Contact account, visit their Web site at http://www.constantcontact.com/index.jsp?pn=avectra .
Enabling Constant Contact in netFORUM Pro
Before you may use Constant Contact with netFORUM Pro, you must first contact Abila Support and have it enabled within your entity. Abila Support will need the following information from you when you contact them:
- Constant Contact User Name for the EmailProviderLogin system option. This will be an e-mail address.
- Constant Contact Password for the EmailProviderPassword system option. This will be the password you use with your user name to log in to your Constant Contact account.
- Constant Contact API Key for the EmailProviderAPIKey system option. This is generated through the Constant Contact Developer Center which is described in more detail in the steps below.
Obtaining a Constant Contact API Key
As stated, you must obtain your Constant Contact API Key to provide Abila Support. To obtain your API Key, complete the following steps:
- Log in to your Constant Contact account at www.constantcontact.com.
- Click the Apps & Services hyperlink in the top menu bar.
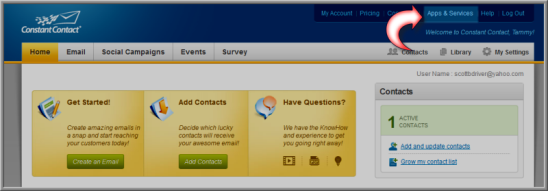
- This will prompt the Constant Contact MarketPlace window.
![]()
-
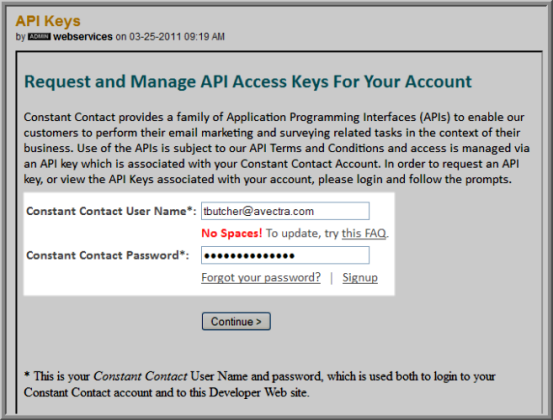
Scroll to the bottom of the MarketPlace window and click the Developer Center hyperlink to go to the Developer Center.

-
Click the Get Your API Key icon under the Getting Started section.
![]()
-
Enter your Constant Contact User Name and Password.
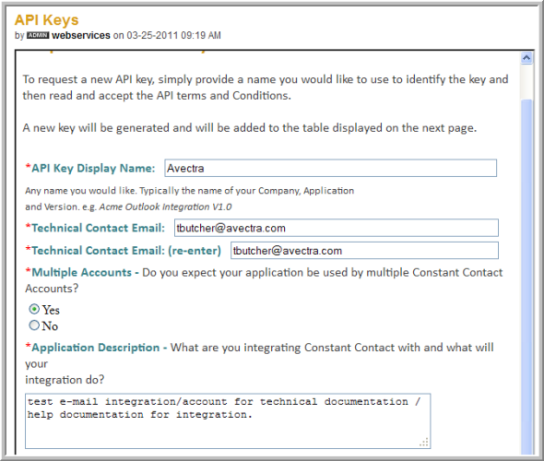
- Provide your API Key with a name (normally the name of your organization) and complete the form’s required fields (designated by a red asterisk). Generate your API Key by clicking the Request API Key button at the bottom of the form.
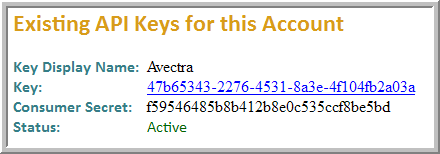
- Your API Key will be generated and display on the screen. Provide the top key displayed to Abila support. The Consumer Secret key is not used at this time.
Abila Support will use your Constant Contact User Name, Password, and API Key to enable your entity for Constant Contact e-mail marketing.
Tip: If you ever need to access your API Key again, return to the Developer Center and click the Get Your API Key icon again (described above). After entering your credentials, your API Key will display
Once the Constant Contact integration is enabled for your entity by Abila Support, you may begin using the E-marketing Setup Wizard to generate queries and then export the fields and parameters to Constant Contact to use with their e-mail marketing features.
Using Constant Contact with the e-Marketing Setup Wizard
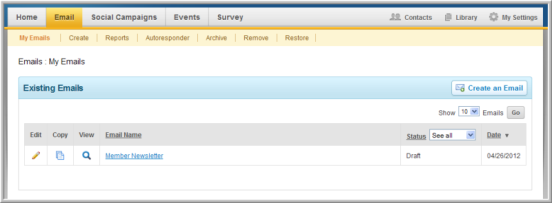
Important: You must have an appropriate e-mail template set-up in Constant Contact before you begin using netFORUM’s E-Marketing Setup Wizard. You will receive an error message and be unable to proceed with your export if you do not. To set-up a template in Constant Contact, create a sample email and select and save a template with it. View Constant Contact’s documentation and help files at www.constantcontact.com for more information on using e-mail templates. If your Email tab in Constant Contact does not look similar to the image below with at least one sample e-mail template set up, you should not proceed with this section.
Once the Constant Contact integration is enabled for your entity by Abila Support, you may begin using the E-marketing Setup Wizard to generate queries and then export the fields and parameters to Constant Contact to use with their e-mail marketing features.
Hover over the eMarketing module tab and select the Messaging Jobs group item. Click the Messaging Job Setup Wizard hyperlink.
You will notice that the wizard now has four steps associated with it (through the breadcrumb navigation at the top of the screen) and a Constant Contact brand logo in the upper right corner.
To use the E-Marketing Setup Wizard and export to Constant Contact, complete the following steps:
- Select a Recipient Type for your Query.
- Select an associated Query based on the Recipient Type selected.
- Select Query Parameters (if they exist for the query selected).
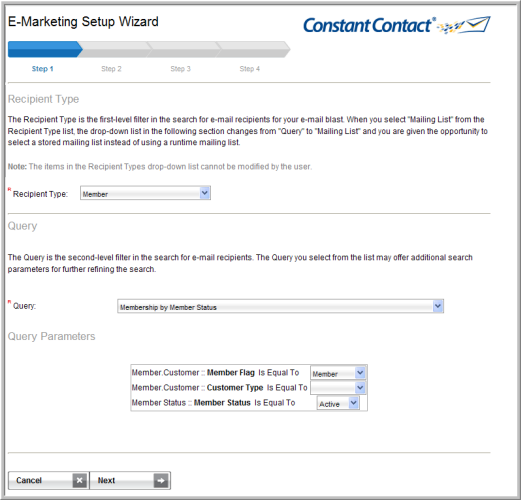
- Click the Next button to proceed to Step 2.
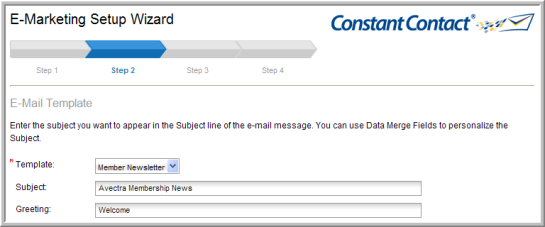
- Select a Template from Constant Contact to use. You will notice that this drop-down contains all the sample templates you have previously set up in your Constant Contact account. This is why it is important that you complete that step first before using the E-Marketing Setup Wizard. If you do not, the wizard will generate an error here.
- Subject: You may enter a subject for your e-mail here if desired but it is not required.
- Greeting: You may enter a greeting for your e-mail here if desired but it is not required. A greeting can be any salutation that you wish to use to open your e-mail.
- You may now choose which query fields you want to map (and then export) to Constant Contact template fields. The fields from the Constant Contact template you selected are on the left while netFORUM fields from the query you selected are on the right. Use the drop-down netFORUM fields to select which template fields you will export them to.
Note: It is important to note that first name, last name, and email fields should be mapped. In some queries, the first name and last name are not available. In this situation, use the Customer::Name (Calculated). Also keep in mind that text fields such as a name should only have text characters and not numbers.
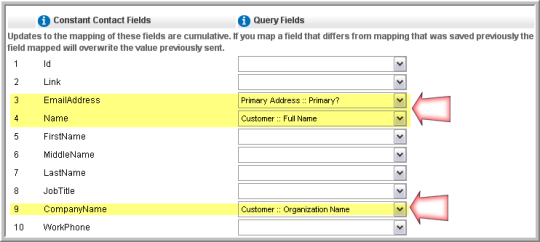
You also have 15 custom fields available to map to in each Constant Contact template. For example, if the template you select does not have a membership date field, you may select the Custom Field 1 to use instead. The image below displays two examples of custom field mapping.
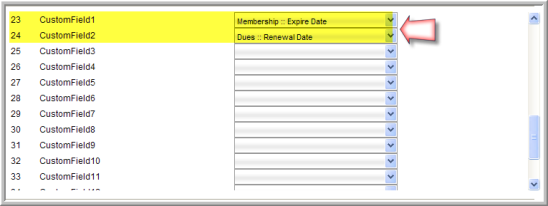
Once a custom field is mapped, do not remap it to a different netFORUM field in additional templates. For example, if you map membership expire date in custom field 1, always use that same mapping in every template you use. If you do not, the first mapping you export will be used and produce unexpected results. Field mappings to all fields are cumulative. If you map a field that differs from a mapping that was saved previously, the field mapped will overwrite the value previously sent.
- Click the Next button to proceed to Step 3.
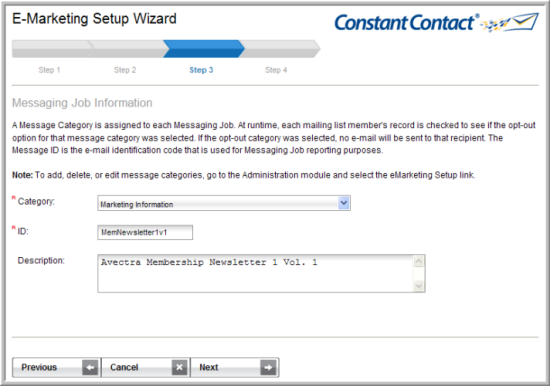
- Enter a Category, ID, and Description for your e-mails.
- Category: Used for opt-outs. However, note at this time that categories are not incorporated into the messaging job for netFORUM. In other words, if an individual has unsubscribed from a category, he/she will not be filtered out and will be included in the list that transfers over to Constant Contact. Opt-outs are then managed within Constant Contact.
- ID: This is not used by Constant Contact in the list name.
- Description: This is not required but is part of the name of the list when it transfers to Constant Contact. You may want to use this field since it shows up in the messaging job profile which may make it easier to find which job relates to which list in Constant Contact.
- Click the Next button to proceed with Step 4.
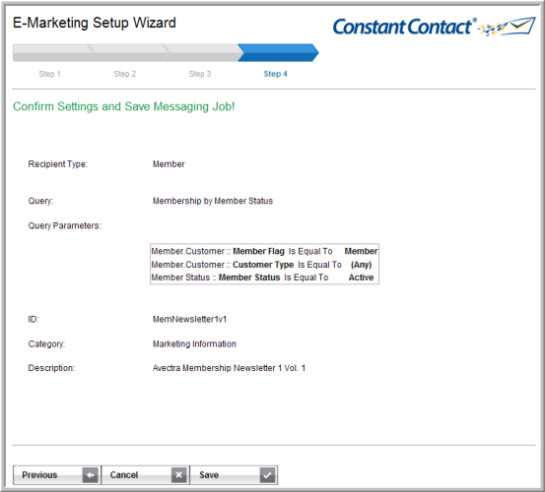
- Review your query and query parameters. If you are ready to export to Constant Contact, click the Save button to proceed.
- You will receive a success message if your e-mail exports successfully.
- You may click Click Here to go to Constant Contact or DONE to go to the Messaging Job Profile.

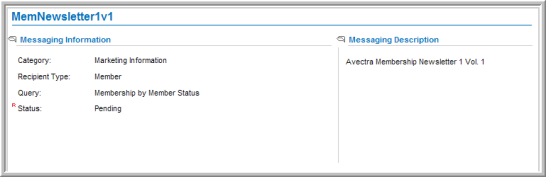
Your initial status on Messaging Job Profile will be Pending. It will switch to Exporting when the scheduling process begins after about approximately 5 minutes. The length of time to export to Constant Contact depends upon how many contacts / parameters are used in the query you selected. When the job is complete, the status will switch to Complete.
You may always check the status by selecting the eMarketing module > Messaging Jobs > List Messaging Job. You may also conduct a Find Messaging Jobs to select your specific Messaging Job.
To check the progress of your e-mail messaging or verify statistics, log in to your Constant Contact account and view your e-mail job.
After completing the messaging job wizard, the list of individuals is sent to Constant Contact. The name of the list is based on the subject, greeting, and description of the messaging job that was created in netFORUM. The message ID is not used.
Tips When Using the Constant Contact Integration
Important: Do not email Constant Contact manages a do not mail list. You need to make sure that you are updating netFORUM with that information – specifically, if someone is listed as do not mail in Constant Contact, their record should also be marked as do not contact by email in netFORUM. This has to be done manually. There is no process for netFORUM to be updated with this information by Constant Contact. If a record is on the do not mail list in Constant Contact, but they are included in the query results from the messaging job in netFORUM and are not marked in netFORUM as do not contact by email, then when the list comes over from netFORUM, the record will be removed from the do not mail list within Constant Contact.
- The integration will take into account records marked as do not email. So if a customer is marked as do not contact by email in netFORUM, then he/she will be filtered out of the messaging job and will not be sent over on the list to Constant Contact. Suggestion – You may want to make sure that you pull a list of your Do Not Mails out of Constant Contact prior to the first use of the integration so you have a backup of this information.
- Opt Out Category – The integration does not take into account opt out categories set in netFORUM. Your opt ins should be managed within Constant Contact.
- New Contacts Receive Welcome Email – Any new contacts added to Constant Contact through the integration will be considered new contacts and Constant Contact will automatically send a welcome email to those new contacts. This email message is configurable within the Constant Contact account.
- Constant Contact Custom Fields – As previously noted, if you use the custom fields available in Constant Contact, once a custom field is mapped, do not remap it to a different netFORUM field in additional templates. For example, if you map membership expire date in custom field 1, always use that same mapping in every template you use. If you do not, the first mapping you export will be used and produce unexpected results.
- Naming Convention within netFORUM’s E-Marketing Setup Wizard – The Description field in the netFORUM messaging job wizard will show as the Constant Contact List name.