Uploading a Document to a Profile
Associate documents and attachments such as a text files, PDF files, and Word documents to certain profile pages. Use the Attachments child form found under the Attachments tab to associate an attachment to a specific profile.
netFORUM Pro uses a server farm to distribute users and content and maximize performance. This process is graphically illustrated on the Help upload and download FAQ. It is important, therefore, that the steps used to upload and link documents are followed correctly.
Once you have uploaded a document into netFORUM Pro, you can refer to it on your eWeb Site pages, or if you prefer, via eMarketing templates and e-mail.
To upload a document to a netFORUM Pro profile page:
- Navigate to the desired profile page.
- Click the Attachments child form tab.
- On the Attachments child form, click the Add
 button to select the document to be uploaded.

The Upload Document Information form will appear. From this form you can select from the list of attachments already uploaded to the system, OR upload a new attachment from your computer.

Selecting an Attachment Already in the System
- On the Upload Document Information form, click the Look-Up
 button to preview a list of attachments already saved in the system.
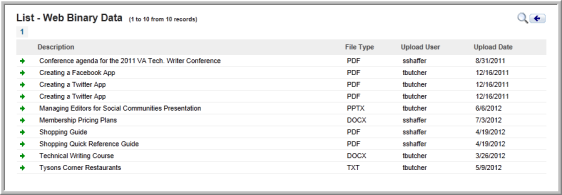
 - On the List page, click the green Go To
 arrow next to an attachment to attach it to the profile.

- Click Save to associate the attachment with the profile.
Uploading a New Attachment
- On the Upload Document Information form, click the Upload
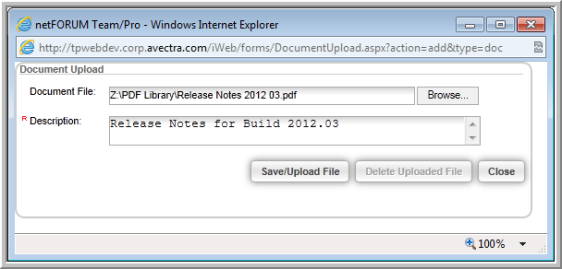
 button. The Document Upload form will appear.

- Click the Browse button to locate the document on your computer and enter a brief Description (required) for the file.
- Click the Save/Upload File button. Then click Save again after you are certain your description carried over.

Note that the file has now been uploaded into netFORUM Pro and is visible on the child form with all applicable data such as the File Description, File Type, Upload User, and Upload Date.

Use the icons on the child form for editing and deleting. Note the following about each icon:
| Icon | Notes |
|---|---|
|
|
Edit: Use to upload a new document from your computer, choose a new document previously uploaded using the Look-Up button, or to detach a document from the current profile by using the delete button. Note that this does not delete the document from the entity but rather only from the current profile. This means that it may be accessed in the future using the Look-Up button as described above. If you choose to upload a new document, click the Delete Uploaded File button after you click the Upload button to remove the old file first before choosing your new file. If you do not remove the old document first, you may have file corruption issues. The difference between the Delete Uploaded File button and other Delete buttons and icons on this child form is that, similar to when you use the Upload button described below, the Delete Uploaded File button will enable you to remove the file completely from the server before you upload a new file. |
|
|
Delete: Use to detach a document from the current profile. Note that this does not delete the document from the entity but rather only from the current profile. This means it may be accessed in the future using the Look-Up button as described above. |

|
Upload: Use to upload a new document from your computer or to delete the current document entirely from the entity. This permanently deletes the document where it may not be accessed in the future using the Look-Up button from another profile. |
You are able to upload file types PDF, text, and Word as well as image-based types such as JPG, BMP, and so forth. For storage space and other subscription limits, try Chat with Support.
After uploading, your file is now available to link to through eMarketing templates and eWeb. For more information, view Help topics on:
