
Advanced Features and Functionality
This section provides information about:
- adding, copying, and deleting security groups
- customizing child form security within a security group
Adding or Copying a Security Group
When possible, use the baseline Security Groups provided upon implementation. However, there may come a time when you need additional Security Groups other than the provided baseline groups. Further, it is suggested that if you need to modify a baseline group that you instead use your own Security Group to do so instead of modifying a baseline group. For this reason, the ability to add your own Security Groups is provided along with the ability to copy the features of a current group so you do not have to start your group from scratch (if desired).
Example: You may want to create a Training Security Group that begins with a limited set of features such as those found in the Executive group.
To copy and add a security group:
- Hover over the Modules tab in the top navigation bar. In the fly out menu, click Administration.
-
Expand the Overview group item and click Set Group Security (Client).
The Add/Edit/Delete Security Group window displays.
-
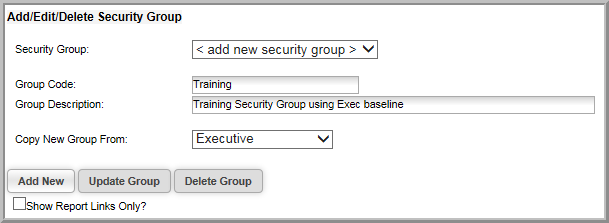
Make sure <add a new security group> appears in the Security Group drop-down.
- Enter a Group Code for your new Security Group. This should be a fairly short, but accurate, description of what your new group will be called. This code is what will appear in the User/Group table at the bottom of the Group Security Setup window. For this example, the Group Code will be ‘Training’.
- Enter a Group Description. This can be a longer description of the group’s intent.
- In the Copy New Group From: drop-down field, select Executive. This means that your new Training group will have all features and functionality of the Executive group enabled upon creation. If you want to create a new group from scratch and enable all aspects of the group yourself, leave this drop-down blank.
- Your new group should look similar to the following figure if you are copying it from an existing baseline group. Remember, if you are starting from scratch, the Copy New Group From field will remain blank and you will update your modules individually as described in the section, Editing Module Access within a Security Group. Otherwise, this field should contain the Security Group that has the functionality you want to start with in your new group.
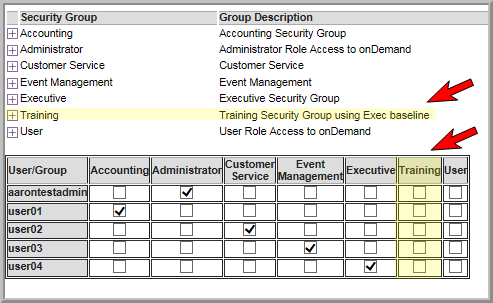
- Click the Add New button to add your new Security Group to the system.
The Administration/Overview window displays.
Notice in Figure 12 that the new group with the Group Code and Description specified is now available and can have more modules added to it (if desired) as well as have group members assigned. If you use the [+] Expand button, you will note that it also has all the functionality of the group it was copied from as well - in this case, the Executive Security Group.
Customizing Child Form Security within a Security Group
netFORUM Pro now provides customers an additional layer of security to their organizations and applications with the addition of Security Groups that allow you to enable or disable modules and their functionality as needed. Some organizations also desire an additional layer of security beyond modules and this is now provided through Child form Security.
Child form Security is similar to Group Security and Adding New Users in that you must have access to the Administration module for access. It is implemented as part of Security Groups and is considered an advanced feature.
Organizations that implement Child form Security are dictating which specific child forms in their application (per module) are either invisible or read-only for each Security Group in use. Using the following figure as an example, note the following:
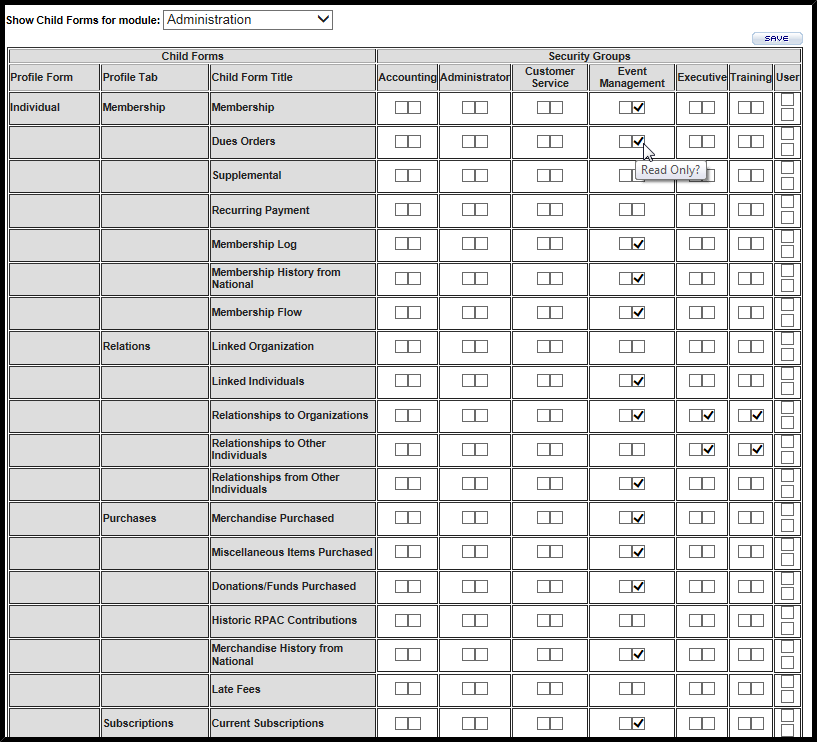
- The screenshot above is a partial graphic showing all the current child forms for the CRM module. The CRM is displayed in the Show Child Forms for module: drop-down at the top of the screen.
- Beside the Child forms column is the Security Groups column displaying each of the active Security Groups in place for this organization.
- For each Security Group, you have two choices for each child form. You may choose to make it completely invisible to the user of that Security Group or you may choose to make it simply read-only. Hover over the check boxes to view the options as displayed in this figure.
-
For example, note that for the Event Management group, several of the CRM child forms are read-only.
-
If you select both invisible and read-only as options, the child form will be invisible to the group member.
- If neither check box is selected, the child form is both visible and editable as dictated by both the user’s normal Access Group and Security Group settings.

To activate child form security:
- Hover over the Modules tab in the top navigation bar. In the fly out menu, click Administration.
- Expand the Overview group item and click Child Form Security (Client).
- Select the module you want to modify child form access to in the Show Child Forms for module: drop-down. Click the invisible or read-only check box as desired for each child form.
- Click the Save button to save your work.
The Child Form Access window displays.
Your changes will not be registered by the Security Group member until he/she logs out and back into the system.
Important: Just as with module manipulation, it is recommended that you do not make changes to the child form security of the four baseline Security Groups. This makes troubleshooting and support much harder should an issue occur for netFORUM Customer Support managers. Just as with adding and deleting module options, it is recommended that, if you want to modify your child form options for a Security Group, you create your own Security Group first to do so instead of changing a baseline Security Group.
Deleting a Security Group
Deleting a Security Group that is no longer in use is similar to adding a new Security Group.
To delete a Security Group:
- Hover over the Modules tab in the top navigation bar. In the fly out menu, click Administration
- Expand the Overview group item and click Set Security Group (Client).
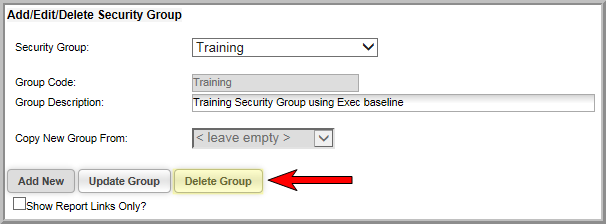
- Make sure the Security Group that you want to delete appears in the Security Group drop-down. In the example shown in the following figure, the Training Security Group created in Adding or Copying a Security Group will be deleted.
- Click the Delete Group button. The Security Group will be immediately removed. Note you are not able to delete baseline Security Groups.
The Add/Edit/Delete Security Group window displays.
Important: If you delete a Security Group, all members of that Security Group are immediately removed from the group as well which includes all rights associated (or disabled) with that group! Think carefully before deleting a Security Group!