
Using Expo Logic for Event Registrations
netFORUM Pro now integrates with the Expo Logic badge [on] demand product registration services. Registrations processed through netFORUM and integrated with Expo Logic will have the ability to have the event confirmation template contain a unique barcode or Quick Response (QR) code for each registrant confirmation email sent. Upon arrival at the event, registrants may then scan their unique codes at an Expo Logic leased kiosk and print their event registration information such as badges and ticketing information. Registrations that take place onsite at the registration desk may also use Expo Logic badge [on] demand product registration services with a badge on demand print button that is integrated on the event Registrant Profile.
With Expo Logic badge [on] demand product registration services, it is easy for you to set up 24/7 real time registration and badge printing services for your events. Some of the features include:
- Badge printing and check-in services.
- Immediate credential processing.
- Barcode and Quick Response (QR) code support for mobile scanning and check-in.
- Session access control and tracking.
- Leading edge hardware and kiosk systems.
- Free personal coaching, training, and support.
For more information and to sign-up for an Expo Logic account, visit their Web site at http://www.expologic.com/2007/contact/submitrfp.cfm.
A demonstration video is located here.
Setting Up Your Expo Logic Account
Before you may use Expo Logic with netFORUM Pro, you must first contact Expo Logic to contract services.
- Visit the Expo Logic Web site to submit a service request at http://www.expologic.com/2007/contact/submitrfp.cfm. You may also call toll free 1-877-ELI-EXPO.
- An Expo Logic representative will contact you and secure a signed contract and/or payment.
- You will then work with Expo Logic to design your badge layout for your event(s).
- An Expo Logic representative will contact Abila Support to have your integration enabled with netFORUM Pro.
Expo Logic
820 Park Way
Broomall, PA 19008
Toll Free: 1-877-ELI-EXPO
Ph. 610-328-7572
Fax. 610-328-1548
Creating an Event Registration Template with Expo Logic Barcodes
Once your contract and implementation has been set up by Expo Logic and Abila Support, you are ready to begin inserting the code necessary to implement barcodes in your registration confirmation templates. You will work with Expo Logic to determine the best barcode to use that meets your needs for your specific event needs.
Expo Logic offers both Quick Reference (QR) barcode support and Standard Barcode (Code 39) support for your confirmation templates. Both are discussed below.
Printing Badges Using Expo Logic and netFORUM Event Confirmation Templates
To enable Expo Logic barcodes in your netFORUM event confirmation templates, the following steps need to be observed:
- The template type should be for Event Registrants
- The template should have one of the code snippets below pasted into it (received from Expo Logic). You must use HTML mode to paste the code into the template.
- The template must be saved and then attached to the event as the confirmation template.
- Once registered, the template will be sent to registrants and should be printed to present upon check-in.
Using Quick Reference (QR) Codes in Event Confirmation Templates

Quick Reference (QR) codes are often preferred in e-mail confirmations because they are easily scanned from printed paper or from mobile devices. As a result, they are increasing in popularity. Expo Logic will specify the dimensions of the QR code (such as square dimensions of 100x100 for example). You will need to insert their code into your template using HTML mode. It will look similar to the code below.
<!--
Sample Code -->
<div
align="center">
<img
src="http://www.ExpoLogic.com/barcodes/qr/100/{reg_id}.png"
/>
<br
/>
Badge
ID: {reg_id}
</div>
Note: When viewing your template and Expo Logic barcode in netFORUM a broken image link (red X) will appear. This is because the {reg_id} has not been populated yet with the Web Method used in the integration. When the registrant registers for the event, and the confirmation template e-mail is sent, it will populate and appear correctly for each unique registrant as demonstrated below.
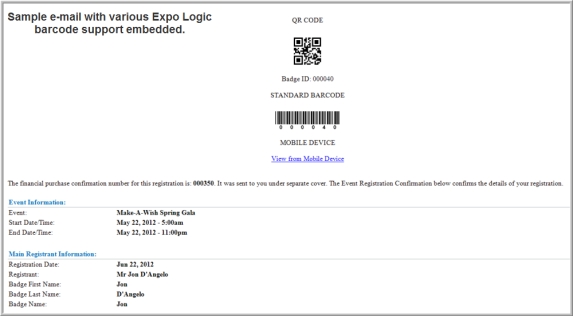
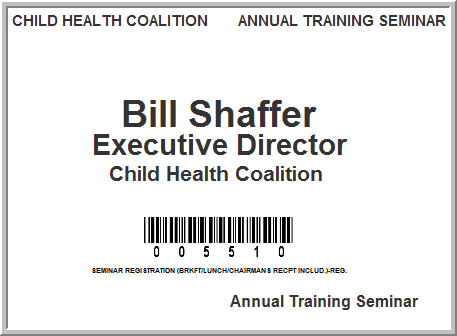
Once the code is inserted into the event confirmation template, a unique QR barcode will be generated each time a customer registers for the event and included in the e-mail confirmation that is sent along with other registration details such as seen in the image below that demonstrates various barcodes that may be used.
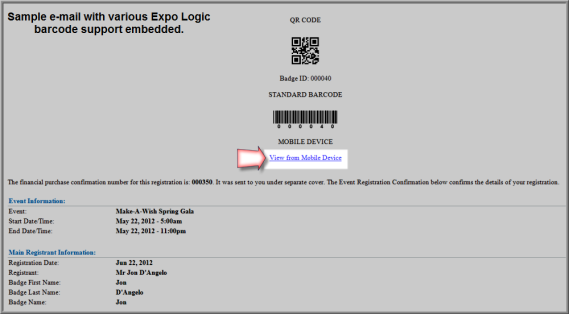
The registrant may print the e-mail and use it to print his/her badge onsite during check-in along with other event materials if desired. Notice that if mobile device support has been included in your set up with Expo Logic, a hyperlink is included to view from a Mobile Device as well.

Tip: For event registrants who may have forgotten their confirmation e-mails, you may also print badges onsite. View, Printing Badges Onsite Using the Expo Logic and netFORUM Integration.
Using Standard Barcode (Code 39) Codes in Event Confirmation Templates

Standard Barcodes (Code 39) are also easily generated on badges and can be used in event confirmations. However, they may not scan as easily as QR codes from mobile devices. Expo Logic will create the barcode code. You will need to insert their code into your template using HTML mode. It will look similar to the code below.
<!--
Sample Code -->
<div
align="center">
<img
src="http://www.Expo Logic.com/barcodes/39/{reg_id}.png"
width="150" />>
</div>
Note: When viewing your template and Expo Logic barcode in netFORUM a broken image link (red X) will appear. This is because the {reg_id} has not been populated yet with the Web Method used in the integration. When the registrant registers for the event, and the confirmation template e-mail is sent, it will populate and appear correctly for each unique registrant as demonstrated below.
Once the code is inserted into the event confirmation template, a unique standard barcode will be generated each time a customer registers for the event and included in the e-mail confirmation that is sent along with other registration details such as seen in the image below that demonstrates various barcodes that may be used.
The registrant may print the e-mail and use it to print his/her badge onsite during check-in along with other event materials if desired. Notice that if mobile device support has been included in your set up with Expo Logic, a hyperlink is included to view from a Mobile Device as well.
Tip: For event registrants who may have forgotten their confirmation e-mails, you may also print badges onsite. View, Printing Badges Onsite Using the Expo Logic and netFORUM Integration.
Viewing a Barcode ExpressPass from a Mobile Device
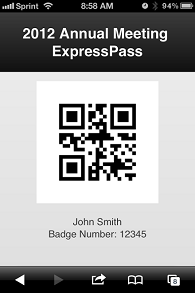
Expo Logic may also provide you with the code to insert a View from Mobile Device hyperlink into your event confirmation template. This will allow attendees to view their ExpressPass barcode from a mobile device such as a smart phone or tablet.
Just as with QR or Standard barcodes, the code must be inserted into the template in HTML format.
<!--
Sample Code -->
<div
align="center">
<a
href="http://www.Expo Logic.com/expresspass/bod_mobile.cfm?
ClientCode=Expo_Logic_Issued_Code&
Barcode={reg_id}& FirstName={reg_badge_firstname}&
LastName={reg_badge_lastname}& Event=Your Event Name">View
from Mobile Device</a>
</div>
Tip: For event registrants who may have forgotten their confirmation e-mails, you may also print badges onsite. View, Printing Badges Onsite Using the Expo Logic and netFORUM Integration.
Printing Badges On-Site Using the Expo Logic and netFORUM Integration
If your event allows for onsite registration, the Expo Logic integration with netFORUM supports on demand registration and badge printing as well.
An example of onsite registration with Expo Logic ondemand services implemented follows:
- An attendee does not register but shows up on the day of your event at the registration desk desiring to attend your event.
- Register the attendee.
- Process the event and session payments as applicable.
- Print the badge.
There are two ways to print badges on-site using the Expo Logic and netFORUM integration. These two methods are:
- From the Registrant Profile.
- From the Confirmation Profile.
Printing the Badge from the Registrant Profile
- Go to the Registrant Profile.
- Notice that with the Expo Logic integration enabled,
the Registrant Profile now
contains a badge (on) demand
 button.
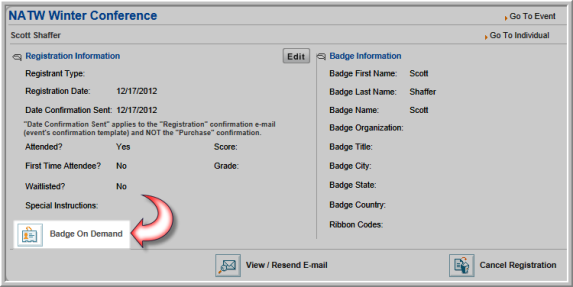
- Click this button to bring up badge and registration information about the new registrant. You may select the Badges checkbox and drop-down to print a badge immediately for the new registrant. The Printed heading on the right displays the number of badges already printed.

Once Print is clicked the new badge appears for the registrant and he/she is ready to attend your event immediately.
Tip: For event registrants who may have forgotten their confirmation e-mails, you may also use this method to print their badges for them onsite.
From the Confirmation Profile
After registering an individual for an event, you can immediately navigate to the Confirmation Profile to print the registrant's badge.
To print the registrant's badge from the Order Confirmation Page, complete the following steps:
- Click the hyperlinked order confirmation number located near the top of the Shopping Confirmation page.
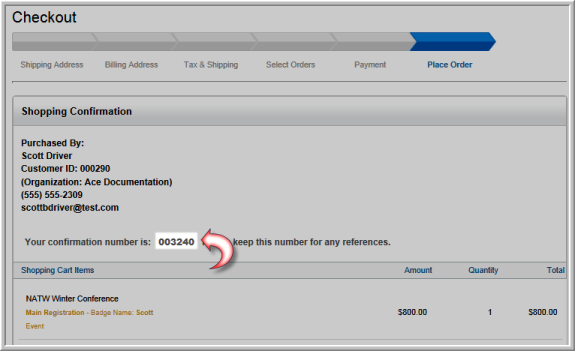
This will open the Confirmation Profile for the registration.
- Click the BadgeOnDemand tab.
- Expand the Registrants child form. This child form displays a list of registrants contained for this order confirmation.
- Click the Badge Link hyperlink for the registrant whose badge you wish to print.
![]()