
The netFORUM Pro Pro Data Import Wizard also allows you to import lockbox files you receive from your bank. This feature allows you to process large numbers of lockbox transactions at once without keying in the payment information.
Once you set up your lockbox template, you will not need to modify this template unless your organization changes banking institutions, or your bank changes the data it includes/excludes in your lockbox files.
To upload a lockbox template into netFORUM Pro Pro using the Data Import Wizard:
- Locate the lockbox file (on your hard drive) you wish to import. Remember it must be an Excel file.
- Give the file a unique name that you will be able to recognize from a list. The name of the file is how this lockbox template will be known in netFORUM Pro Pro. This name will appear in lists and in any applicable drop-down menus within the application.
- Click the Administration hyperlink on the Module Menu to launch the Administration module.
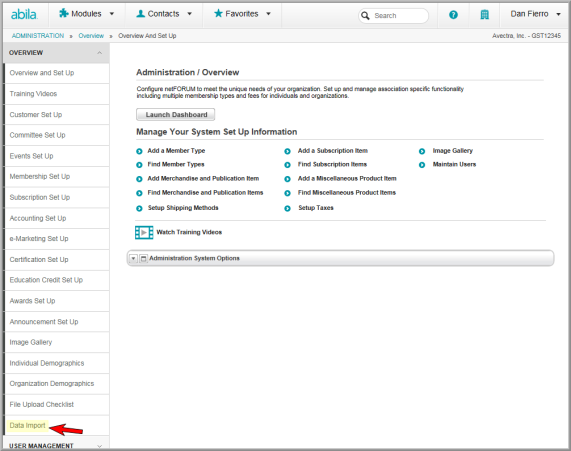
- Hover over the Overview option to expand the Overview options on the right side of the Administration fly-out menu.
- Click the Data Import link. This will launch the Data Import Wizard.
- Click the Browse button to locate the lockbox file you wish to import.
- After locating and selecting the correct lockbox file, click the Save button.
The Quick Preview of Uploaded Worksheets section of the Data Import Wizard will update to show a snapshot of the data that was just uploaded.
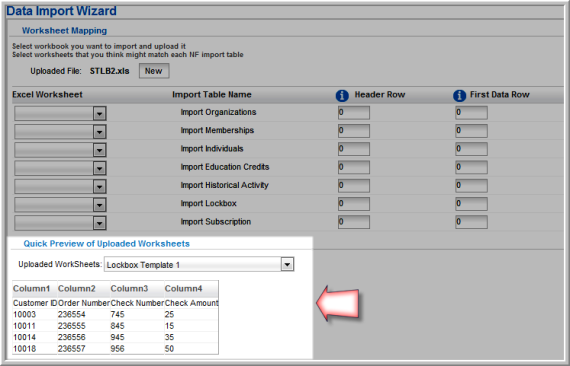
- Expand the Excel Worksheet drop-down menu next to the Import Lockbox line item in the Import Table Name column of the Data Import Wizard.

- Select the name of the lockbox worksheet from this drop-down menu.
- Set the Header Row and First Data Row numbers to correspond with the worksheet you just uploaded (i.e. setting the Header Row at number 1 will pull in the first row of the worksheet as a header row for your import.)
- Click the Next button. You will be taken to the page where you will map the Excel Column to the Import Table Column in netFORUM Pro Pro.
- Map the Excel Columns from your lockbox worksheet to their corresponding netFORUM Pro Pro Import Table Column values.
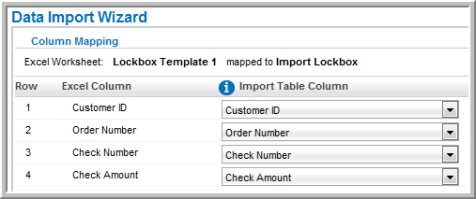
- After you have completed mapping the columns, click the Next button. You will receive a message informing you that everything is prepared for the final import of data.
- Click the Finish button.
- Click the OK button on the confirmation pop-up window that appears after clicking the Finish button. Your import will begin and you will receive a status update as to its success. If there are any failures, you may need to examine the lockbox file to correct any errors.

Viewing the Lockbox Information After Data Import
To view lockbox information after the import:
- Click the Go to Lockbox hyperlink
- Visit the Lockbox group item in the Accounting module.
To view lockbox information in the Accounting module:
- Click the Accounting hyperlink on the Module Menu to launch the Accounting module.
- Click the Lockbox group item to view the available actions.

- Locate the lockbox you just uploaded. You can either use the Find functionality to locate your lockbox, or click List to see all of the lockboxes currently created for this entity and then select yours from that list.

- Click the name of the lockbox to view its Lockbox Information page.
- Click the Edit button to view the Process Bank Lockbox Report for your newly uploaded lockbox.
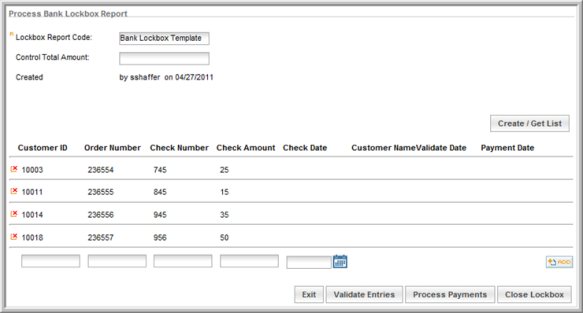
- From the Process Bank Lockbox Report, you can perform all of the tasks normally associated with lockboxes (and outlined in the Using the Manual Lockbox Function topic available in netFORUM Pro Online Help.)