
Enabling Custom Demographic Data Fields for Merchandise
Custom demographic data fields for merchandise are set up from the Merchandise Profile. After the demographic fields are enabled, they will display in the Shopping Cart or Online Store when the customer purchases the merchandise. Later, the demographic information can be viewed from the Merchandise Information profile.
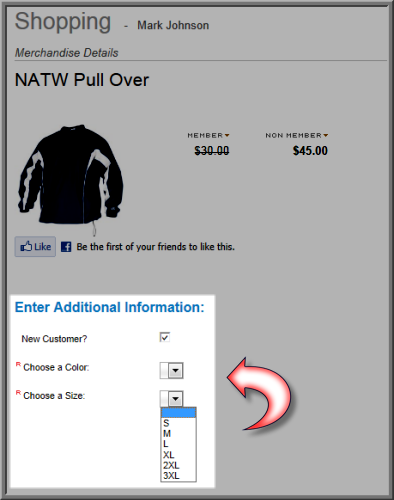
Note: To require the customer to fill in data when they purchase the merchandise, select the Required In Cart check box.
To create custom demographic data fields for merchandise:
- Go to the Merchandise Profile.
- In the Merchandise Information section, click the Setup Demographics link.

- In the Demographics Setup window, notice the column headers for Order, Caption, Type of Input, Show Internally, Show Externally, Required in Cart, Multi/Single Select, and Long Description. There are no baseline demographics included with merchandise demographics. Custom demographic setup is required. However, you must still decide and setup the custom demographic parameters as desired which are described below.

-
Enter or modify the Order number for the data entry field as needed. (This is the order it will appear on the form relative to the other fields.)
Tip: If you leave the order "0", it is the same as entering "1." It is best to use a numbering schema of 10, 20, 30, etc., so that you can easily edit and re-order the demographics as you add new ones. The data fields will only show on the forms if you select check boxes in the Show Internally, Show Externally, etc. columns. It is important to note that each item must have a separate and distinct order number. If each item does not have a unique order, netFORUM will randomize the order of the items on the page and eventually generate an error.
- If you want to be able to view this demographic information from iWeb, select the Show Internally check box.
- If you want to be able to view this information from the eWeb site, select the Show Externally check box.
- If you want to make sure that the information is collected before the customer may check out, select the Required in Cart check box.
- Click Save.
Merchandise demographics contain no baseline demographics. You must create your own along with multi/singe select demographics and long descriptions (such as entering drop-downs for selecting colors and sizes for clothing purchases). View more information on custom demographic fields at Creating Custom Demographic Data Fields.
Tip: You may decide the look and feel of how you present your demographics in customized forms both on iWeb and on eWeb. View Designing Custom Forms for Demographics for more information.
When a customer purchases the merchandise using the Shopping Cart (shown below) or Online Store, they will see the demographic data fields that have been enabled in the Additional Information section.
Remember, to display these fields, the Show Internally check box (and Show Externally check box for the Online Store) must have been selected during setup.
The demographic information is stored on the Merchandise Information profile.
To view or edit the demographic information:
- Go to the Merchandise Information profile.
- Click the Demographics link. The Demographic Information window displays the selected demographics.
- Click Save to close the window.
