
Adding an Exhibit Show
The Exhibit Show Profile contains show details, including key dates and times. From the Exhibit Show Profile, set up show contract fees, booth fees, and booth inventory. Access the exhibition floor plan (URL), add sponsorship information, exhibit location information, priority points, and additional instructions.
You may also upload an exhibit image to display in the Shopping Cart and Online Store and set up demographic fields to appear in the Shopping Cart or Online Store. Create an Exhibitor Contract using the Shopping Cart on the Exhibit Show Profile.
- Hover over the Modules tab in the top navigation bar. In the fly out menu, click Exhibits.
- On the Exhibits / Overview page, click Add a Show.

The Show Information form will appear. Enter show data in four key sections of the form:
- Show Information
- Key Dates & Times
- Availability for PURCHASE
- Online Information
Once a Show Profile has been added, you can create copies of the Show Profile, including booths and fees.
Completing the Show Information Form
Enter basic show information—including show code, title, and description—in the Show Information section of the Show Information form.
- On the Show Information form in the Show Information section, enter a show Code and a show Title (required).
- If you wish to assign the show to a particular merchant account, select one from the Merchant Account drop-down menu. If no merchant account is selected, the default will be used.
- If desired, enter a description of the exhibit show in the Description field.
- To limit the show availability to members only, click the Available for Members Only check box.

- Select a show type from theShow Type drop-down menu (required).
- If desired, enter Priority Points for this show.
- Select a show category from the Show Category drop-down menu.
- Enter a Product List Order number to specify where in the show list this show should appear.
- If the show is related to an event, click the Look-up
 button next to the Related Event field. Click on the desired event on the List–Event page. (If you know the event name you can narrow the search results returned on the List–Event page by entering all or part of the event name in the Related Event field before clicking the Look-up button.)
 - If a floor plan for the show is available online, enter the URL in the Floor Plan URL field.
- Enter several Keywords to ensure that the show can be found in a search. All keywords must be separated by commas.
In the Key Dates & Times section of the Show Information form, set start and end dates and times for the show. You can also set the time zone in which the exhibit will take place.
- Enter a Start Date and Time (required). You can use the calendar
 icon to select the start date from the calendar widget, or type in the desired date. Time must be entered in 12-hour clock format.
 - Enter an End Date and Time (required). You can use the calendar icon to select the end date from the calendar widget, or type in the desired date. Time must be entered in 12-hour clock format.
- Select a time zone from the Time Zone drop-down menu (required).

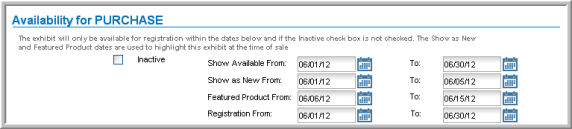
Specify whether or not the exhibit is available for customers to purchase in the Availability for PURCHASE section. Set date ranges in which the exhibit is shown as available, new, or featured.
- If the show is inactive, click the Inactive check box. If the show is not inactive, leave this box unchecked.
- In the Show Available From and To fields, use the calendar icon to select the start date from the calendar widget, or type in the desired date. Set date ranges for the Show as New From and To fields, the Featured Product From and To fields, and the Registration From and To fields.
In the Online Information section of the Show Information form, specify whether to offer the exhibit online
- Select the Sell Online check box if you want the Exhibit Show Contract to be available through the Online Store.
- Enter the Sell Online Dates. (These dates determine when the Exhibit Show Contract will be available through the Online Store.)

- Click Save. The new Exhibit Show Profile will appear.
Copying an Existing Show
When setting up a new exhibit show, if a pre-existing show with similar data exists you can copy that show's information using the Copy Show option. Copying a show copies all of that show's attributes, including booths and fees. You can also choose whether or not to copy keywords, priority points, description, custom demographics, as well as other settings.
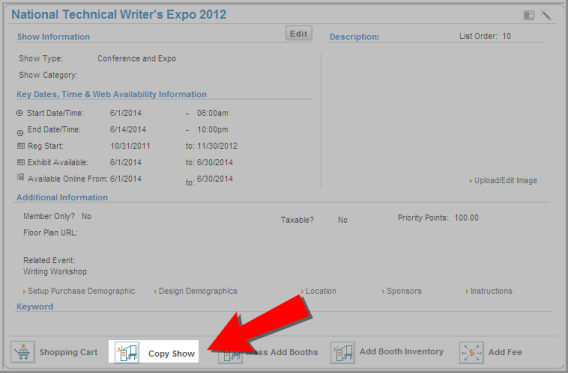
- Navigate to the Show Profile to be copied.
- Click the Copy Show action icon at the bottom of the Show Profile.
- The Copy Show form will appear. In the Copy Show window, the Show Code and Show Name of the Show Profile that you wish to copy automatically populates the Copy From Show drop-down menu. This drop-down menu contains a listing of all exhibit shows that have been created. You have the option of selecting a different show from this drop-down menu if you choose.
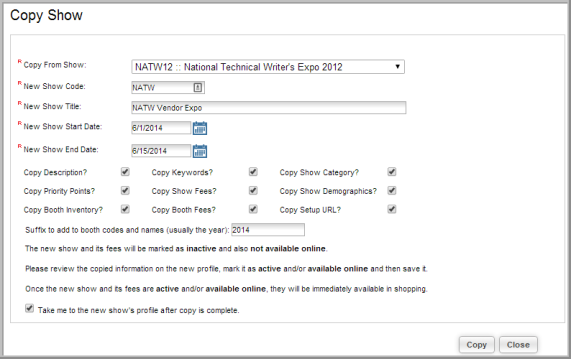
- Enter the New Show Code (required).
- Enter the New Show Title(required).
- Enter the start date in the New Show Start Date field (required).
- Enter the end date in the New Show End Date field (required).
- The Copy? check boxes allow you to specify which features of the original show to copy. If there is information from the original show that you do not wish to copy, clear the appropriate check box(es).
- If you would like to add a suffix to the Show Code and Show Names, enter the suffix in the Suffix to add to booth codes and names (usually the year) field. This field is not required, but entering a suffix (such as the year) will help you differentiate from the original booth codes and names particularly in report and query results. If no suffix is entered, the booth codes and names will be copied as they are from the original show.
- To navigate to the new Show Profile after saving your data, ensure that the Take Me To The New Show’s Profile After Copy Is Complete check box is selected.
- Click the Copy button to create the new Show Profile.
The copied Show Profile will appear. Note that the new profile is automatically set as inactive.
The copied profile displays the message that the "Item is Inactive & Not Available for Sale". When you are ready to display the event in the Shopping Wizard and make it available online, go to the Show Information form by clicking the Edit button on the Show Profile.
In the Show Information form, clear the Inactive check box and select the Sell Online check box (if you want to make the show available on eWeb.) You have the option of setting several dates that will affect how this show displays both in iWeb and eWeb. You will also need to make each show fee active in order for the show to display in the Shopping Wizard.

When you have finished editing the show, click the Save button. The Show Profile updates and the "Item is Inactive & Not Available for Sale" message is no longer displayed. Once a show has been copied, it has full show functionality.