
Mass Add Booths
netFORUM Pro allows users to add multiple booths of the same type in one operation by using the Mass Add Booths functionality.
The Mass Add Booths function uses a booth that has been setup as a template and allows you to make multiple copies of this template. These copies will include all attributes of the template booth, including the fees if they have been set up. If no templates are available, users can still mass create several booths on the fly by completing the necessary fields.
To use the Mass Add Booths feature, complete the following steps:
- Open the Show Profile page for the show to which you wish to mass add booths. You can locate the Show Profile by using the Find Shows or List Shows features available on the Exhibits fly-out menu.
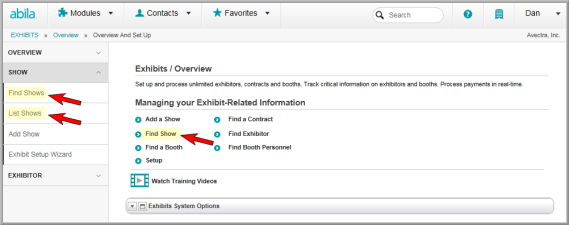
If no shows have been created, click the Add Show link and follow the steps in online Help to Add a Show.
- Once on the Show Profile, click Mass Add Booth from the Action fly-out menu or from the link near the bottom of the screen.

This will open the Add Multiple Booths pop-up window. Several of the fields on the Add Multiple Booths form are pre-populated with information from the show, such as the Add to Show field and the date fields (if they have been setup on the Show Profile.)
- Expand the Booth To Copy drop-down menu to select the booth type you would like to mass add to the show.
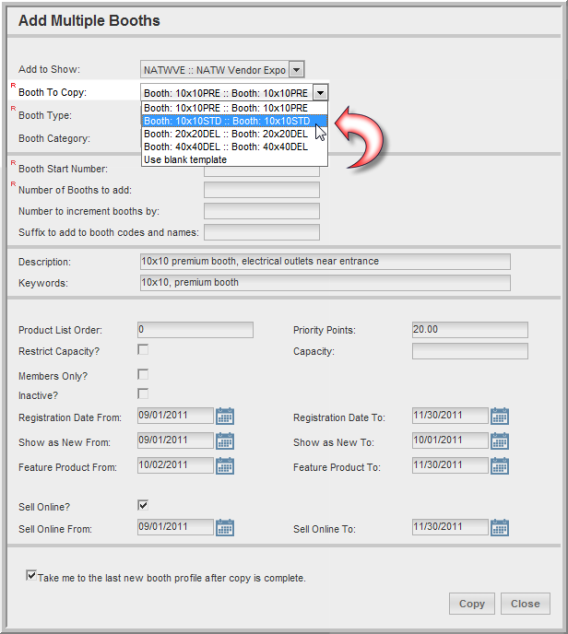
The Booth To Copy drop-down menu contains a list of all of the booths that have been added to the show. If no booths have been added, the Booth To Copy drop-down menu will only contain the Use blank template option.
The Use blank template option will allow you to manually enter the data for the booth you wish to mass add to your show.
- Select the booth option you wish to mass add to the show from the Booth To Copy drop-down menu.
- The Booth Type drop-down menu will default to the booth type that was set for the booth selected in the Booth To Copy drop-down menu.
- The Booth Category drop-down menu will default to the booth category that was set for the booth selected in the Booth To Copy drop-down menu.
Tip: While the Booth Type and Booth Category fields default to the settings from the booth selected in the Booth To Copy drop-down menu, they can be overridden. This is useful if the booth selected in the Booth To Copy drop-down has many of the characteristics that you would like to add to another series of booths for your show.
- Enter the starting number for the mass added booths in the Booth Start Number.
- Enter the number of booths to mass add in the Number of Booths to add field.
- Enter the value you wish to increment the booth numbers by in the Number to increment booths by field.
- Enter the suffix code you would like to add to your booth names and codes for identification purposes in the Suffix to add to booth codes and names field.
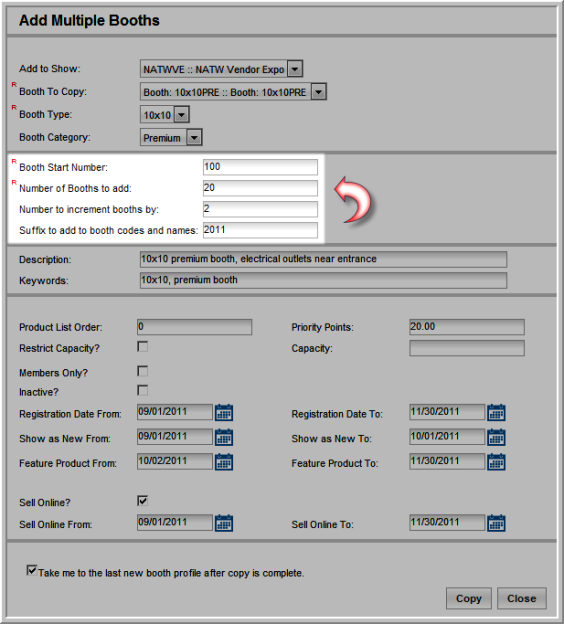
In the example above, the first booth added will be number 100 and each subsequent booth will have their booth number incremented by 2 (102, 104, 106, and so-forth.) In addition, each booth will have 2011 appended to their booth code/name for identification purposes.
- The text in the Description field will default to the text entered for the booth selected in the Booth To Copy drop-down menu. You may edit this text if you wish.
- The keywords displayed in the Keywords field will default to the keywords entered for the booth selected in the Booth To Copy drop-down menu. You may edit these keywords if you wish.
- The remaining fields will all default to the values set for the booth selected in the Booth To Copy drop-down menu. You may override each of these values if you wish.
The remaining fields are:
- Product List Order: This value determines where these booths will display in the product list for this show.
- Priority Points: This value determines the number of priority points the purchaser of one of these booths will receive.
- Restrict Capacity?: To limit the number of individuals allowed in these booths, click the Restrict Capacity? checkbox.
- Capacity: If the Restrict Capacity? checkbox was selected, you must enter the capacity for these booths in the Capacity field.
- Allow Waitlist?: To allow a waitlist to be started for this booth once the capacity number is reached, click the Allow Waitlist? checkbox.
- Members Only?: To limit the purchase of these booths to members of the organization, click the Members Only? checkbox.
- Viewable To Non Members?: Clicking the Members Only? checkbox will make the Viewable to Non Members checkbox visible. Selecting this checkbox will allow these booths to be seen by non-members, but only members will be able to purchase them.
- Inactive?: To mass create these booths, but not make them available for purchase, click the Inactive? checkbox.
- Registration Date From / Registration Date To: Enter the dates these booths will be available for purchase in these fields.
- Show as New From / Show as New To: Enter the dates to display these booths as “New” in the online store in these fields.
- Feature Product From / Feature Product To: Enter the dates to display these booths as a featured product in the online store in these fields.
- Sell Online?: To make these booths available in the online store, click the Sell Online? checkbox.
- Sell Online From / Sell Online To – if the Sell Online? checkbox is selected, enter the dates to make these booths available for purchase in the online store in these fields.
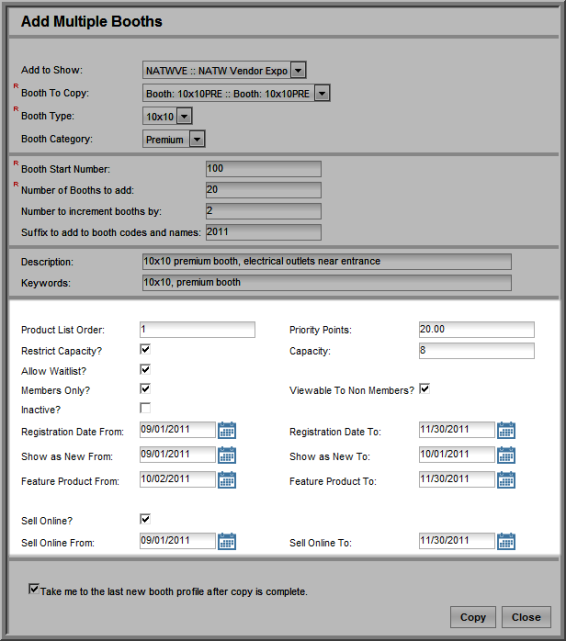
- Click the Take me to the last new booth profile after copy is complete check box if you would like to be taken to the Booth Profile for the last booth created in the series.
- Click the Copy button. You will be taken to the Booth Profile for the last booth created in the series (if the Take me to the last new booth profile after copy is complete check box was checked.)
- Follow the steps outlined in the Adding Exhibit Booth Fees help topic to add fees to the booth. You will need to individually go to each newly added booth and repeat the add fees steps to add fees to each of the added booths.
Tip: To mass add the booth fees to all of the newly added booths, set the booth fees for the booth to be used as a template. When you select this booth in the Booth To Copy drop-down menu, everything, including the fees will be copied to all of the newly added booths.
- To see the newly added booths, open the Show Profile and expand the Booth Inventory child form located in the Booth tab.
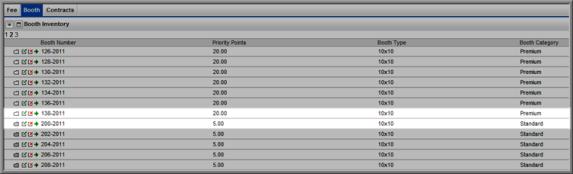
Notice that some of the newly added booths have a white folder icon next to their Booth Number in the Booth Inventory child form, while some have a gray folder. Those booths with the white icon do not have booth fees added, those that have the gray icon present, already have their fees added.
Clicking the gray icon will expand a new line item displaying the fees that have been set up for that booth.
