
Checking Out in iWeb
netFORUM Pro features a streamlined checkout process that is both functional and efficient.
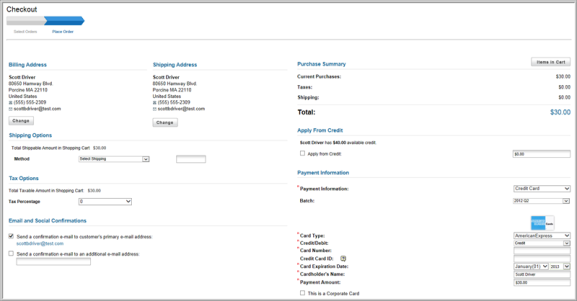
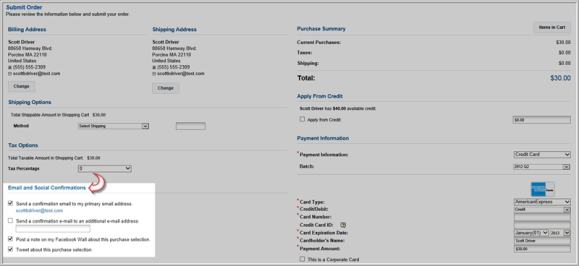
The checkout page has several sections:
- Billing Address.
- Shipping Address.
- Shipping Options.
- Tax Options.
- Email and Social Confirmations.
- Purchase Summary.
- Apply From Credit.
- Payment Information.
Modifying the Billing and Shipping Address
The Billing Address and Shipping Address default to the primary address for the individual or organization that is making the purchase.
To modify the Billing and/or Shipping Address(es), complete the following steps:
- Click the Change button under the address you would like to modify.
This will open the Select Your <Billing or Shipping> Address pop-up window.
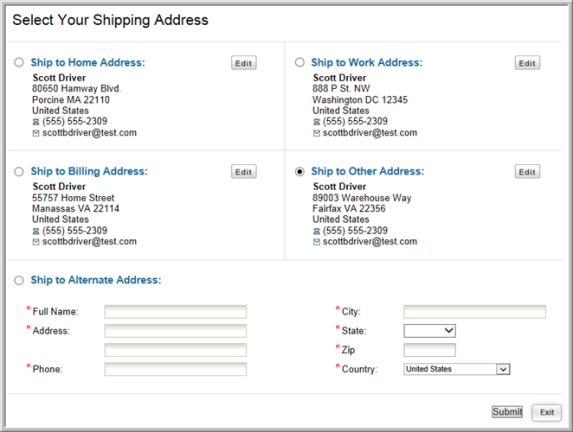
The addresses displayed are addresses that are currently associated with the individual or organization profile.
- Click the radio button next to the address you wish to have this order billed or shipped to.
- Click the Edit button next to an address to make modifications to that address.
- Click the radio button next to the Ship to Alternate Address to specify an address that is not currently associated with the individual or organization profile.
- Click the Submit button to save your changes.
Selecting the Shipping Options
To select the shipping options for the order, complete the following steps:
- Expand the Method drop-down menu located in the Shipping Options section of the Checkout page.

The cost field next to the Method drop-down menu will auto-populate with the cost of the selected shipping method.
The Purchase Summary section of the Checkout page will also update to show the Shipping charges.
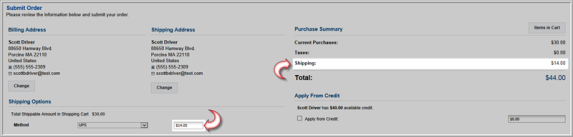
Note: The order Total listed in the Purchase Summary section of the Checkout page will also update to reflect the newly added Shipping charges.
Setting the Tax Options for the Order
By default, the Tax Percentage field will be set to the default tax rate for the Shipping Address.
If multiple tax rates are available for the shipping location, you may expand the Tax Percentage drop-down menu and select the appropriate tax.
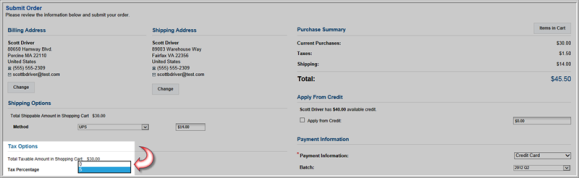
Once a Tax Percentage is set, the Purchase Summary section of the page will update to show the taxes being applied to the order.

Note: The order Total listed in the Purchase Summary section of the Checkout page will also update to reflect the newly added Taxes.
Enabling E-mail and Social Confirmations
The netFORUM Pro Checkout page provides the ability to have confirmation e-mails sent to the e-mail address associated to the individual or organization as well as another e-mail address that may be specified at the time of checkout. You may also choose to have the purchase posted to Facebook and/or Twitter.
By default, the following check-boxes are checked:
- Send a confirmation e-mail to my primary e-mail address.
- Post a note on my Facebook Wall about this purchase selection.
- Tweet about this purchase selection.
To enable e-mail and social confirmations, complete the following steps:
-
Checking the Send a confirmation e-mail to my primary e-mail address check-box will send a purchase confirmation e-mail to the e-mail address specified on the profile of the individual or organization making the purchase.
-
Checking the Send a confirmation e-mail to an additional e-mail address check-box will allow a purchase confirmation e-mail to be sent to an e-mail address that is not specified on the individual or organization profile. If this check-box is checked, the additional e-mail address you would like to send this purchase confirmation to must be specified in the associated field.
-
Checking the Post a note on my Facebook Wall about this purchase selection will enter a post on the Facebook profile specified for the individual or organization that is making the purchase.
-
Checking the Tweet about this purchase selection will send out a Tweet from the individual or organization's Twitter account that is specified for the individual or organization making the purchase.
Note: The Facebook and Twitter fields will only display if the customer has those accounts set up in the netFORUM database.
-
De-selecting any of the check-boxes will disable that feature for the current purchase.
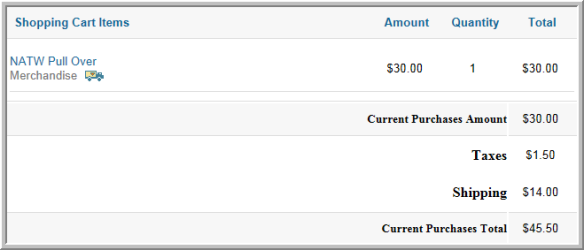
Purchase Summary
The Purchase Summary section of the Checkout page provides a running total of the charges associated with the current purchase. As shipping charges and/or taxes are added to the order, they will be reflected as line items in the Purchase Summary section (including the Total.)

It is very important that you click the Items
in Cart button before completing this page and submitting the payment
information. Clicking this button will open the
Using Credit to Pay for the Order
If the individual or organization making the purchase has any credit available, it may be applied to the order in this section of the Checkout page.
To apply credit to the payment of an order, complete the following steps:
- Click the Apply from Credit check-box.
- Enter the amount to apply from the available credit in the associated field.
The available credit amount is shown above the Apply from Credit check-box.

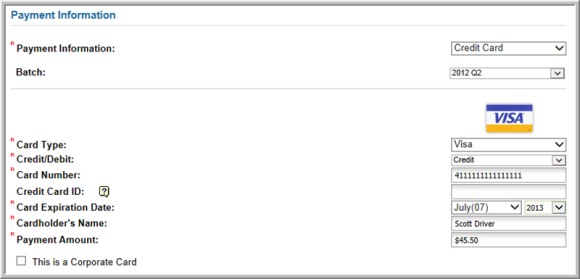
Payment Information
The Payment Information section allows you to specify the payment method to be used for this order.
To enter the payment information for this order, complete the following steps:
- Expand the Payment Information drop-down menu and select the method of payment to be used for this order.
The payment method chosen will affect many of the remaining fields in the Payment Information section.

- Expand the Batch drop-down menu and select the batch to be used for this transaction.
- Complete the remainder of the Payment Information fields. These fields will vary based on the payment method chosen above.
- Enter the amount to be paid during checkout in the Payment Amount field.
- Click the Submit Order button.
This will open the Order Submitted page which provides confirmation that the order has been submitted. Clicking the hyperlinked order number will take you to the order profile page.
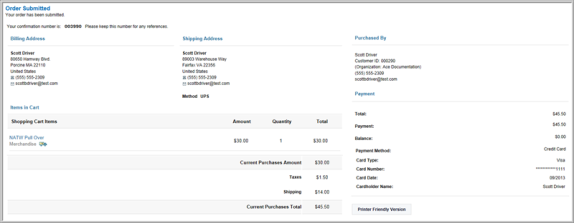
Printing the Order Confirmation
To print the order confirmation, complete the following steps:
- Click the Printer Friendly Version button located on the Order Submitted page.
This will open the Shopping Confirmation pop-up window.

- Click the Print This Page button.
This will open the standard Windows Print pop-up window where you can select your printer and printing options before sending the confirmation page to the printer.