
Adding a Template Header
Note: If you are using the Informz Integration with netFORUM, the Messaging Job Setup Wizard will have a slightly different look and feel. Further, not all steps will be available since some functions are handled by Informz. For more information, view Using Informz for eMarketing.
You can customize the template by uploading a Header Image to the Image Gallery on the netFORUM server. This allows you create the look of a newsletter, letterhead, or invoice.
To "upload" a template header image file:
- In the Messaging Job Setup Wizard, on the Customize the E-Mail Template page, click the Upload button for the Header Image.
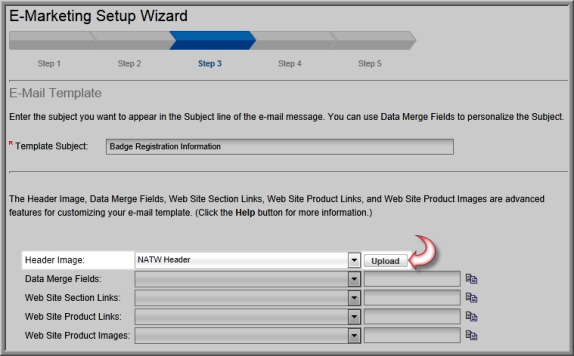
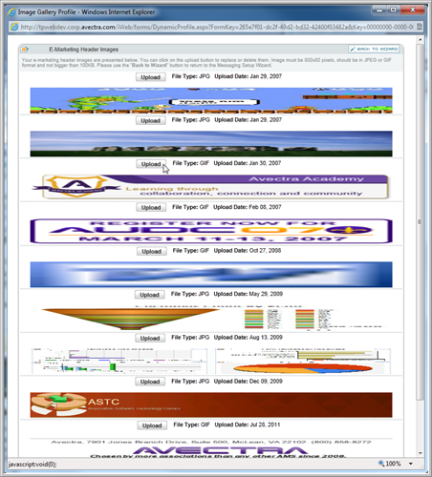
- The UPLOAD button opens the E-Marketing Image Gallery Profile. To upload an image to the Header Image drop-down list, click the UPLOAD button (as shown below).
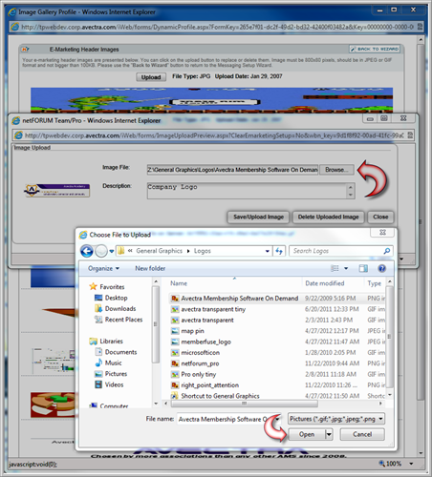
Note: To add a new image to the Image Gallery, click the UPLOAD button in the lower right.

- The UPLOAD button opens the Image Upload window. Use the Browse button to locate the image file.
Note: The file format should be JPEG or GIF and the file size should not be larger than 100 KB.
- After you locate the file on the server, select the filename and click Open to insert the name in the Image File field.
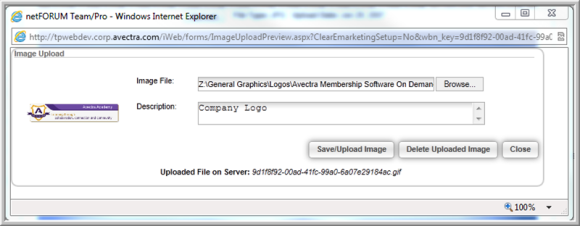
- In the Image Upload window, add a Description.
- Click Save to "upload" the Image File and to close the Image Upload window.
- To return to the Template Overview page, click the BACK TO WIZARD button in the upper right corner.
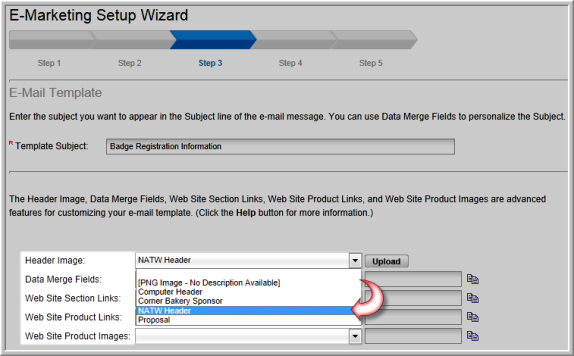
On the Template Overview page, notice that the name of the uploaded image displays in the Header Image field.
Note: Currently, there is no ”r;preview” feature to show you what the header will look like with your message, but you can send a test message to yourself before you send the message to the mailing list if you need to see how it will look.
Next:Inserting Data Merge Fields into Your Template
Removing a Template Header
If you want to change the Header Image of an Existing Template, you can remove the Header Image from the E-Marketing Image Gallery using the UPLOAD button on the Template Overview page.
To remove a template header:
- In the Messaging Job Setup Wizard, on the Customize the E-Mail Template page, click the UPLOAD button for the Header Image.

- In the E-Marketing Image Gallery Profile window, click the middle UPLOAD button.
- On the Image Upload window, click the Delete Uploaded Image button to remove the image file's association with the template.
