
Adding an Event Session
An event session is a meeting that is part of an event (e.g., presentation, training, roundtable discussion, reception, breakfast meeting, etc.). You can add event sessions from the Event Profile. You may also use the Event Setup Wizard to add or modify sessions.
To add an event session from the Event Profile:
- Go to the Event Profile.
- On the Event Profile, click the Add Session
 button.

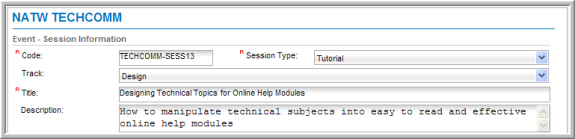
- On the Event Session Information form, enter the session Code.
- Select the Session Type.
- Select a session Track if applicable.
- Enter a session Title.
- Enter a session Description.
- To restrict the number of people attending the session, select the Restrict Capacity check box. If this check box is selected, also enter the Capacity, or total number of registrations allowed.
- To restrict this session to members only, select the Available for Members Only check box.
- If you want to be able to add people to a "wait list" even though a session is full, select the Allow Waitlist check box. (See Adding People to a Wait List)
- To track scores or grades, select the Track Scores/Grades check box. (See Adding a Score or Grade and Importing Scores and Grades.)
- Enter the Estimated Attendance (not required).
- Select the Ticketed check box if you want to allow customers to increase the quantity of session attendees in the Shopping Cart without actually requiring an event registration for each session attendee save an initial main event registration.
- Enter a Session Goal (not required).
- Enter Keywords to be used when searching for the session online (not required).

To add session start dates and times:
- In the Key Sessions Dates and Times section, enter a Session Start Date and Session Start Time.
- Enter a Session End Date and Time and Session End Date and Time.

To add session availability for registration:
- Enter a Registration Available From and To date.
- Enter a Show as New From date and New To date. (The session will appear in the New Products list during this time period.)
- Enter a Featured Product From date and Featured To date. (The session will appear in the Featured Products banner during this time period.)

To post event information online:
- Select the Sell Online check box.
- Enter Sell Online From and To dates. (Event registration information will be available online during this time period.)
- Click Save.
To sell the session on your Web site through the Online Store, the Sell Online check box must be selected.

To add a session fee:
- Enter a Session Fee Name.
- Enter both a Member Fee and a Non Member Fee for Early Registration dates. If the session is free, enter 0.00. Select a Charge Code from the drop-down menu.
- Enter both a Member Fee and a Non Member Fee for Regular Registration dates. If the session is free, enter 0.00. Select a Charge Code from the drop-down menu.
- Enter both a Member Fee and a Non Member Fee for Late Registration dates. If the session is free, enter 0.00. Select a Charge Code from the drop-down menu.

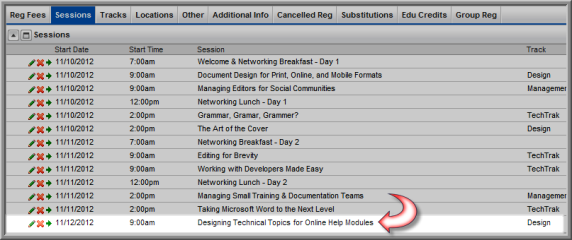
After all information is completed on the Event Session Information form and the Save button is clicked, the new session is added to the Sessions tab, Sessions child form.
To add additional session registration fees after the session is added:
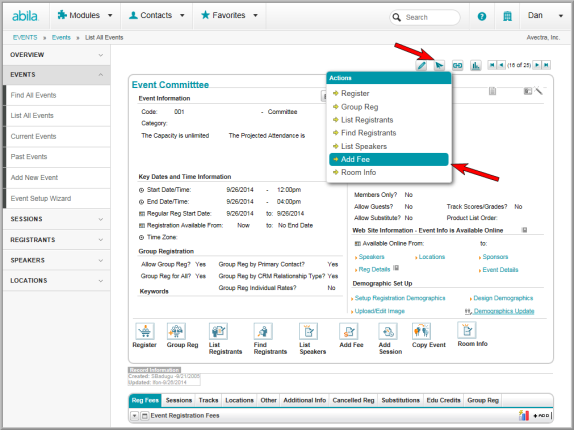
- On the Event Profile, Sessions tab, click the Go to Record
 arrow to go to the Session Profile.
 - On the Session Profile, click Add Fee from the Actions menu. (You may also click the Add
 button on the Reg Fees child tab).
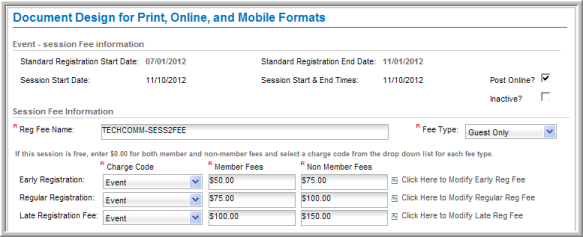
The Event Session Fee Information form displays.
- Enter the Registration Fee Name.
- Specify the Fee Type. You may select Customer Only, Guest Only, or both (All).
- Enter Member and Non-member Fees for Early, Regular, and Late Registration.
- Select Event from the Charge Code drop-down lists.
Important: You must select the Post Online check box in the Event Session Fee Information window, if you want to sell this session on your Web site through the Online Store.
To add a price qualifier:
Adding a session price qualifier is exactly the same as adding an event registration fee qualifier. Just as with event registrations, you may want to set up a special session registration fee for a specific time period, for a certain type of member (e.g., student), for a specific member status (e.g., renewed), for a donor or volunteer (e.g., record source), for a specific individual type (e.g., exhibitor), or for a specific organization type (e.g., non-profit organization). For more detailed information on each field, view the Adding Registration Fee Qualifiers help topic.
