Sending Correspondence to Event Registrants
You can send a "blast" e-mail communication to a list of event registrants using the Send Correspondence form.
Note: You may prefer to use the Messaging Job Setup Wizard to send correspondence to take advantage of the query option.
To generate the list of event registrants, go to the Events
Profile and click the List Registrants
![]() button to generate the list of event registrants for that event. (You
can also click the Find Registrants button on the group
items bar to open the Find Registrants page where you can enter search
criteria to generate the list of event registrants.)
button to generate the list of event registrants for that event. (You
can also click the Find Registrants button on the group
items bar to open the Find Registrants page where you can enter search
criteria to generate the list of event registrants.)
To create correspondence for event registrants:
- Go to the Event Profile.
- On the Events Profile page, click the List Registrants button to display the list of registrants.
- On the List Event Registrant page, click the E-mail To This List icon in the upper right corner to create the e-mail message for the event registrants. Click the Select Mode checkbox if you want to select only certain individuals to send the correspondence to.
- On the Send Correspondence page, notice the number of records in the data set. This number represents the number of individuals who will receive the correspondence.
- On the Send Correspondence page, select the correspondence Category. (One of the purposes of selecting a category is to look for individuals who want to opt out of receiving this type of e-mail. For more information, see Setting up the E-Mail Opt Out and Message Categories.)
- Enter a Description for the correspondence.
- After you select a Template, the Subject field will automatically populate, but can be edited. If you are not using a template, enter a subject for the correspondence in the Subject line.
- The Available Fields drop-down is used to data into your template such as a first name. The fields in this drop-down are based upon the template you select. Notice you may also insert data into the Subject field if desired.
-
Type (or copy and paste) the body text for your message into the HTML text box area. The built-in HTML editor automatically creates the HTML code for you behind the scenes.
Tip: To view the message in HTML, click the Source
 button.


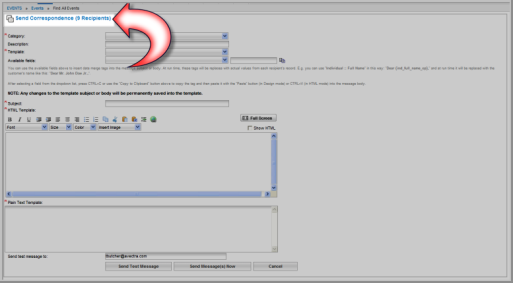
Note: The templates in the Template drop-down list are available based on the Recipient Type that was set up for the template when the template was created. For example, if you are creating correspondence for a List of Event Registrants, only templates that have been set up for Recipient Types = Event Registrant will show in the list. If you are creating correspondence for a List of Individuals, a different set of templates will display in the template list (Recipient Type = Individual). (See Creating a Correspondence Template)


To insert data from the database (e.g., First Name) into your correspondence:
- Select a data merge field from the Available Fields drop-down list. The merge code displays in the text box to the right of the drop-down list (e.g., when you select Badge First Name from the drop-down list, {reg_badge_firstname} displays in the next field.
- Click the Copy to Clipboard icon to copy the merge code (e.g., {ind_first_name}).
- Place your mouse cursor in the document where you want to insert the data merge code.
- Right-click and select Paste from the menu to insert the merge code into the document. When the message is sent, the appropriate data will be merged into the text of your message.
To send a test message to yourself:
- Make sure your e-mail address appears in the Send test message to text box.
- Click the Send Test Message button. The correspondence will be sent to your e-mail address.
To send the correspondence to the list:
- Click the Send Message(s) Now button.
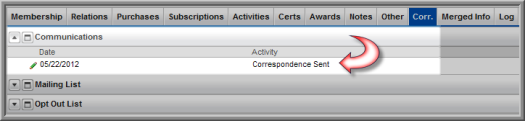
- The correspondence will be sent to the event registrants on the list. A record of the correspondence will be added to the recipient's Individual Profile, Corr. tab, Communications child form once the messaging job has completed.