
When an event is available for registration, an Event Registration Wizard facilitates the registration process with a step-by-step process both on iWeb and eWeb. Before the registration wizard appears on eWeb, the customer must be logged-in. A customer must be logged-in before registering for an event. The Register for this Event button on the Event Details page (on eWeb) will prompt for a log-in when clicked if the customer is not logged in. Once logged-in, the wizard will then appear and the customer may register. The step-by-step process for both iWeb and eWeb is exactly the same.
Individual Registration and the Registration Wizard
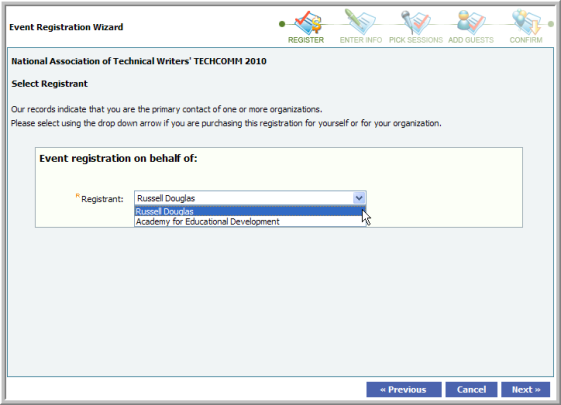
The first item of note is that if the customer is the primary contact for one or more organizations, he or she will be presented with a drop-down menu that enables registration selection for the individual or for the organization he or she represents as the primary contact.
The first step in the registration wizard entails completing registration information details and selecting the appropriate registration fee that the customer qualifies for and that has been set-up as a customer only fee. If more than one registration fee has been set-up for the event, the customer will be able to select which is the appropriate fee. In the image below, a default fee and a non-default fee have been set-up for example purposes.
Note: If an individual tries to register for an event for which they are already registered, and the event does not allow duplicate registrations, the individual can't register. A message displays stating registration has already been made and the Next button will be unavailable.

Notice that if education credits are available for this event, the customer may select them as well in the ED drop-down. Keep in mind that the education credit selected here has been set-up for the event itself and not for sessions. Individual session education credits may be set-up and selected through the wizard as well. Further, the early, regular, and late registration fee is already selected and applied as well (based on registration date) if the customer is using the wizard on eWeb. If association staff is registering the customer on iWeb, there may be times when this date needs to be selected manually such as granting early registration rates for a VIP customer. Or when a check payment is dated for early registration dates but arrives after regular registration dates have started. Notice in the image below that registration dates and fees can be selected manually in iWeb for such an occurrence.

Once the appropriate fee and education credits are selected, the customer may proceed to the next step in the wizard by clicking the Next button.
The next step in the registration process is to complete registration and badge information. When entering this screen, default registration information such as First Name, Last Name, Badge Name, and Registration Date will already be populated based upon the customer’s log-in.
Additional registration demographics may be collected as needed such as seen in the image below with the Badge State and Badge Title fields. Those will only appear in the registration wizard if you set-up registration demographics on the Event Profile. Recall that you may also choose whether or not to make those fields required as well during registration.

Once the customer has completed their registration and badge information, clicking the Next button will proceed to selecting Sessions that have been set-up for the Event.
When the customer is ready to pick Sessions that have been set-up for the event, the Event Registration Wizard is divided into two tabs; the first is titled Available Sessions where sessions that have been set-up for the event can be selected. The second tab has two different titles depending upon if it is viewed on eWeb or iWeb. On eWeb it is titled My Agenda since it is the customer that will be registering for the event and viewing the sessions they have selected; on iWeb the tab is titled Conference Agenda since it is association staff that has selected the sessions.
Tip: The Cancel button can be clicked at any time to take the customer to the Online Store. The Previous button will navigate back to the previous screen should the customer want to change the values formerly entered.
