
Creating a Facebook App for Integration with netFORUM Pro
Before an entity will allow customers to post Facebook updates from eWeb, you must first create a Facebook App that will integrate Facebook with your netFORUM Pro entity. This is a simple process and quickly accomplished.
To create a Facebook app for integration with netFORUM Pro, complete the following steps:
- Navigate to the URL: https://developers.facebook.com.
- Click the My Apps button in the top navigation bar.
- If you are not already logged in to Facebook, the option to Log In to your Facebook account will appear. If you are logged in, Register as a Developer will appear in the drop-down menu. Click this option to continue.
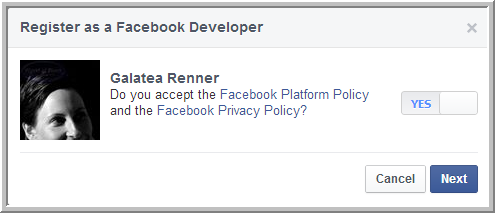
- On the Register as a Facebook Developer pop-up, slide the toggle to Yes and click Next. The Facebook Developers page will load.
- Now that you have logged in to the Developers page, once again click the My Apps button in the top navigation bar. Click the option to Add a New App, which now appears in the drop-down menu.
- Click the advanced setup link.
- In this pop-up enter:
- Display Name: Enter a descriptive app or Web site name. It cannot not contain a Facebook trademark or have a name that can be confused with an app built by Facebook.
- Namespace: Enter a unique identifier for your app.
- Category: Select a category under which the app best fits.
The Add a New App pop-up window displays.
The Create a New App ID window displays.
After clicking the Create App button, the development page for the newly created app will appear. A navigation bar with tools for developing the app appears on the left side of the page.

Entering URL Settings for netFORUM Pro Integration
Two important URL settings must be completed and saved in your newly created App so that it will integrate correctly with your netFORUM Pro entity and allow posting to Facebook. They are: App Domains and Deauthorization Callback URL. Both must point to your live netFORUM ProeWeb URLs.
To update the Site URL setting, complete the following steps:
- Click the Settings option in the left navigation bar. The Settings page will appear. The Basic settings tab is automatically selected.
- Click the Add Platform button at the bottom of the Basic settings options. The Select Platforms pop-up will appear.
- In the Select Platform pop-up window, click Website.

- The Website settings section will display at the bottom of the Basic Settings page. Locate the Site URL field.
- In another browser tab, launch netFORUM Pro eWeb and copy the URL from the address bar in your browser window.
- In the Facebook Developers site browser tab, right-click and paste the URL into the Site URL field.
- Remove all text from the URL after and including “eWeb”. For example, if your eWeb URL is https://netforum.avectra.com/eWeb/StartPage.aspx?Site=Abila, your Site URL will be https://netforum.avectra.com.
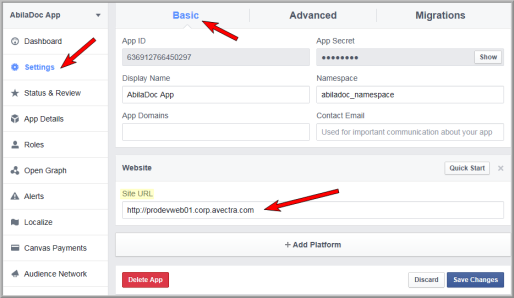
- Click Save Changes.
Facebook users are always provided the opportunity to deauthorize an application/site from posting status updates to their accounts. As a result, your App must provide this deauthorization as well.
To set up deauthorization functionality, complete the following steps:
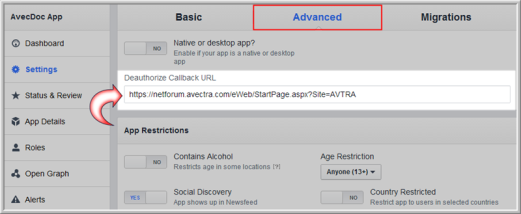
- From the app Settings page, click the Advanced settings tab.
- Enter the deauthorize callback URL in the Deauthorize Callback URL field.
The Deauthorize Callback URL is the same as your Site URL with one exception: replace the text StartPage.aspx? with the text SocialSharing.aspx?. For example, the URL https://netforum.avectra.com/eWeb/StartPage.aspx?Site=AVTRA becomes https://netforum.avectra.com/eWeb/SocialSharing.aspx?Site=AVTRA for the Deauthorization URL. - Do not modify any other settings aside from the Deauthorize Callback field on this screen at this time. Click Save Changes to save your entries.
Porting Facebook App Information to netFORUM Pro
Once you have entered Site URL and Deauthorization settings, you are ready to port information about the app back into netFORUM Pro to finalize integration. The App ID and App Secret fields must be entered in netFORUM Pro.
Both of these fields are found on the Settings page, under the Basic settings tab.

To enter these fields in netFORUM Pro:
- Log in to netFORUM Pro and access the Accounting module Overview page.
- On the Accounting Overview page, click the Setup hyperlink.
- Expand the Account Information child form.
- Click the Edit icon next to the desired account in the Account Information child form.

The Client Information form will appear. In the Social App Information section (this section is visible only after Abila Support has enabled Social Networking Integration for your entity):
- Copy the App ID from your Facebook App into the Facebook Key field in netFORUM Pro.
- Copy the App Secret from your Facebook App into the Facebook Secret field in netFORUM Pro.

- Click Save to finish your Facebook integration with netFORUM Pro.
Customers can now use the Share with your Social Networks buttons in netFORUM Pro to post status updates on Facebook.
Testing Social Networking App Functionality
Once Facebook app information has been ported to netFORUM Pro as described in the section above, test to ensure that the social application information that has been entered functions correctly.
To test newly created social networking apps, complete the following steps:
- Log in to netFORUM Pro and access the Accounting module Overview page.
- On the Accounting Overview page, click the Setup hyperlink.
- Expand the Account Information child form.
- Click the Edit icon next to the desired account in the Account Information child form. The Client Information form will appear.
- Locate the Social App Information section at the bottom of the window and click the Test Application Settings hyperlink.

- The Social Application Tests window appears.
- Click the Test Facebook button.

- The Test button returns a success or fail message. A message of success displays in green, while failure messages display in red.
